I love creating monotype prints with leaves on my gel plate! The leaves in all shapes and sizes are calling me during these Autumn months. These are vine maple leaves that are turning at this time of year. I was able to capture some lovely color on a recent trip and immediately printed with some of the leaves..
I used some Distress Oxide inks and acrylic paints to make some leaf prints right after I collected these maple leaves. We traveled to central Oregon recently, which is a fall tradition for us, and it is fun to print botanical immediately after I gather them! It was a little cool, so I didn’t set up my gel plate outside like I do sometimes, but it was still very pleasant. I decided to quickly make a card with one of the prints.
Often when I make cards from gel prints, it is hard for me to cover up the print with a lot of stuff. With this, the leaves (the right-hand leaf) are really the focal point and a simple die-cut sentiment really keeps the card simple and elegant. I added a little ribbon across the top to visually balance out the sentiment, repeated the black with a mat around the print and adhered it all to a navy card base. I added a smattering of epoxy dots I had in my stash and called it done!
Inks – Ranger Tim Holtz Distress: Aged Mahogany, Carved Pumpkin, Forest Moss, Wild Honey and Walnut Stain
Embossing powder – Lindy’s Stamp Gang – Pumpkin Fiesta
Cardstock – Bazzill
It was fun to use this new leaf die set and then combine the leaves with items I’ve had in my stash for quite a while. I started off by applying five colors of Distress ink to mixed media cardstock with a foam applicator tool, blending the colors as I went. Once I was happy with the colors, I die cut the leaves from this fall-colored paper. I then die cut the dot-embossed kraft cardstock with the Avery Elle die and adhered it to the card base. I arranged the leaves on top, adhering them when I was happy with the composition. From there, I added the sentiment with dimensional adhesive and called it done! Thanks for visiting.
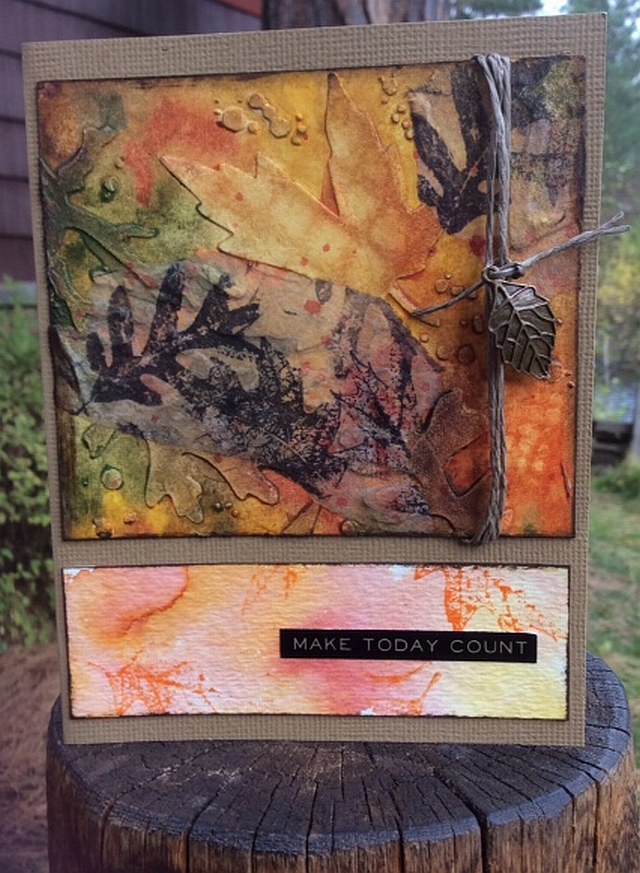
This was one of those backgrounds that involved layers and layers, which is one of my favorite things! I began by stenciling texture paste through the leaf stencil onto smooth Bristol paper and allowed it to dry. I stamped some leaves on tissue wrap and added them with gel medium onto the piece. Then I added and blended Distress Inks to cover the background with color. I stenciled some pattern as well with the ink until I was pleased with the colors and overall appearance. For some final sparkle, I sprayed and spattered some copper and pewter inks in a couple of places. I added the die cut and stamped sentiment, then tied the charm and twine onto the card with the Freshly Made Sketches sketch as inspiration. I mounted the card front onto the card base with an extra vertical strip of cardstock for visual balance. Thanks for visiting.
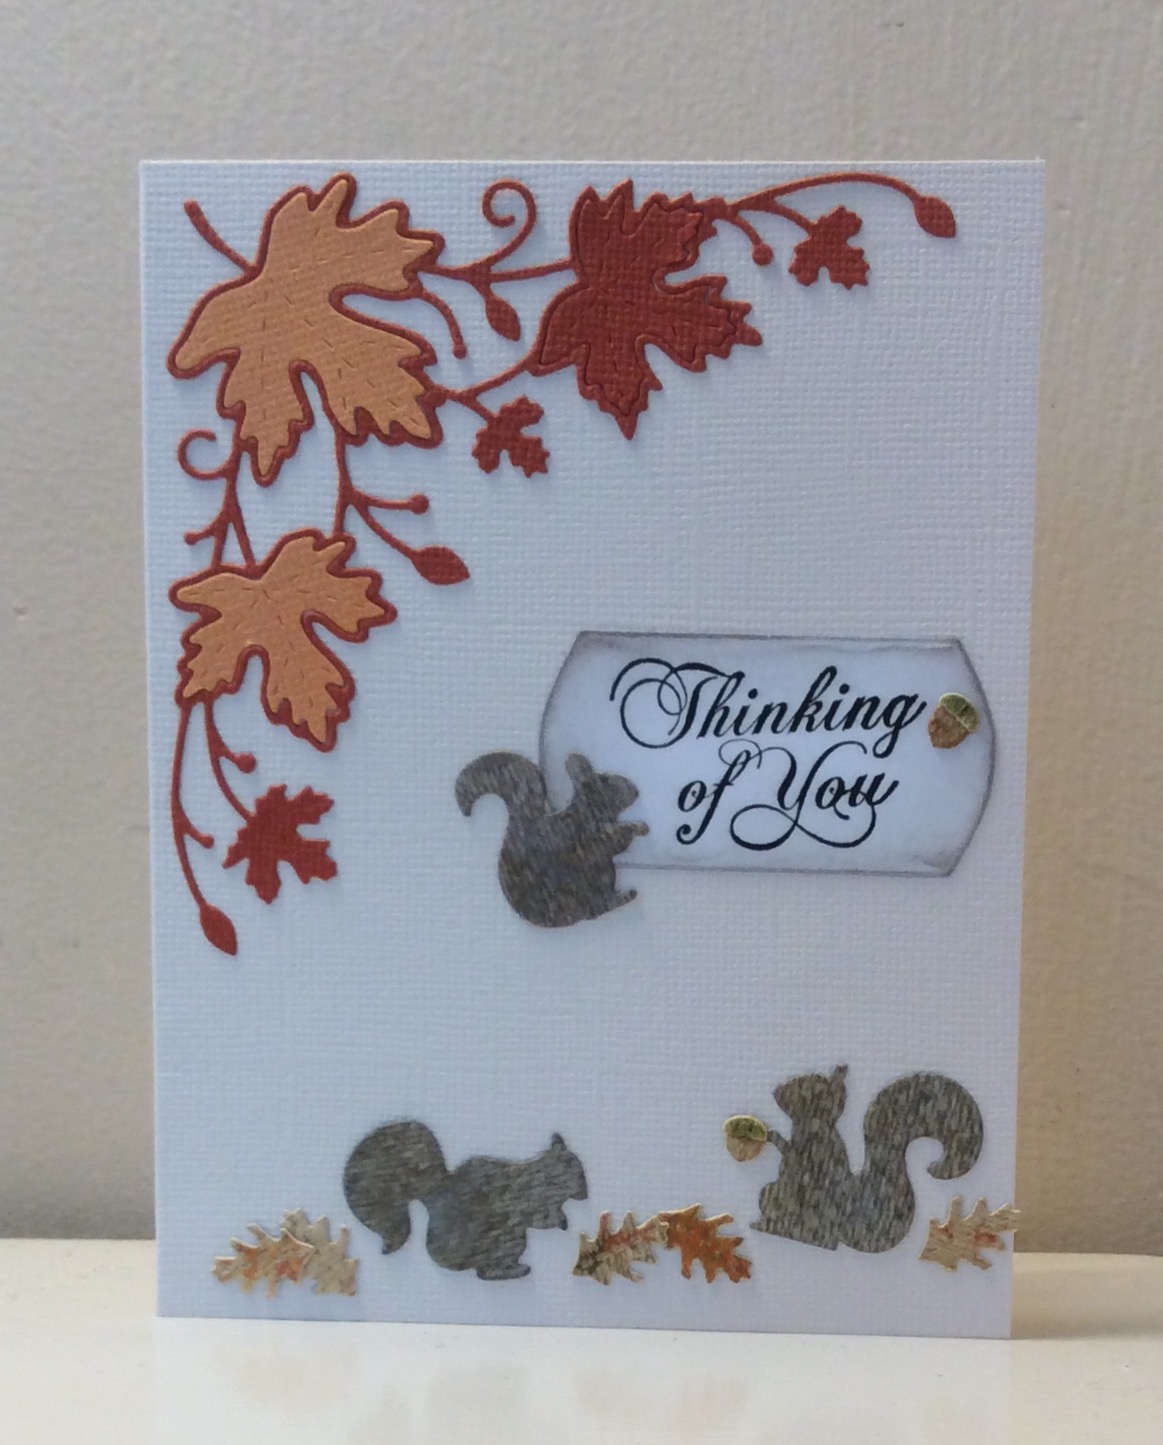
Memory Box “Busy Squirrels” and “Playful Squirrels”
Simon Says Stamp “Maple Leaf Corner”
Creative Expressions Craft Dies “Atlantic Ocean Collection – Cape Verde”
Stamp – Inkadinkado Personal Expressions “Expressions”
Ranger Distress Inks
Cardstock – Bazzill
I enjoy making Fall cards. When October begins, I think of leaves changing colors, my birthday (hee hee), pumpkins, and squirrels scampering. So I decided to make a card featuring squirrels scampering among the Fall leaves. I’ll probably send this to my son at college, who enjoys all things squirrel.
For this card, I die cut all of the Memory Box pieces from white cardstock and then used Distress Inks to color them. I cut the maple leaf die in the corner twice so I could inlay the contrasting color in some of the leaves. All of the supplies I used for this card have been in my stash for a long time, particularly the sentiment stamp that appears to be made in 2006! Thanks for stopping by.
This card was fun to make because of all the layers–and of course it took me a very long time, just because when I’m making decisions as I move through the process it always takes me a long time! I really enjoy the process and since it is my birthday today, I indulged in getting messy and creative.
I started out by applying texture paste through the leaf stencil onto watercolor paper. I love leaves as a theme in my work! Then I stared at it for awhile, and added Distress Crayons all over the piece, blending as I went along. I then scrubbed some of the color away with a damp paper towel through a couple of stencils and continued to blend colors by adding a bit of water until I was satisfied.
Meanwhile I stamped leaves on tissue wrap with black Archival ink and added some ink splatters and Mica Spray. Once this was dry, I added some torn pieces of the stamped tissue with gel medium to the piece. I then cut the piece I would need for my card design and applied Walnut Stain Distress Ink to the edges. I wrapped it with paper string and attached the brass leaf charm.
On another scrap of watercolor paper, I watercolored with some Distress Inks and lightly stamped a few more leaves. This was meant to be a background for my sentiment, so I didn’t want my colors to be very intense. One dry, I cut out the sentiment piece, applied Walnut Stain Distress ink to the edges, and popped on the sentiment sticker. I attached the two pieces to cardstock and called it a day. Thanks for visiting.
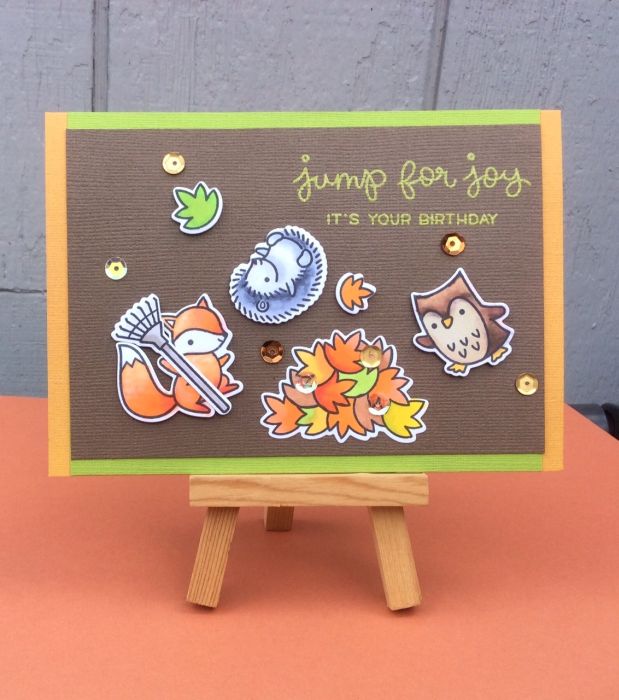
Lawn Fawn “Jump for Joy” set and “Wheelie Like You”
Avery Elle “Petals and Stems” (sentiment)
Patterned papers –
Bella Blvd “Hello Autumn”
Pebbles “Woodland Forest”
Woodgrain tape – American Crafts
Sequins – Doodlebug Designs
Copic markers
Cardstock – Bazzill
I created this card for my son to give his good friend who was just diagnosed with Leukemia. They’ve been friends since kindergarten–and now they are high school seniors. I colored the critters with Copics and then fussy cut them. I didn’t want any white around the edges that the dies would leave (and I don’t have dies for all of the creatures anyway!). I edged all of the critters and leaves with black. I arranged the animals and added some sequins to jazz things up a bit. I stamped the sentiment on the woodgrain tape and cut a “tail” for a flag.
I couldn’t resist these creatures playing in the Fall leaves! I stamped and die-cut the various elements to create a clean and simple birthday card for my son. The images are colored with Copic markers. I’m thinking this card is perfect for the Paper Players Challenge #313 “Taste of Fall.” Thanks for stopping by.
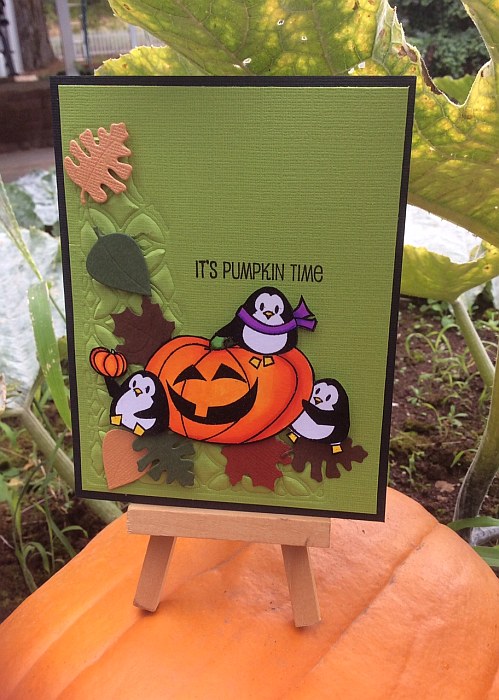
Sizzix – Tim Holtz Alterations – “Mixed Media” (used for dry embossing)
Embossing powder – Detail Black
Cardstock – Paper Accents
I created this card for the TCP Challenge #322 – Embossing. This stamp set is one of my absolute favorites! It combines penguins and pumpkins–what could be better? I embossed the image with black embossing powder and then colored it with Zig Clean Color markers. I fussy-cut the image and arranged the die-cut leaves around it. I used the Sizzix die to emboss the pattern on a green panel for a backdrop. I photographed my card on our only normal shaped pumpkin that seems to be maturing in our garden this year, just to set the mood! Thanks for visiting.
Impression Obsession: “Small Oak” and Seth Apter “Faded Fragments”
JudiKins “Calligraphic Flourish”
Inks – Ranger: Adirondack Lights “Cloudy Blue” and Black Archival
Gold Vellum
Gold metallic thread
Derwent Inktense Pencils: Peacock Blue, Iris Blue, Shiraz, Red Oxide, Tangerine, Madder Brown
Golden Gesso
Dina Wakley Gel medium
Old Book Paper
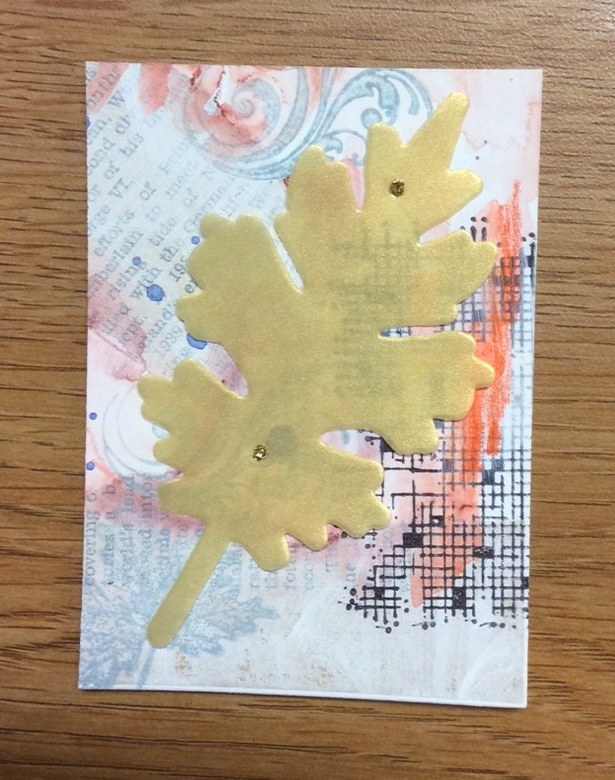
I created these Artist’s Trading Cards to share at my monthly Craft Stamper group this past week. The inspiration came from the December 2015 issue of Craft Stamper magazine, pages 10-12, which featured techniques by Designer Kim Dellow. I worked in layers, with old book pages adhered with gel medium and covered with a thin layer of gesso. I added stamped images and areas of watercolor with Inktense pencil and waterbrush, creating a masterboard and then cut the “board” into 2-1/2″ X 3-1/2″ backgrounds. I then attached my gold vellum oak leaves with two french knots tied from gold metallic thread. Finally, I edged the card with a gold Krylon pen to pick up the gold metallic for a finishing touch.
CL738 – Messages with Flourish
CL834 – Stamp Your Own Plant
CG613 – Simple Leaf Background
Hero Arts Frame Cuts:
D1004 – Rectangle Frame
Twine – My Mind’s Eye “Chalk Studio”
Cardstock – Bazzill and Worldwin
Ranger Distress Inks
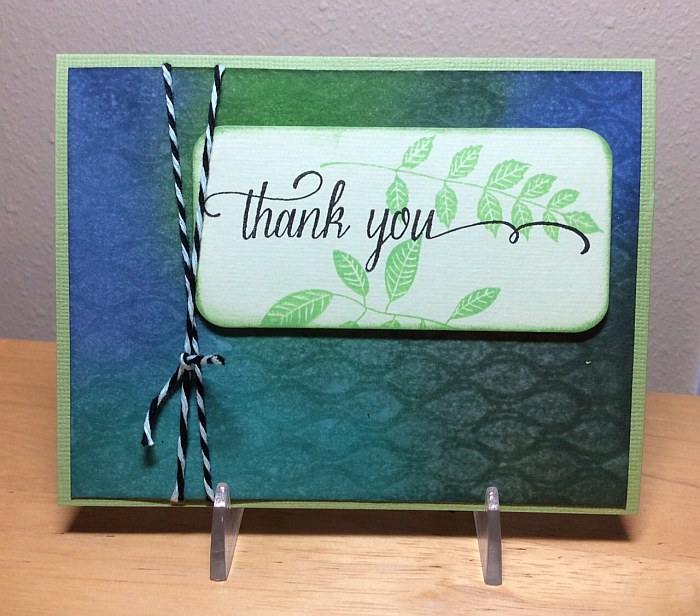
I created this card as part of a personal challenge on the Hero Arts Flickr group, where we challenged ourselves to create a card with at least one Hero Arts product within a 90 minute timeframe. I made it (barely!) within that amount of time. I’m very slow and methodical, so any timed challenge is really tough for me! The background was something I made after taking the first day of Online Card Classes “Background Check” class. I used Distress inks and water, plus a lovely Hero Arts background stamp to make the background. A very fun technique! Thanks for visiting today.