Tag Archives: spellbinders
Supplies:
- Stamp and Die set – Spellbinders Many Birthdays (Happy Birthday sentiment)
- Die set – Spellbinders Sakura Blossoms
- Patterned papers – Basic Grey 6 X 6″ pads: Eva, Blush, and Infuse
- Sequins – Little Things from Lucy’s Cards (lucys-shop.com) – Tiara
- Foam – Spellbinders Pop-Up Die Cutting Foam Sheets
- Cardstock – Bazzill
- Gold embossing powder – Lawn Fawn
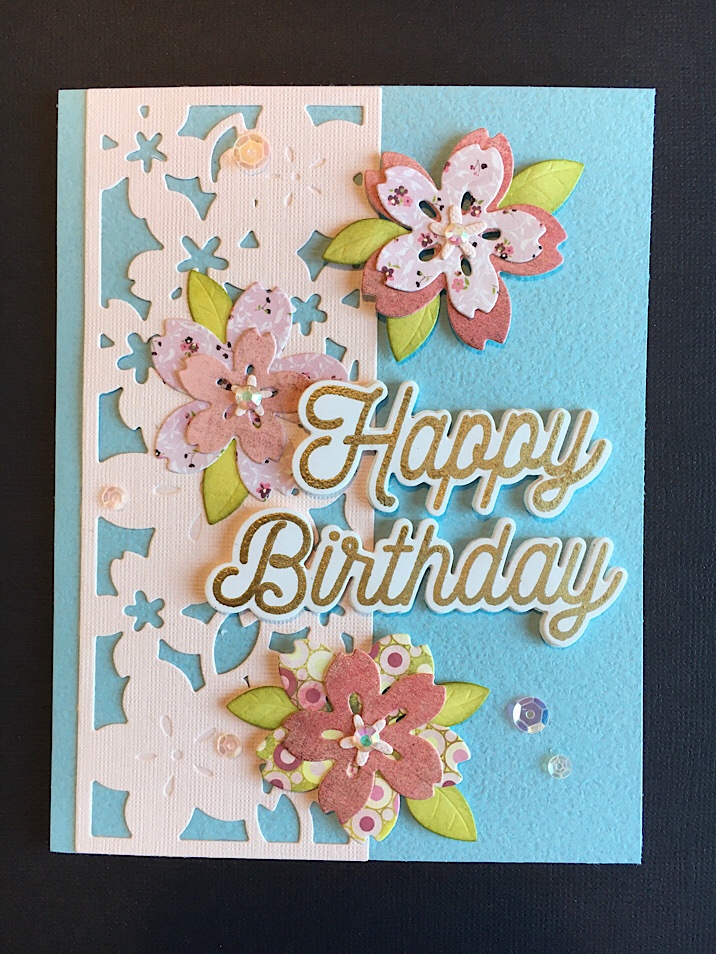
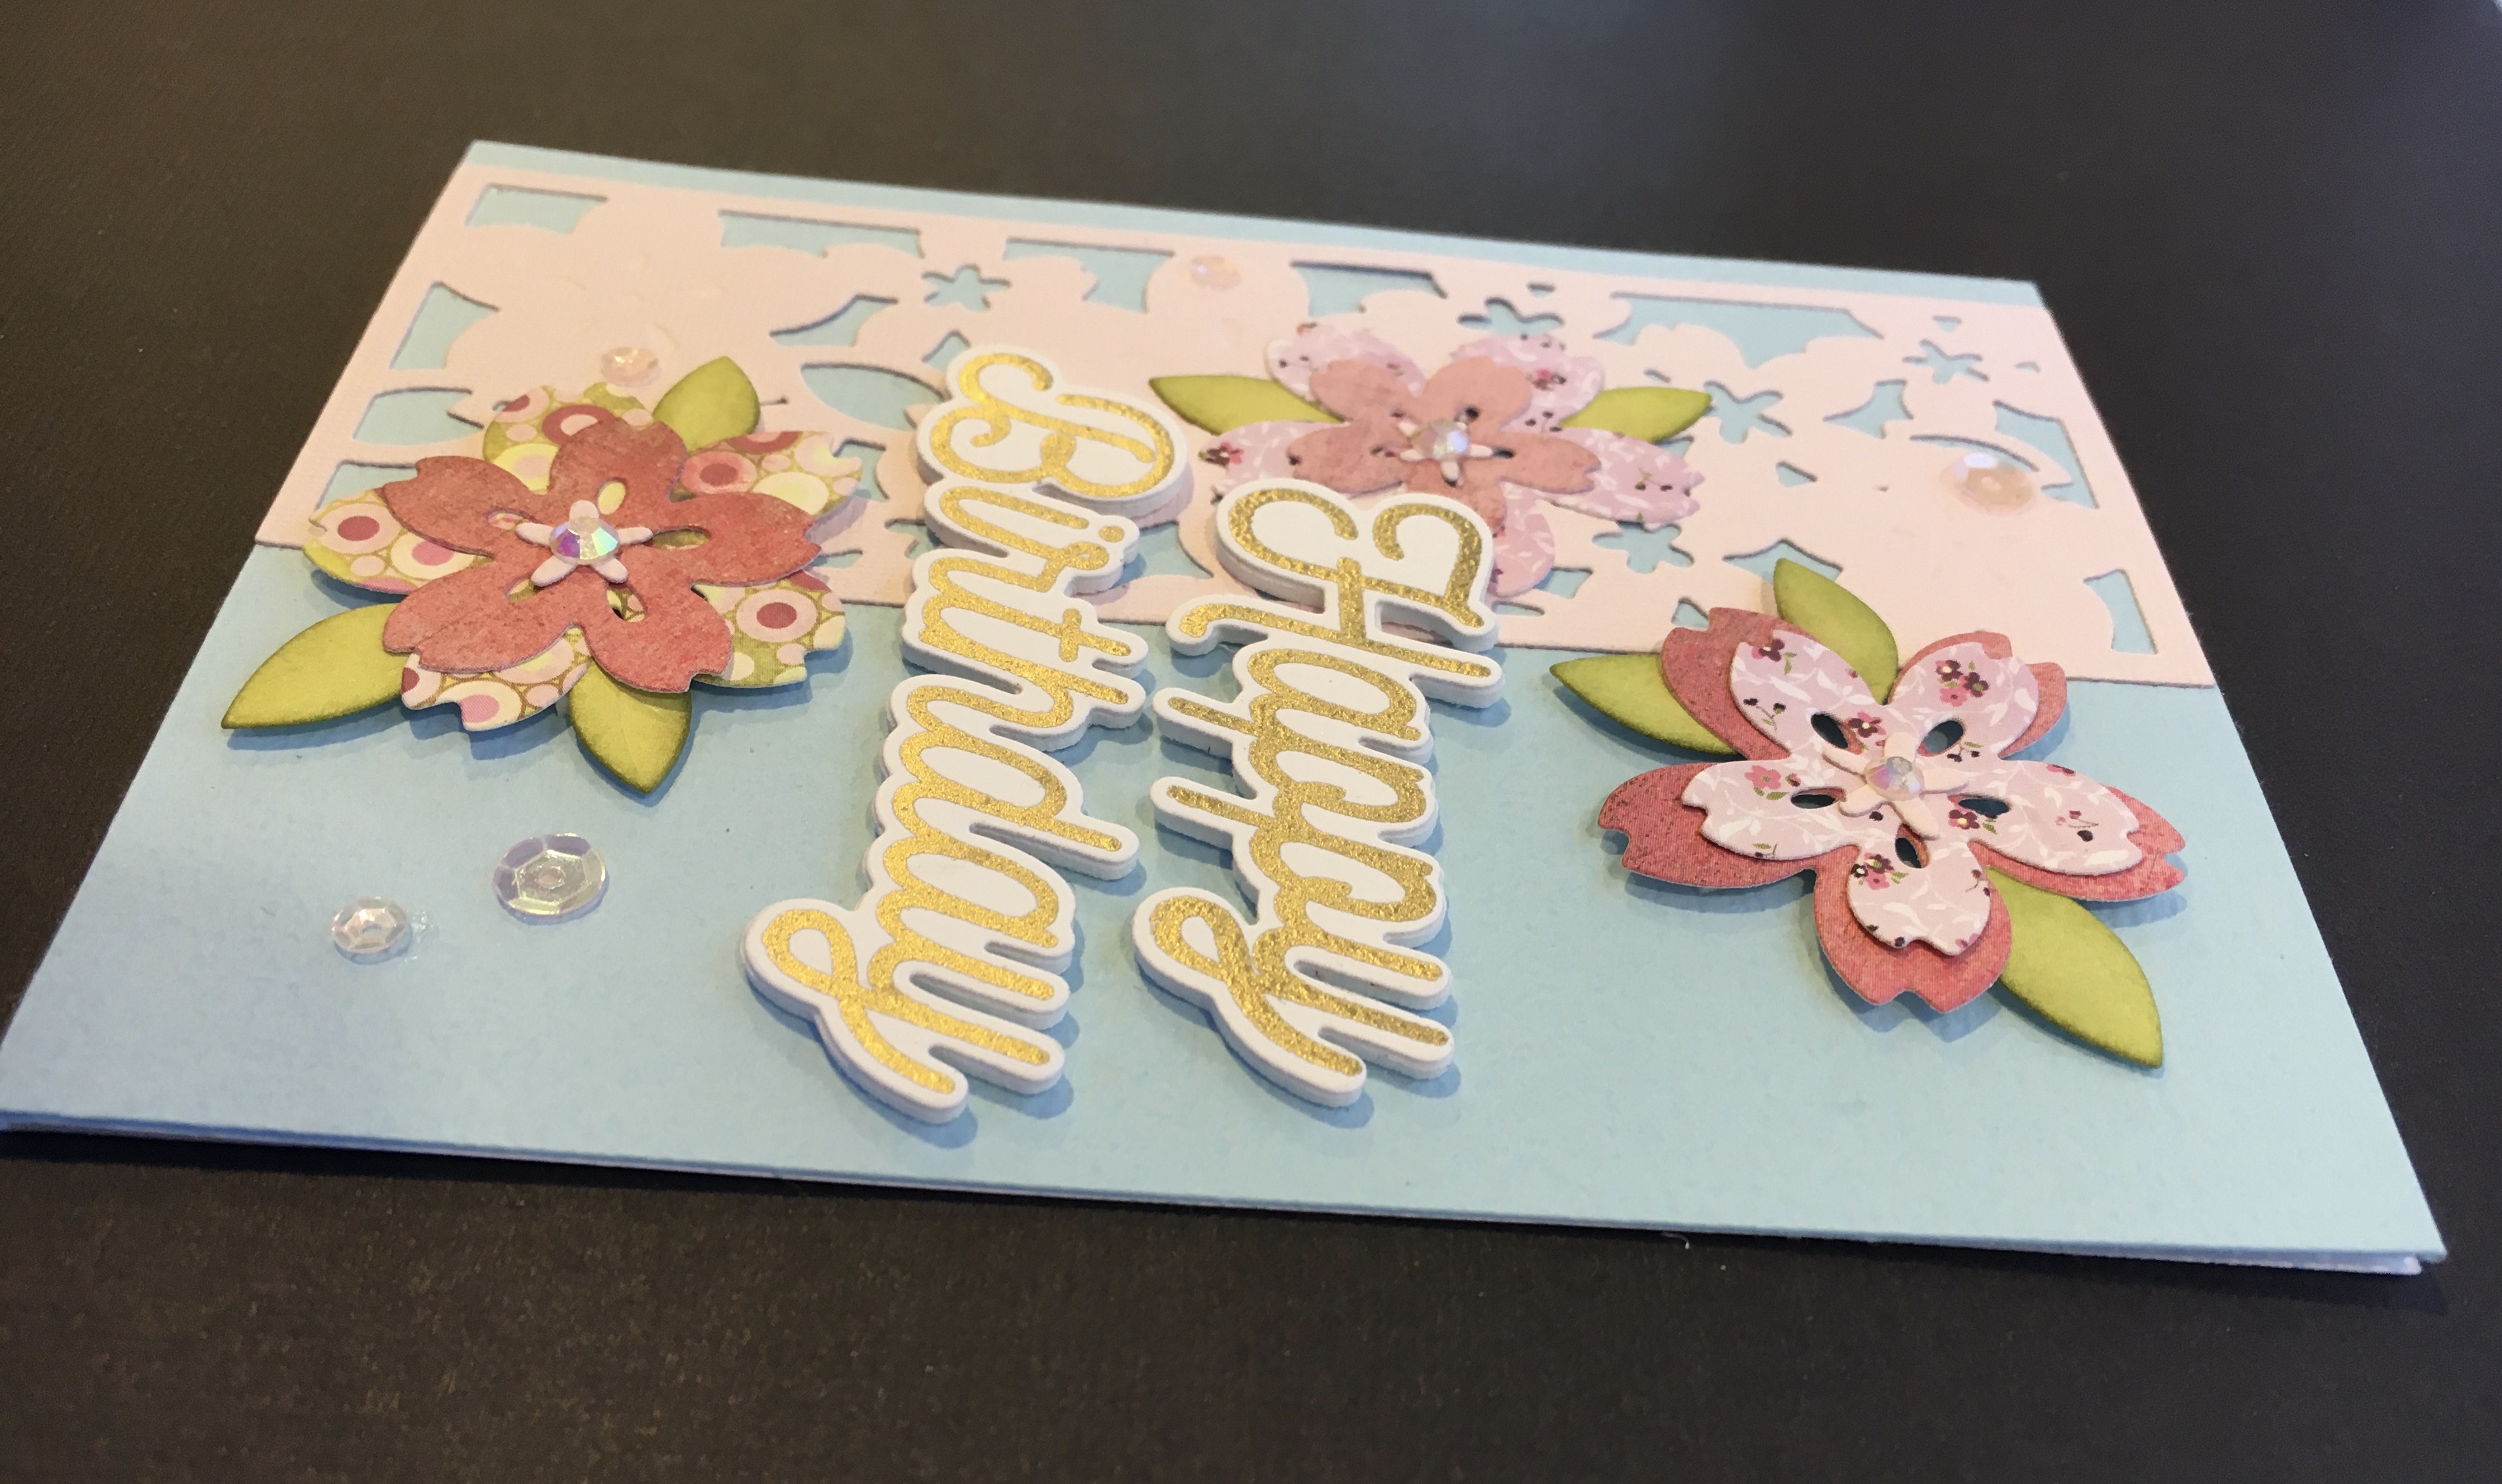
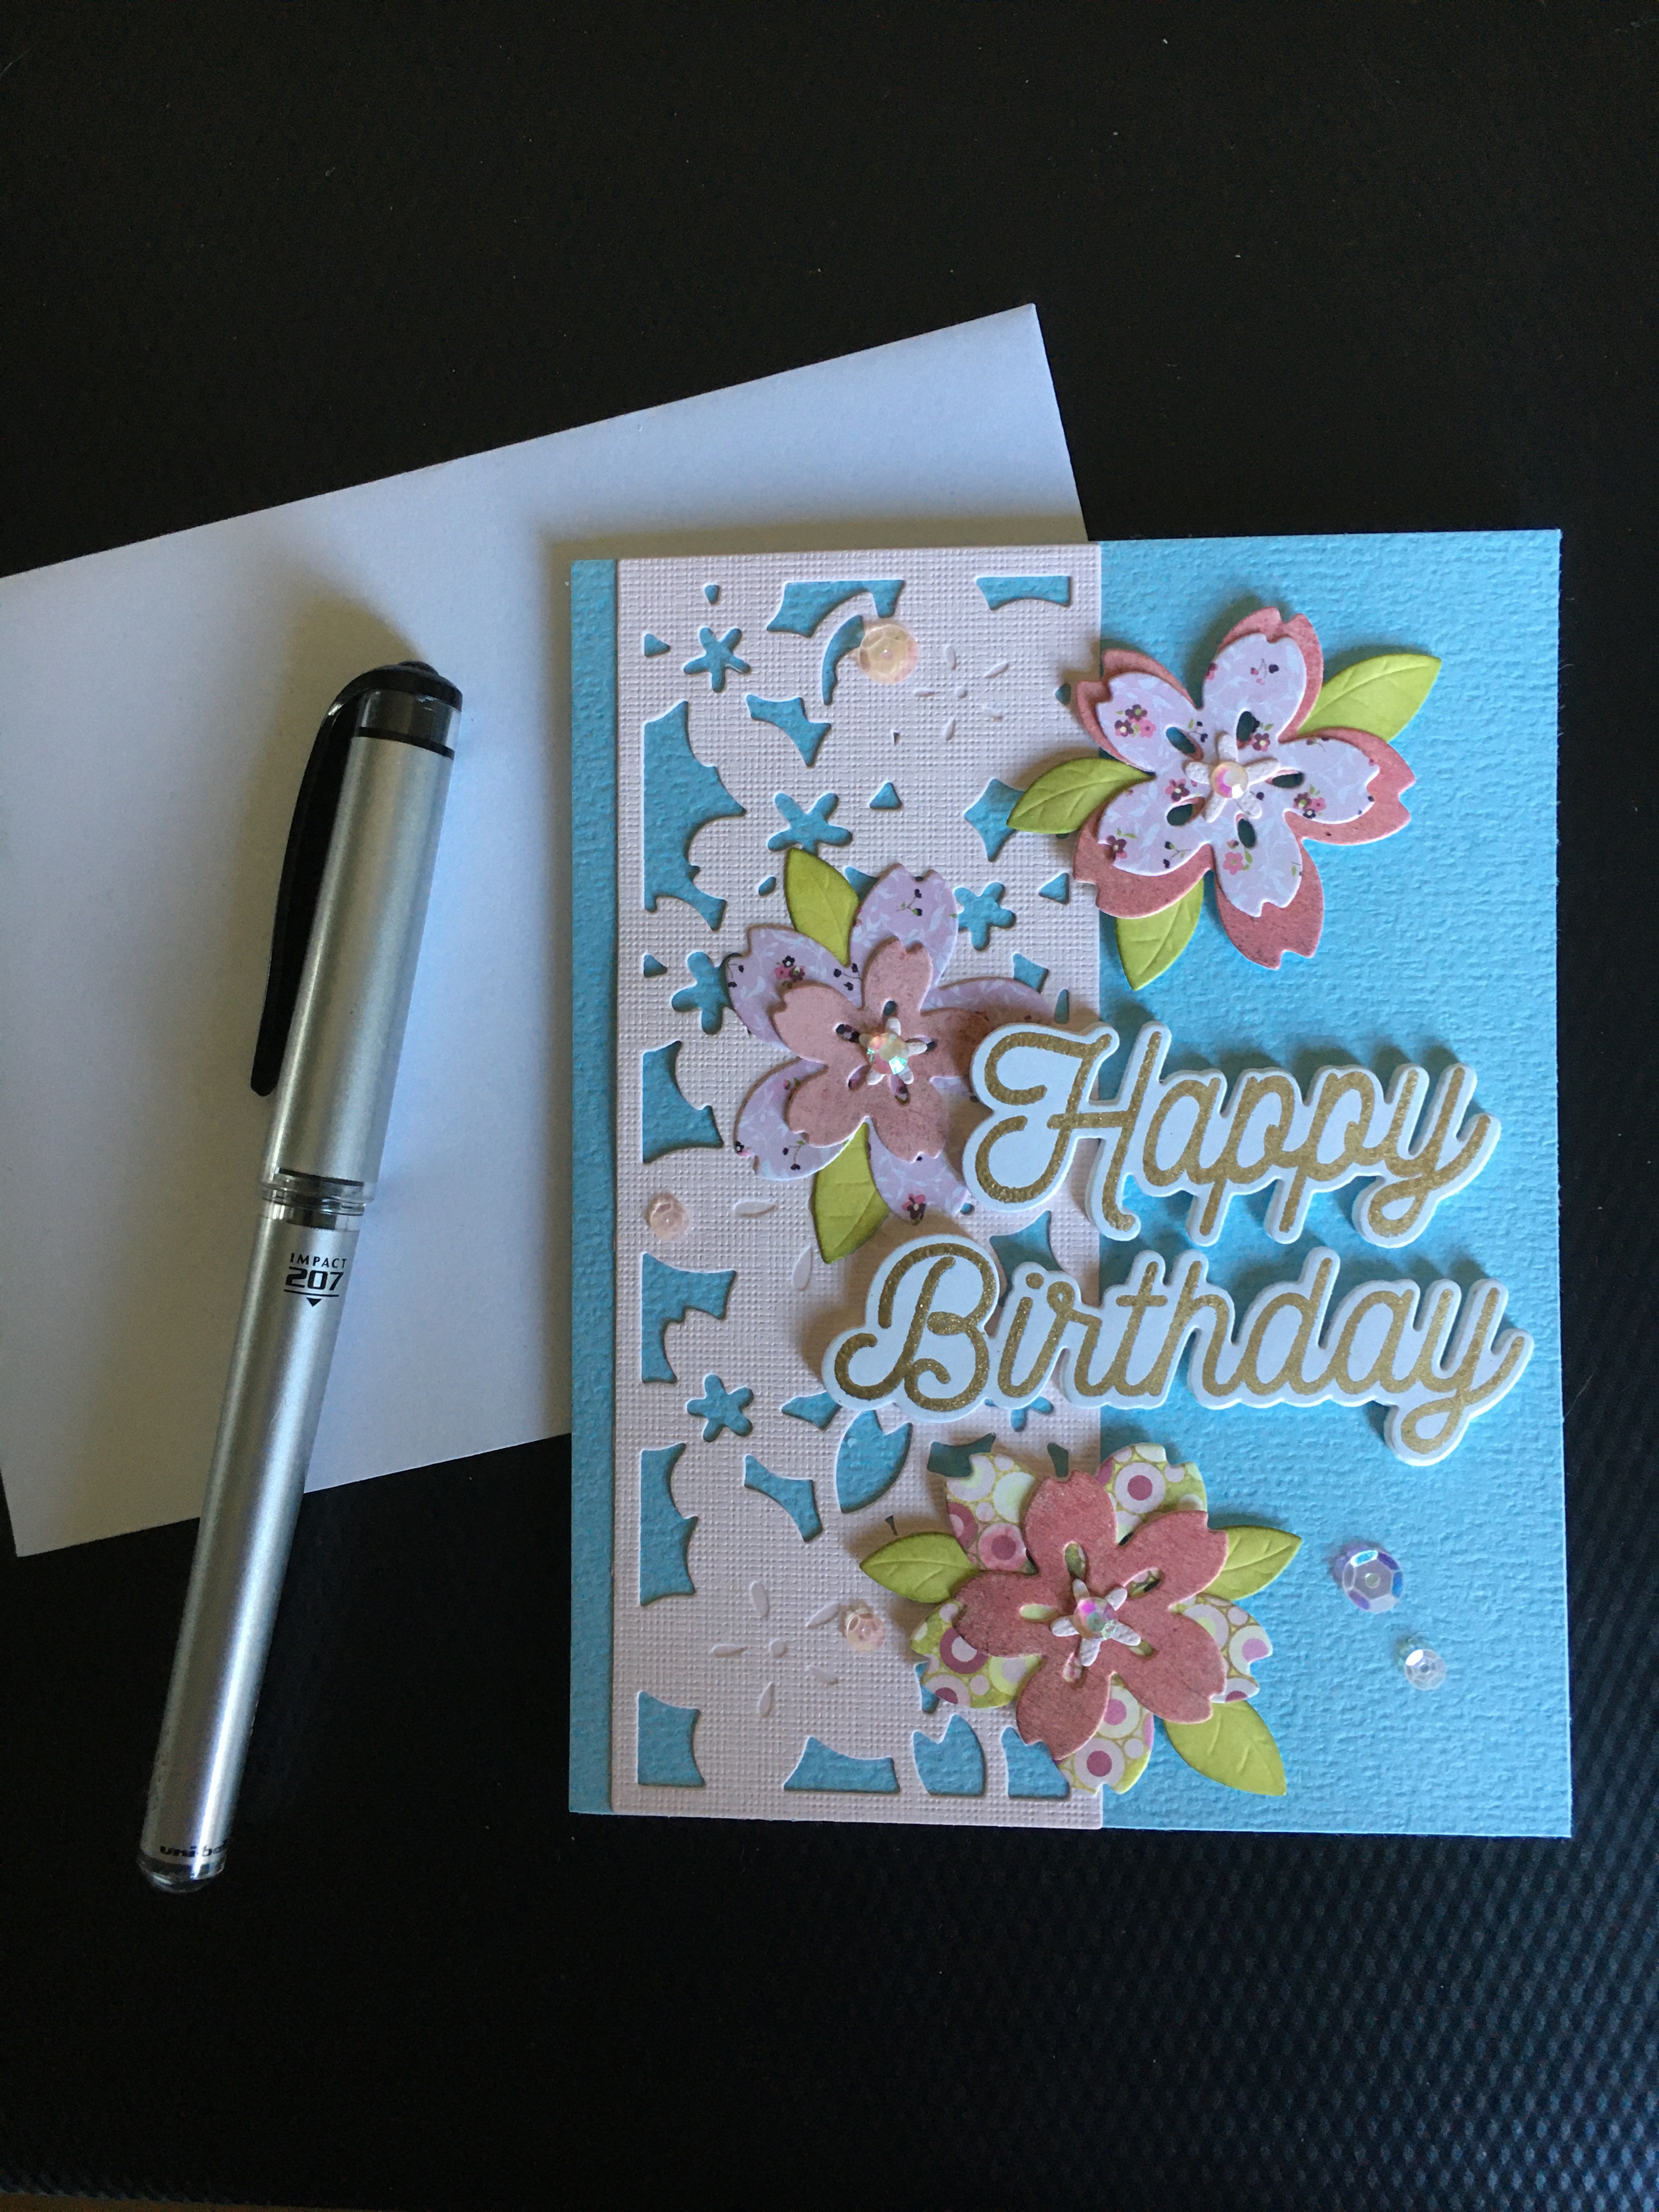
These cherry blossoms were perfect for a friend’s birthday card. I cut the flowers and leaves from some very old Basic Grey paper pads that I’ve had in my stash for years (I found dates of 2006 and 2008!). They’re kind of antique papers! Anyway, I save them for special projects because they were so lovely. I die cut foam and adhered the heat embossed sentiment onto the foam layer for some really nice dimension.
I layered the blossom die cuts in a variety of colors and patterns on top of the small cut-out panel. I used the “waste” for centers of the blossoms and added a gem on top to finish out the flowers. I then scattered sequins around the rest of the card to finish it up. Thanks for visiting.
1 Comment | tags: cardmaking, die cuts, embossing, flora, handmadecards, spellbinders | posted in Birthday, Spring

- Die and stamp set – Spellbinders – Hello Expressions
- Stencil – The Crafter’s Workshop – TCW829 Heartful Flower by Julie Fei-Fan Balzer
- Ink – StazOn Pigment – Snowflake
- Posca paint markers
- Cardstock – black and turquoise
Surprise! I’m finally posting!
I created this card as a sample for a demo I’m doing. I will be creating cards from stenciled backgrounds at Runaway Art and Craft Studio during a demonstration at First Wednesday on May 1st. First Wednesday, sponsored by Salem Main Street Association, is a monthly celebration in downtown Salem during which businesses open their doors to celebrate with the community. While I am stenciling and making cards, Christy is art journaling and Robin will be sharing her illustrated coloring posters.
I began this card by applying white ink through a stencil onto black cardstock to create the base design. I then added color by drawing dots around the stenciled design with Posca acrylic paint markers. I layered the die-cuts and popped it up with dimensional adhesive above the stamped sentiment and then adhered the whole card front onto a turquoise card base.
Thanks for stopping by.
Leave a comment | tags: cardmaking, crafter's workshop, die cuts, flora, spellbinders, stencils | posted in General Cards

- Distress Inks – Blueprint Sketch, Mermaid Lagoon, Tumbled Glass, Wilted Violet
- Distress Oxide Inks – Shaded Lilac, Milled Lavendar
- Stamps –
- Lawn Fawn – Snow Cool, Say What? Christmas Critters and Winter Fox
- Stampers Anonymous/Tim Holtz – Reflections
- Embossing folders – Sizzix Snowfall and Swirls
- Ranger Stickles – Diamond
- Vellum
- White embossing powder – Stampendous
- Watercolor paper
- Cardstock
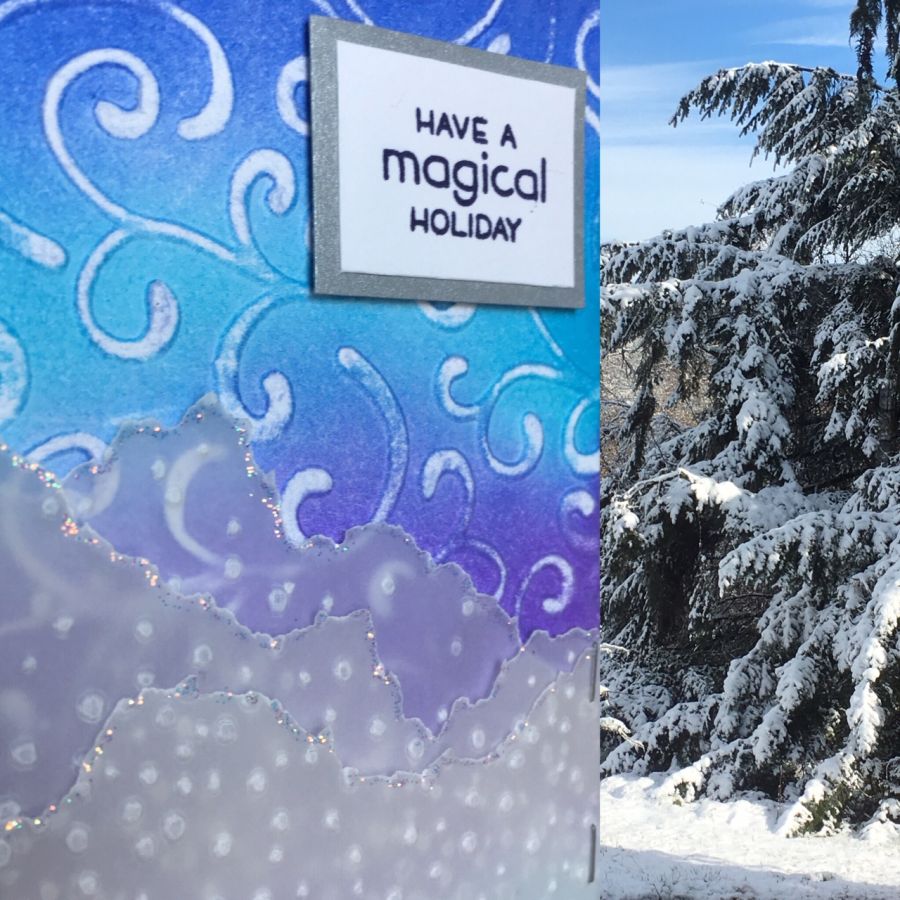
I was on deck to present the demonstration at our Craft Stamper group last week. We select something from an issue of Craft Stamper magazine and present it to the group and then we all make the project. It just so happened that I selected the masterclass that featured snowy hills from the January 2019 issue. While I was working on my sample cards, it snowed here, in March. This isn’t the first time we’ve had snow in March in Oregon’s Willamette Valley, but we’ve had at least four doses in the past two weeks. That is a little unusual. We are in the midst of one more snow shower today and that may be the end of it for this winter. Crazy!

For the first card I used two different embossing folders. I first applied Distress Inks, blending four colors. I then dry-embossed it with the Swirls embossing folder and then sanded it to expose the swirls. For the snow drifts, I embossed the snow onto vellum with the Snowfall embossing folder. I then tore the vellum into pieces to resemble snowy drifts and layered them together. When I liked the composition, I stapled the vellum onto the background with the Tim Holtz Tiny Attacher and applied Stickles glitter glue to the edges of the vellum. I added a layered sentiment and a layer of silver cardstock and adhered it to a white card base. You can see the sparkle in the photo below.
For the second card (below), I used the Distress Inks like watercolor. I heat-embossed the snow on watercolor paper using the Lawn Fawn Snow Cool stamp set and white embossing powder. Then I applied the Distress Inks to my craft sheet and spritzed the ink with water. By dragging the watercolor paper through the wet ink, drying, and reapplying, I created the colorful and snowy background. The embossing powder resists the “snow” that is heat embossed. I heat embossed the Tim Holtz script stamp on the vellum for this card and tore it to make the drifts again this time. I also applied embossing powder to the torn edges to give the appearance of snow. Again, I attached the vellum to the background with the Tim Holtz Tiny Attacher. To finish off this card, I stamped and colored the Lawn Fawn fox and popped it up onto the scene. I liked having his tail go off the background. I colored the card base by applying Milled Lavender and Shaded Lilac Distress Oxide inks to white cardstock. Finally I layered all of the pieces together and added the sentiment.
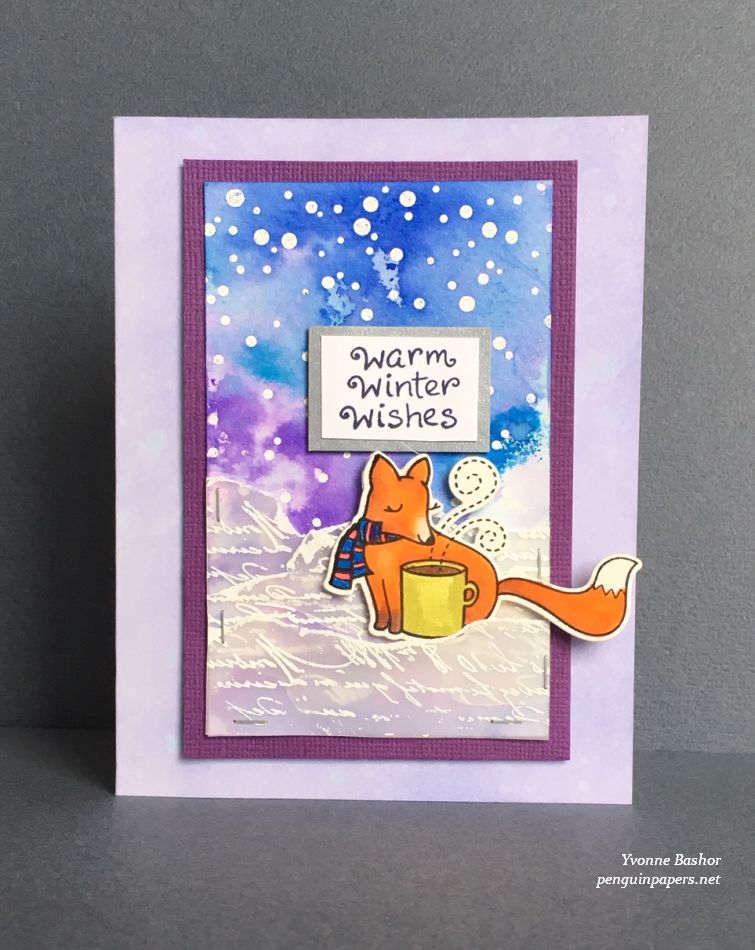
Thanks for visiting. I still have some catching up to do with posting here!
4 Comments | tags: cardmaking, distress techniques, embossing, fauna, lawn fawn, Ranger, spellbinders, Stamper's Anonymous, stamping | posted in Distress Techniques, Winter

- Stamps – Art Impressions – Valentine Critters set
- Dies –
- Spellbinders – Curvy Labels
- Mama Elephant – Heart Border
- Patterned paper – Memory Box – Sweetheart Collection
- Stickers – Mrs. Grossman’s
- Cardstock – Bazzill and BoBunny
- Copic markers
I know many people think Valentine’s Day is a marketing holiday, but I must admit to liking little hearts and cute animals on cards! And chocolate is a nice touch, too! I actually like to incorporate hearts in my mixed media work often, no matter what time of year.
I made this card for my husband. We are a cute animal loving family, so this is the first of several cute animal valentines I’ll be posting! I really like this set from Art Impressions and knew when I saw it at Creativation that I had to have it. I colored the otter with Copics. I pulled this card together by using some items that have been in my stash for years and years. The heart stickers and patterned paper are things I’ve had for at least 10 years, but I pull my Valentine-making supplies out and it keeps on giving!
Happy Valentine’s Day! Thanks for visiting today.
Challenge – Freshly Made Sketches #375
3 Comments | tags: Art Impressions, cardmaking, die cuts, fauna, memory box, spellbinders, stamping | posted in Freshly Made, Valentine
- Stamps –
- Penny Black – Smile All Day
- Technique Tuesday / Ali Edwards – Missing You
- Dies – Spellbinders Nestabilities – Small scalloped rectangles
- Patterned papers – Basic Grey 6″ paper pad – Lime Rickey
- Cardstock
- Sprinkles – Doodlebug Designs
- Copic markers
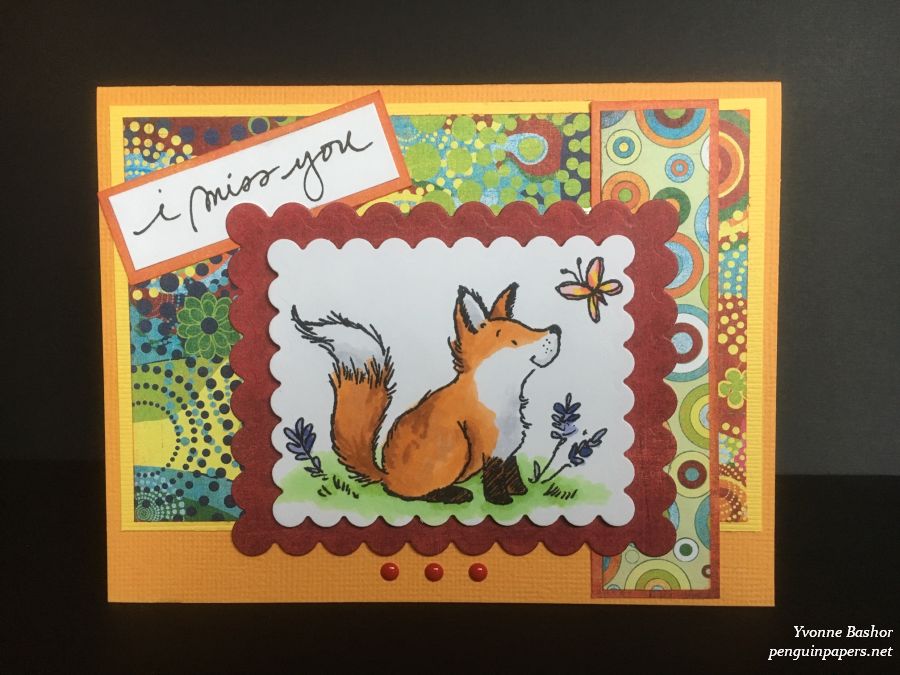
This card is another for the military drive my friend is doing. I colored the happy little fox with Copic markers and cut it out with the scalloped die. I then pulled out an old favorite patterned paper collection from long ago and created a design with it. Thanks for stopping by.
Challenge: The Paper Players Challenge #423 – Crazy About Critters
3 Comments | tags: basic grey, cardmaking, copics, die cuts, fauna, penny black, spellbinders, stamping, technique tuesday | posted in Miss You, Paper Players, penny black

- Dies –
- Memory Box – Flicker Hearts
- Spellbinders – Romantic Rectangles
- Stamp – Technique Tuesday – Dogwood
- Patterned paper – Prima Marketing / Julie Nutting – Blush
- Cardstock – Bazzill
I’m still embracing creating cards that are different from the Christmas cards that I concentrated on during the last month or two. It is fun to pull out some different supplies! For this I pulled some scraps together and used some pretty dies in my stash to create a simple card. This will be added to the box I’m putting together with cardmaking friends to send to a military unit (for the soldiers to send home to their friends and families). Thanks for stopping by.
By the way, my new friend pictured to the right of my card was a Christmas gift. Is he cute or what?! He is such a good model that he may appear in more upcoming photos! Thanks, Rene’!
Challenge: Your Next Stamp – Fun Friday Challenge #104 Anything Goes
2 Comments | tags: cardmaking, clean and simple stamping, die cuts, memory box, spellbinders, stamping, technique tuesday | posted in Challenges, General Cards, Love

- Stamps – The Cat’s Pajamas – Constellation Prize
- Dies – Spellbinders – Curvy Labels
- Patterned papers – Echo Park – Fine and Dandy
- Copic markers
- Cardstock – Bazzill
Happy New Year! I created this card for a challenge I was hosting today for an online cardmaking group. It was my first card of 2019. It had been a while since I created a card using patterned papers, especially one that wasn’t for the holidays! So it was fun to put this together. I colored the cute penguin image with Copic markers and layered the patterned papers. Very simple, but bright and cheery! Thanks for visiting and have a wonderful 2019.
Challenge – Two Crafty Critter Crazies Challenge #22 – Anything Goes
2 Comments | tags: cardmaking, Cat's Pajamas, clean and simple stamping, copics, die cuts, echo park, fauna, spellbinders, stamping | posted in Challenges, General Cards, TCP

- Dies – Spellbinders Swirl Happy Birthday Frame
- Patterned paper – Graphic 45
- Rhinestones
- Cardstock – Bazzill Bling
I created this card using a folding technique I had never tried before. This is called a double-pleat fold. I belong to a cardmaking group online and periodically we propose challenges to the group. During our fifth anniversary celebration recently, someone had a challenge to create a card featuring a fancy fold. This is the fold I chose. At first I thought it would be really difficult, but once I read through the instructions, I was able to create it without problem. I adhered the frame die-cut down onto the card base and then added the pleated piece. Having double-sided paper for the pleated piece made it finished very nicely. Once that was all adhered, I topped it off with the sentiment die-cut, which is really striking. I love this die set from Spellbinders! I added a few rhinestones on points on the die-cuts to add a little sparkle. I really enjoyed this fold and will definitely make some more cards using it.
Thanks for stopping by!
Challenge: Always Happy Birthday – November Challenge
1 Comment | tags: cardmaking, die cuts, spellbinders | posted in Birthday, Uncategorized

- Die – Spellbinders – Swirl Happy Birthday Frame
- Patterned papers – Authentique Pleasant Collection
- Sequins – Neat & Tangled Festive Fall Sequin Mix
- Cardstock – Bazzill
- Ranger Distress Ink – Carved Pumpkin
This is a very simple, yet elegant card with no stamping. It features one of the beautiful vintage images from Authentique’s Pleasant collection, framed with a decorative Spellbinders die cut. I edged the pumpkin image and the patterned background piece with Carved Pumpkin Distress ink. I popped up the pumpkin image onto the frame and adhered the whole thing to a white card base. I simply added a few sequins among the flowers as a final touch and that was it! Anything more would seem overpowering to me, but I tend to design on the side of simplicity. Thanks for stopping by.
Challenge: Shopping Our Stash – Giving Thanks
Also, here’s a photo of a new friend I made!

5 Comments | tags: authentique, cardmaking, die cuts, flora, spellbinders | posted in Autumn, Thanksgiving

- Stamps –
- Stampers Anonymous/Tim Holtz – “Flutter”
- Flourishes LLC – “Botanical Bookplates”
- Embossing folder – Sizzix/Tim Holtz 3D Texture Fades “Botanical”
- Graphic 45 – Floral Shoppe Collection – 12 x 12 Double Sided Paper – “Indigo Lilies”
- Die – Spellbinders Nestabilities “Lacey Ovals”
- Pearls – KaiserCraft – Hot Pink
- Cardstock – Bazzill
I love floral images and butterflies, so this card was a joy to make. The floral paper is gorgeous and comes from an amazing collection from Graphic 45. Combining this paper with the new bling cardstock embossed with the new (to me) botanical embossing folder made for some tasty layers. I colored the butterflies with Distress inks using Ranger’s Detail Blending Tools that allowed me to blend the inks in smaller areas. I fussy-cut the butterflies to retain the antennae and popped them up with dimensional adhesive. I scattered a few pink pearls among the butterflies to tie the colors together. Thanks for visiting.
Challenge: Always Happy Birthday September Challenge – Happy Birthday
2 Comments | tags: butterflies, cardmaking, die cuts, embossing, flora, Flourishes, Graphic45, spellbinders, Stamper's Anonymous | posted in Birthday