I love creating monotype prints with leaves on my gel plate! The leaves in all shapes and sizes are calling me during these Autumn months. These are vine maple leaves that are turning at this time of year. I was able to capture some lovely color on a recent trip and immediately printed with some of the leaves..
I used some Distress Oxide inks and acrylic paints to make some leaf prints right after I collected these maple leaves. We traveled to central Oregon recently, which is a fall tradition for us, and it is fun to print botanical immediately after I gather them! It was a little cool, so I didn’t set up my gel plate outside like I do sometimes, but it was still very pleasant. I decided to quickly make a card with one of the prints.
Often when I make cards from gel prints, it is hard for me to cover up the print with a lot of stuff. With this, the leaves (the right-hand leaf) are really the focal point and a simple die-cut sentiment really keeps the card simple and elegant. I added a little ribbon across the top to visually balance out the sentiment, repeated the black with a mat around the print and adhered it all to a navy card base. I added a smattering of epoxy dots I had in my stash and called it done!
Ranger Distress inks: Carved Pumpkin, Peeled Paint and Hickory Smoke
This is a pretty adorable image of the kitties among the pumpkins by Newton’s Nook. Their animal designs are some of my favorites! I colored the image with Copic markers and trimmed it out so no white was showing. I inked the edges with a black Sharpie to cover any white paper edges. The sentiment is heat embossed, adding a little shine to the words. I trimmed the sentiment flag-style. Before I adhered the foreground, I applied some Distress inks to the patterned paper, beginning with Hickory Smoke and then adding Peeled Paint ink for a colorful shadow beneath the image. I popped up the image with dimensional adhesive and then edged the panel with Carved Pumpkin Distress Ink. Thanks for visiting today.
Patterned papers – Authentique Pleasant Collection
Sequins – Neat & Tangled Festive Fall Sequin Mix
Cardstock – Bazzill
Ranger Distress Ink – Carved Pumpkin
This is a very simple, yet elegant card with no stamping. It features one of the beautiful vintage images from Authentique’s Pleasant collection, framed with a decorative Spellbinders die cut. I edged the pumpkin image and the patterned background piece with Carved Pumpkin Distress ink. I popped up the pumpkin image onto the frame and adhered the whole thing to a white card base. I simply added a few sequins among the flowers as a final touch and that was it! Anything more would seem overpowering to me, but I tend to design on the side of simplicity. Thanks for stopping by.
Inks – Ranger Tim Holtz Distress: Aged Mahogany, Carved Pumpkin, Forest Moss, Wild Honey and Walnut Stain
Embossing powder – Lindy’s Stamp Gang – Pumpkin Fiesta
Cardstock – Bazzill
It was fun to use this new leaf die set and then combine the leaves with items I’ve had in my stash for quite a while. I started off by applying five colors of Distress ink to mixed media cardstock with a foam applicator tool, blending the colors as I went. Once I was happy with the colors, I die cut the leaves from this fall-colored paper. I then die cut the dot-embossed kraft cardstock with the Avery Elle die and adhered it to the card base. I arranged the leaves on top, adhering them when I was happy with the composition. From there, I added the sentiment with dimensional adhesive and called it done! Thanks for visiting.
Stampers Anonymous Tim Holtz Collection, “Falling Leaves”
Hero Arts “Branch Background”
Hero Arts/Basic Grey “Dotted Grid”
Embossing powders – Ranger Ink Wendy Vecchi – Red Geranium, Sunflower, and Forget-Me-Not; Ranger – Lime Green and White
Cheesecloth
Tea bag paper
Sticker – Tim Holtz Idea-ology “Small Talk”
Ticket – Tim Holtz Idea-ology “Expedition” Ephemera pack
Inks – Tsukineko VersaMark watermark ink and Ranger Distress and Archival inks
Sequins – Neat & Tangled “Festive Fall Sequin Mix”
Flower – Prima
Twine – from the kitchen drawer
I’m kind of thinking I should rename my blog “Lots o’ Layers,” based on some of my projects! I certainly get caught up in enjoying the process and never am very sure of the outcome! For this piece I was inspired by a technique demonstrated in the November issue of Craft Stamper Magazine. The unique step that I took away was using white embossing powder almost as a paint rather than embossing from a stamped image.
I die cut a number of different circles and used one large circle for the base. I stamped the two larger circles with VersaMark and then also applied a bit more VersaMark ink with my finger before adding the embossing powder and heating. After stamping the leaves with Distress inks and moving the colors a bit with a waterbrush, I applied VersaMark ink with my finger, then white embossing powder and heat-set the powder. The bright colors of the ink and some of the embossing powders, along with the white embossing powder, made this a visually interesting collage. I added cheese cloth, paper from a tea bag cut into a circle, sequins and ephemera, layer by layer and topped it off with the little sticker sentiment: Finders Keepers. Thanks for visiting today.
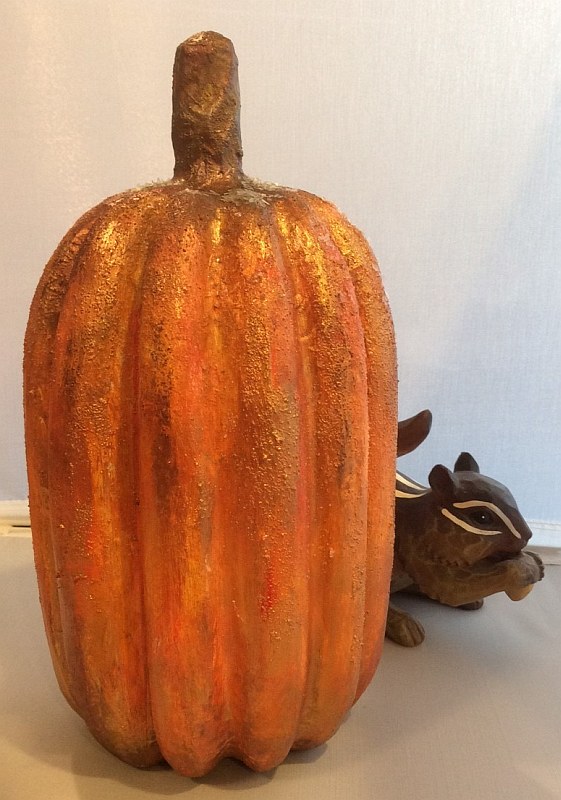
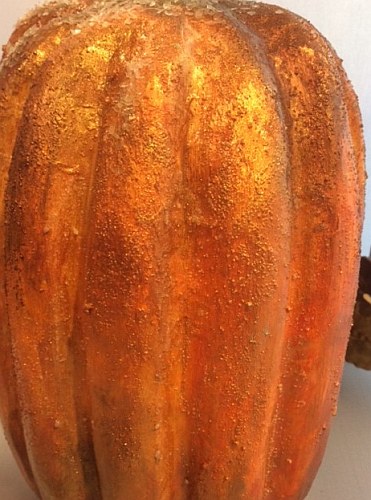
Dina Wakley Media acrylic paints – Cheddar, Ruby, Umber, Tangerine, and Evergreen
Prima Art Alchemy Acrylic Paint – Sparks Ginger Magic
Prima Art Alchemy Acrylic Paint – Opal Magic Violet Green
Finnabair Art Extravagance Texture Paste – White Sand
Prima Art Alchemy Metallique Wax – Rich Copper
Finnabair Art Basics 3D Matte Gel
Finnabair Art Ingredients Glass Glitter – Pearl
I bought this paper mache’ pumpkin for 70% off a couple of weeks ago and had no specific plan. I just thought it would be fun to paint it and use some of the many mediums I have collected! I also saw John Creighton Petersen’s magical pumpkin last week and was inspired.
So I started applying layers of paint and texture, beginning with gesso and then with a variety of Dina Wakley Media acrylic paints. Then I started adding some sparkle and shine with some Prima paints, followed by some White Sand Finnabair texture paste. That stuff really gave it the effect I was looking for. I added some more paint here and there and then applied the Prima Rich Copper Metallique Wax to add some shadows and color variation. Finally, I added 3D Matte Gel to the top of the pumpkin and partway down in spots and patted on (carefully!) the pearl glass glitter. It made it look like there is frost on my pumpkin! Great fun!
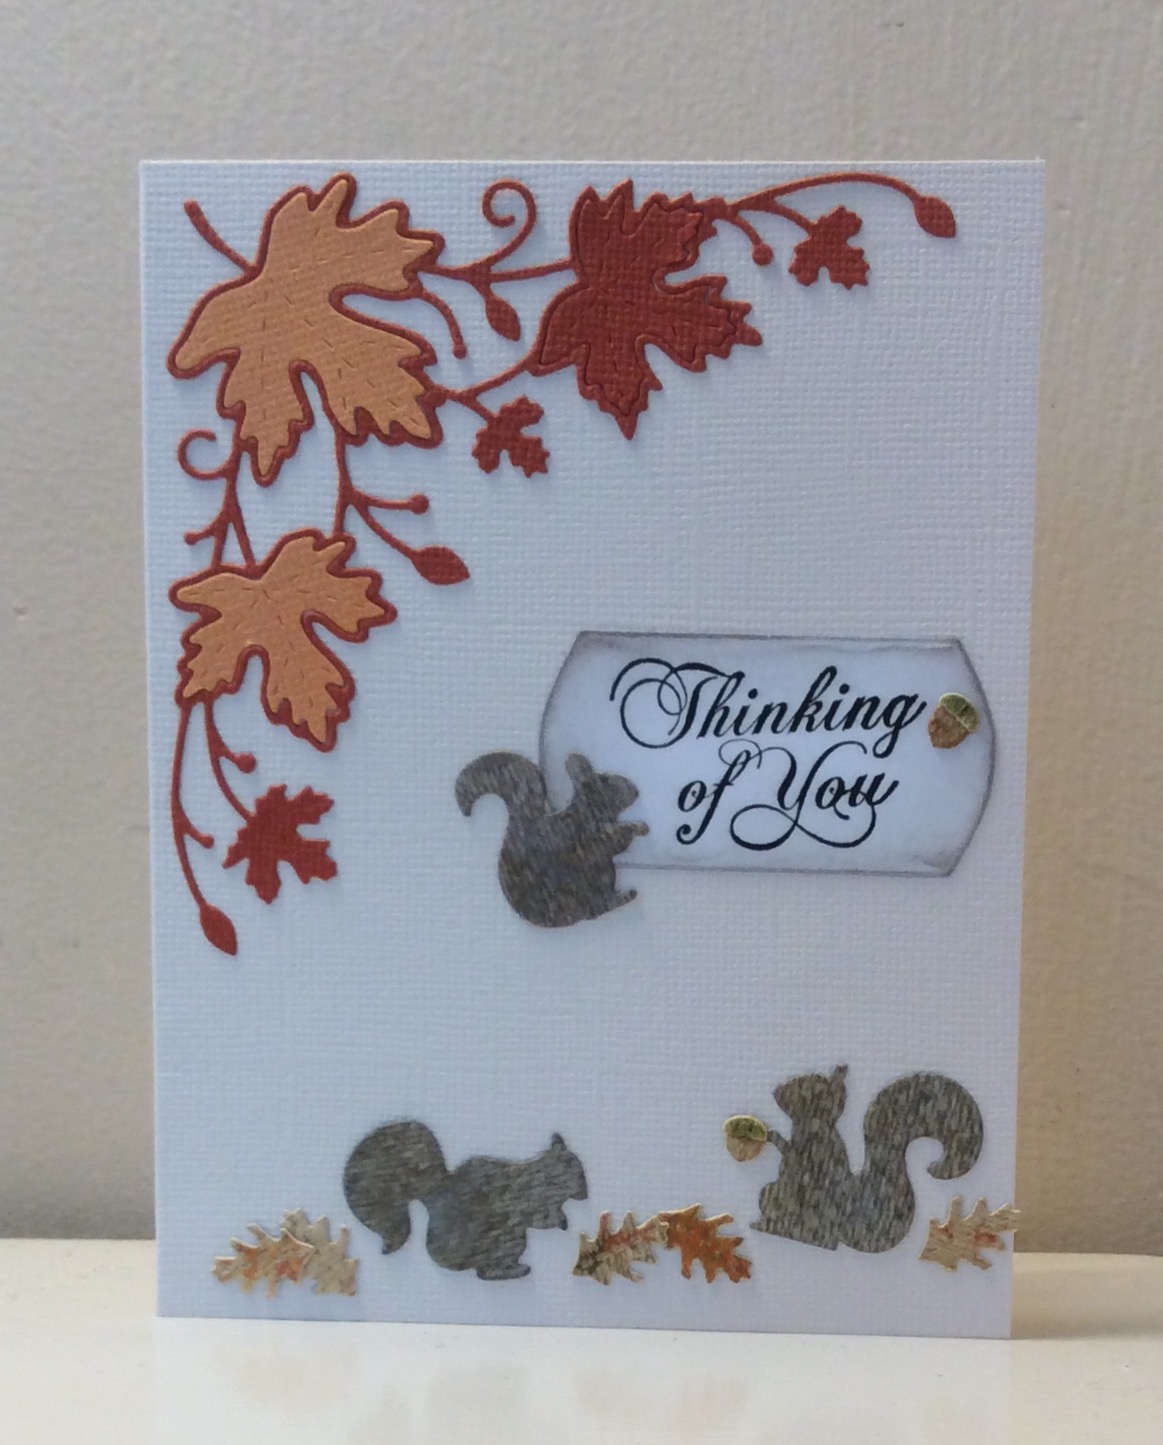
Memory Box “Busy Squirrels” and “Playful Squirrels”
Simon Says Stamp “Maple Leaf Corner”
Creative Expressions Craft Dies “Atlantic Ocean Collection – Cape Verde”
Stamp – Inkadinkado Personal Expressions “Expressions”
Ranger Distress Inks
Cardstock – Bazzill
I enjoy making Fall cards. When October begins, I think of leaves changing colors, my birthday (hee hee), pumpkins, and squirrels scampering. So I decided to make a card featuring squirrels scampering among the Fall leaves. I’ll probably send this to my son at college, who enjoys all things squirrel.
For this card, I die cut all of the Memory Box pieces from white cardstock and then used Distress Inks to color them. I cut the maple leaf die in the corner twice so I could inlay the contrasting color in some of the leaves. All of the supplies I used for this card have been in my stash for a long time, particularly the sentiment stamp that appears to be made in 2006! Thanks for stopping by.
This card was fun to make because of all the layers–and of course it took me a very long time, just because when I’m making decisions as I move through the process it always takes me a long time! I really enjoy the process and since it is my birthday today, I indulged in getting messy and creative.
I started out by applying texture paste through the leaf stencil onto watercolor paper. I love leaves as a theme in my work! Then I stared at it for awhile, and added Distress Crayons all over the piece, blending as I went along. I then scrubbed some of the color away with a damp paper towel through a couple of stencils and continued to blend colors by adding a bit of water until I was satisfied.
Meanwhile I stamped leaves on tissue wrap with black Archival ink and added some ink splatters and Mica Spray. Once this was dry, I added some torn pieces of the stamped tissue with gel medium to the piece. I then cut the piece I would need for my card design and applied Walnut Stain Distress Ink to the edges. I wrapped it with paper string and attached the brass leaf charm.
On another scrap of watercolor paper, I watercolored with some Distress Inks and lightly stamped a few more leaves. This was meant to be a background for my sentiment, so I didn’t want my colors to be very intense. One dry, I cut out the sentiment piece, applied Walnut Stain Distress ink to the edges, and popped on the sentiment sticker. I attached the two pieces to cardstock and called it a day. Thanks for visiting.
Stamp/Stencil set – Stampers Anonymous: Studio490 Wendy Vecchi “Autumn Harvest”
Sentiment – Hero Arts CL987 “Color Layering Grateful Leaves”
Die – Lawn Fawn “Outside In Stitched Scalloped Square Stackables”
Ranger Distress inks
Ranger Distress markers
Handmade paper – Black Ink
Cardstock – Bazzill
This image was created with a stamp and stencil set. First I stamped it with black ink and then I applied Ranger Distress inks through the stencil to color the image. I used Distress markers to color the tall vegetation in the background. I framed it with the Lawn Fawn die-cut and layered all on top of the lovely handmade paper by Black Ink. Thanks for stopping by.
Lawn Fawn “Jump for Joy” set and “Wheelie Like You”
Avery Elle “Petals and Stems” (sentiment)
Patterned papers –
Bella Blvd “Hello Autumn”
Pebbles “Woodland Forest”
Woodgrain tape – American Crafts
Sequins – Doodlebug Designs
Copic markers
Cardstock – Bazzill
I created this card for my son to give his good friend who was just diagnosed with Leukemia. They’ve been friends since kindergarten–and now they are high school seniors. I colored the critters with Copics and then fussy cut them. I didn’t want any white around the edges that the dies would leave (and I don’t have dies for all of the creatures anyway!). I edged all of the critters and leaves with black. I arranged the animals and added some sequins to jazz things up a bit. I stamped the sentiment on the woodgrain tape and cut a “tail” for a flag.


 thought it would be fun to paint it and use some of the many mediums I have collected! I also saw