I created this by using what I have–and what I’ve already cut and stamped out! Between classes I’ve taught and past projects, I’ve got a lot of bits and pieces to work with. Sometimes it is fun to see what I can come up with by just using those miscellaneous elements. I will list all of the products I used below.
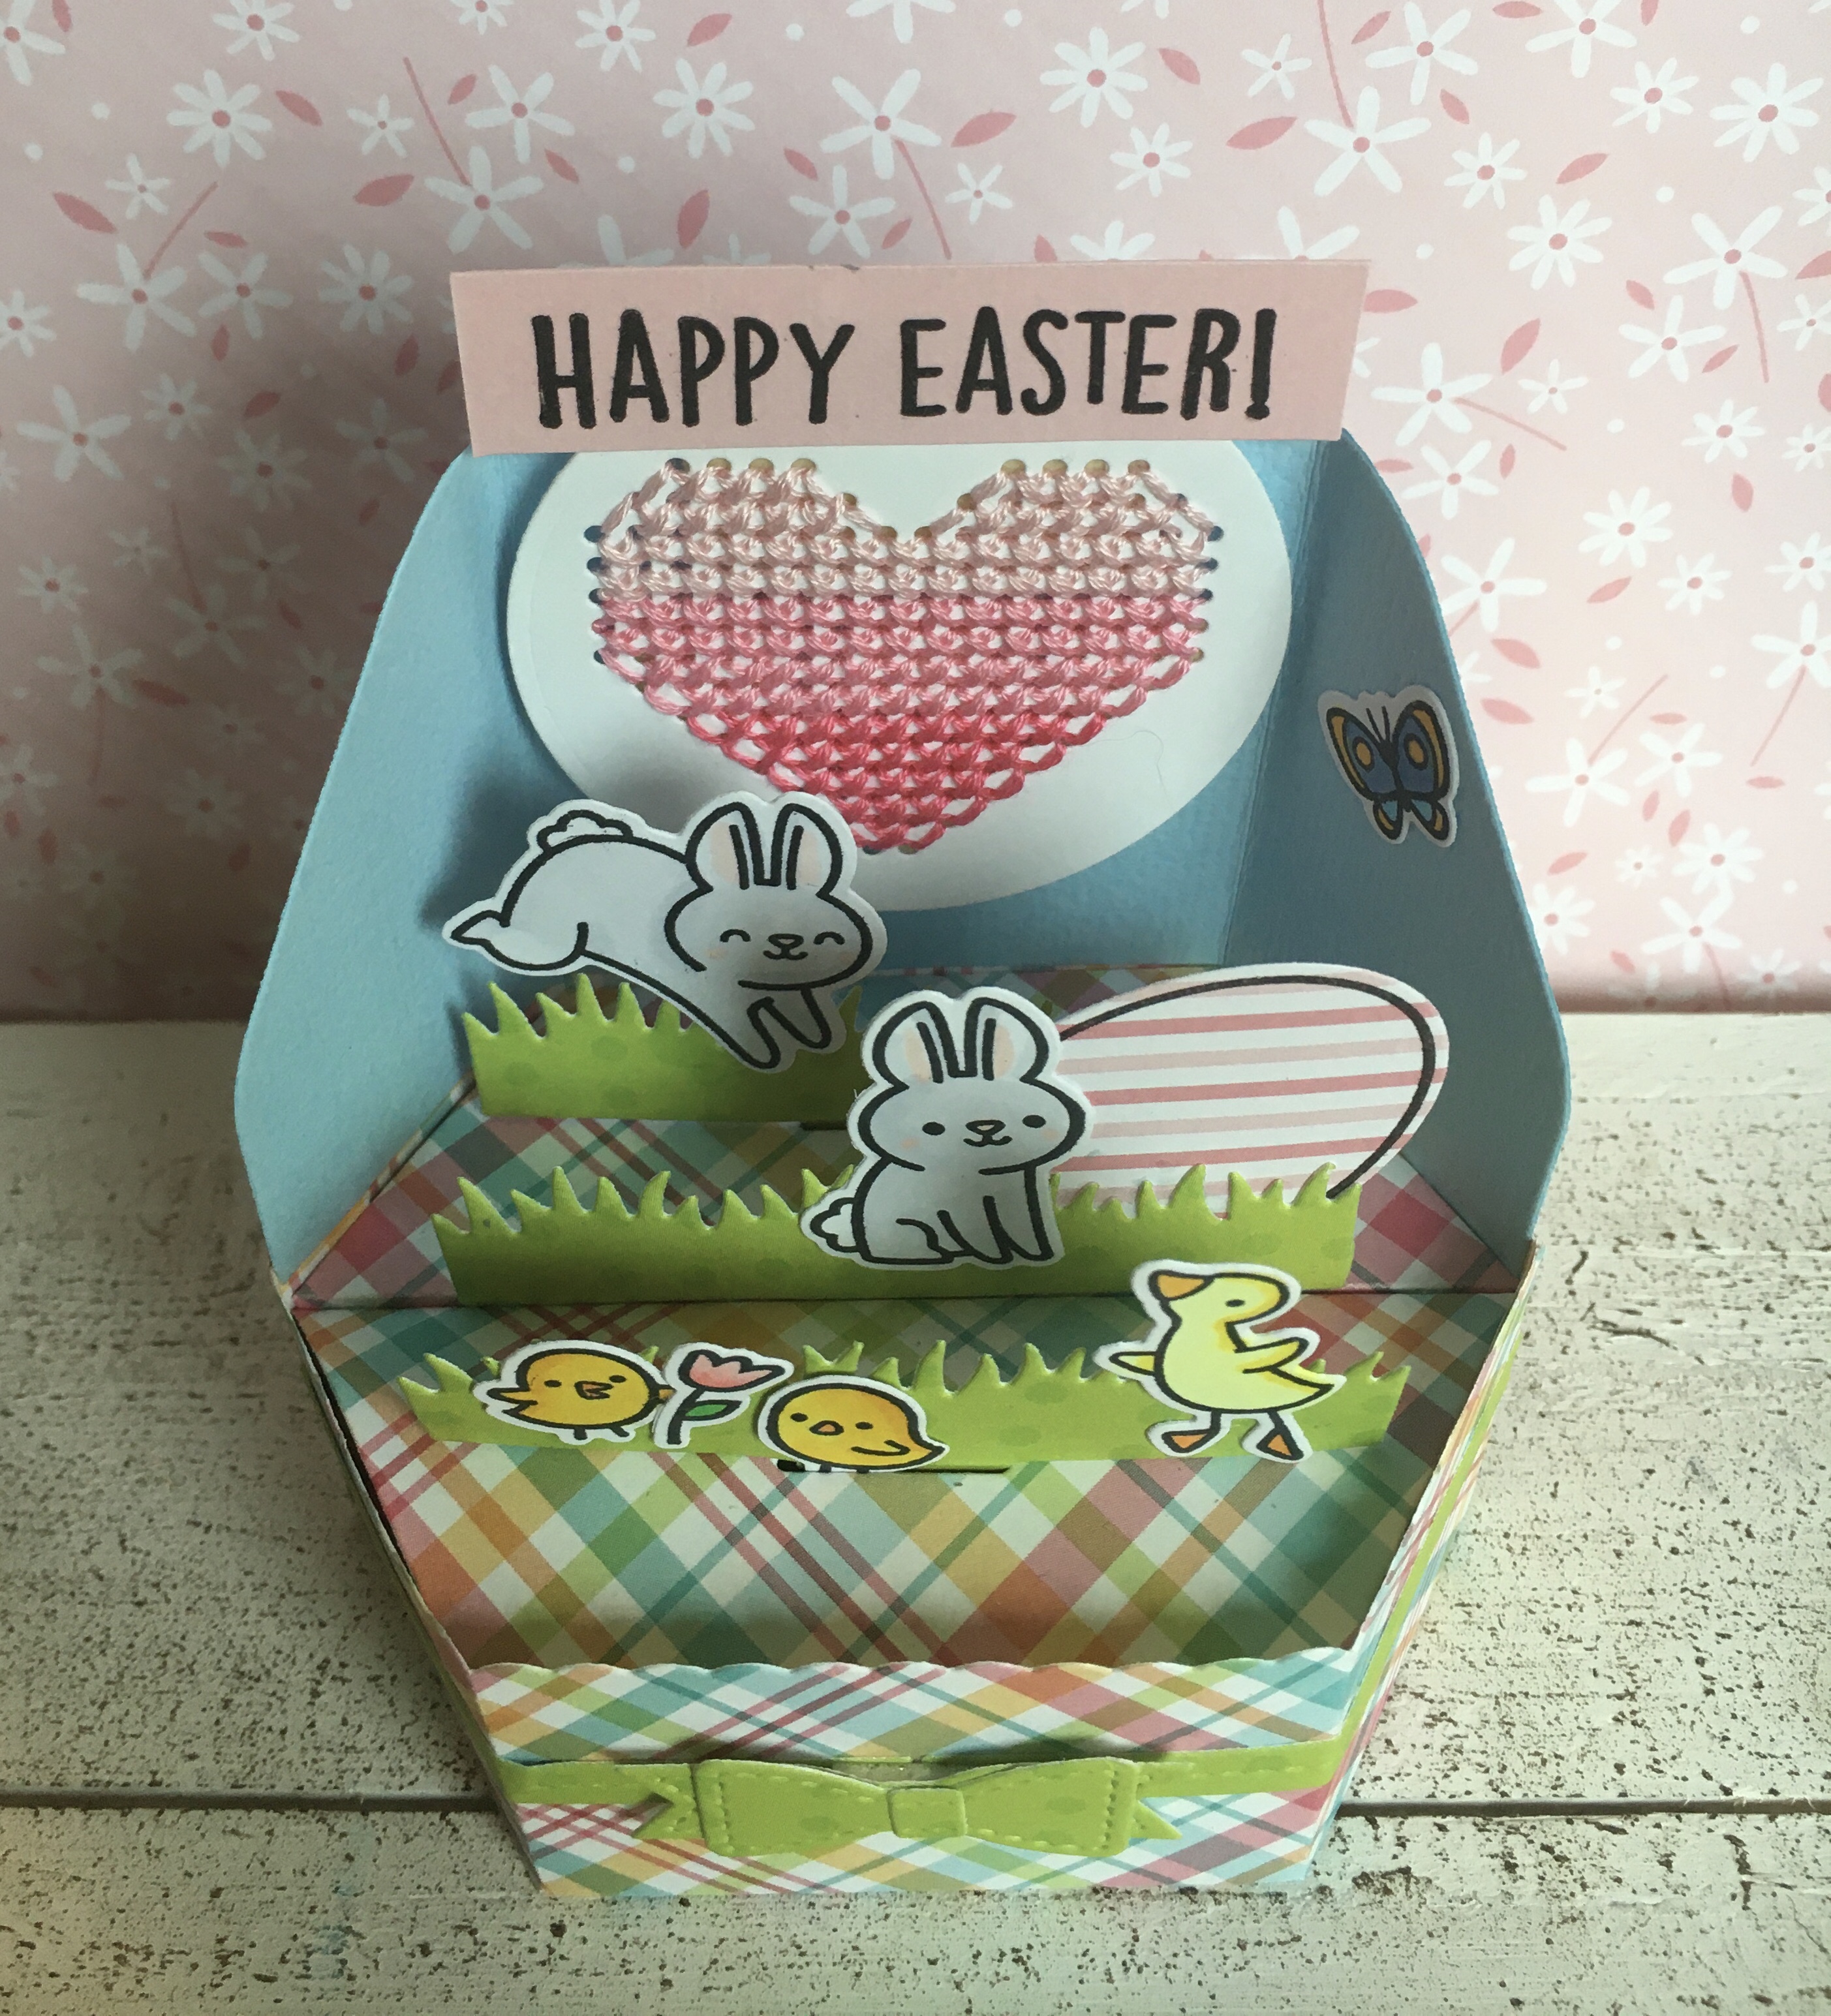
I was really anxious to do some cross stitching on one of the new Lawn Fawn Embroidery Hoop dies. I have deadline I should be designing for, but I couldn’t stand it any longer! I decided to use three shades of pink to stitch the heart for an Ombre effect. The stitching went quite quickly and I chose not to put it into the hoop part of the die set. I decided to use it for a backdrop on a Pop-up Platform with an Easter scene. These critters are so cute and I had a lot of them from the classes I taught recently. I colored them with Copic markers.
This dimensional scene folds flat for mailing, which is really amazing! Lawn Fawn dies are designed so well. It is almost more of a gift than a card–a great surprise for any recipient.
Lawn Fawn Eggstraordinary Easter stamps and dies
Lawn Fawn Eggstraordinary Easter Add-on stamps and dies
Lawn Fawn Embroidery Hoop dies
Lawn Fawn Rub-a-dub-dub Flip-flop stamps and dies
Lawn Fawn Platform Pop-up dies
Lawn Fawn Platform Pop-up Add-on dies
Lawn Fawn Flower Market and Perfectly Plaid papers
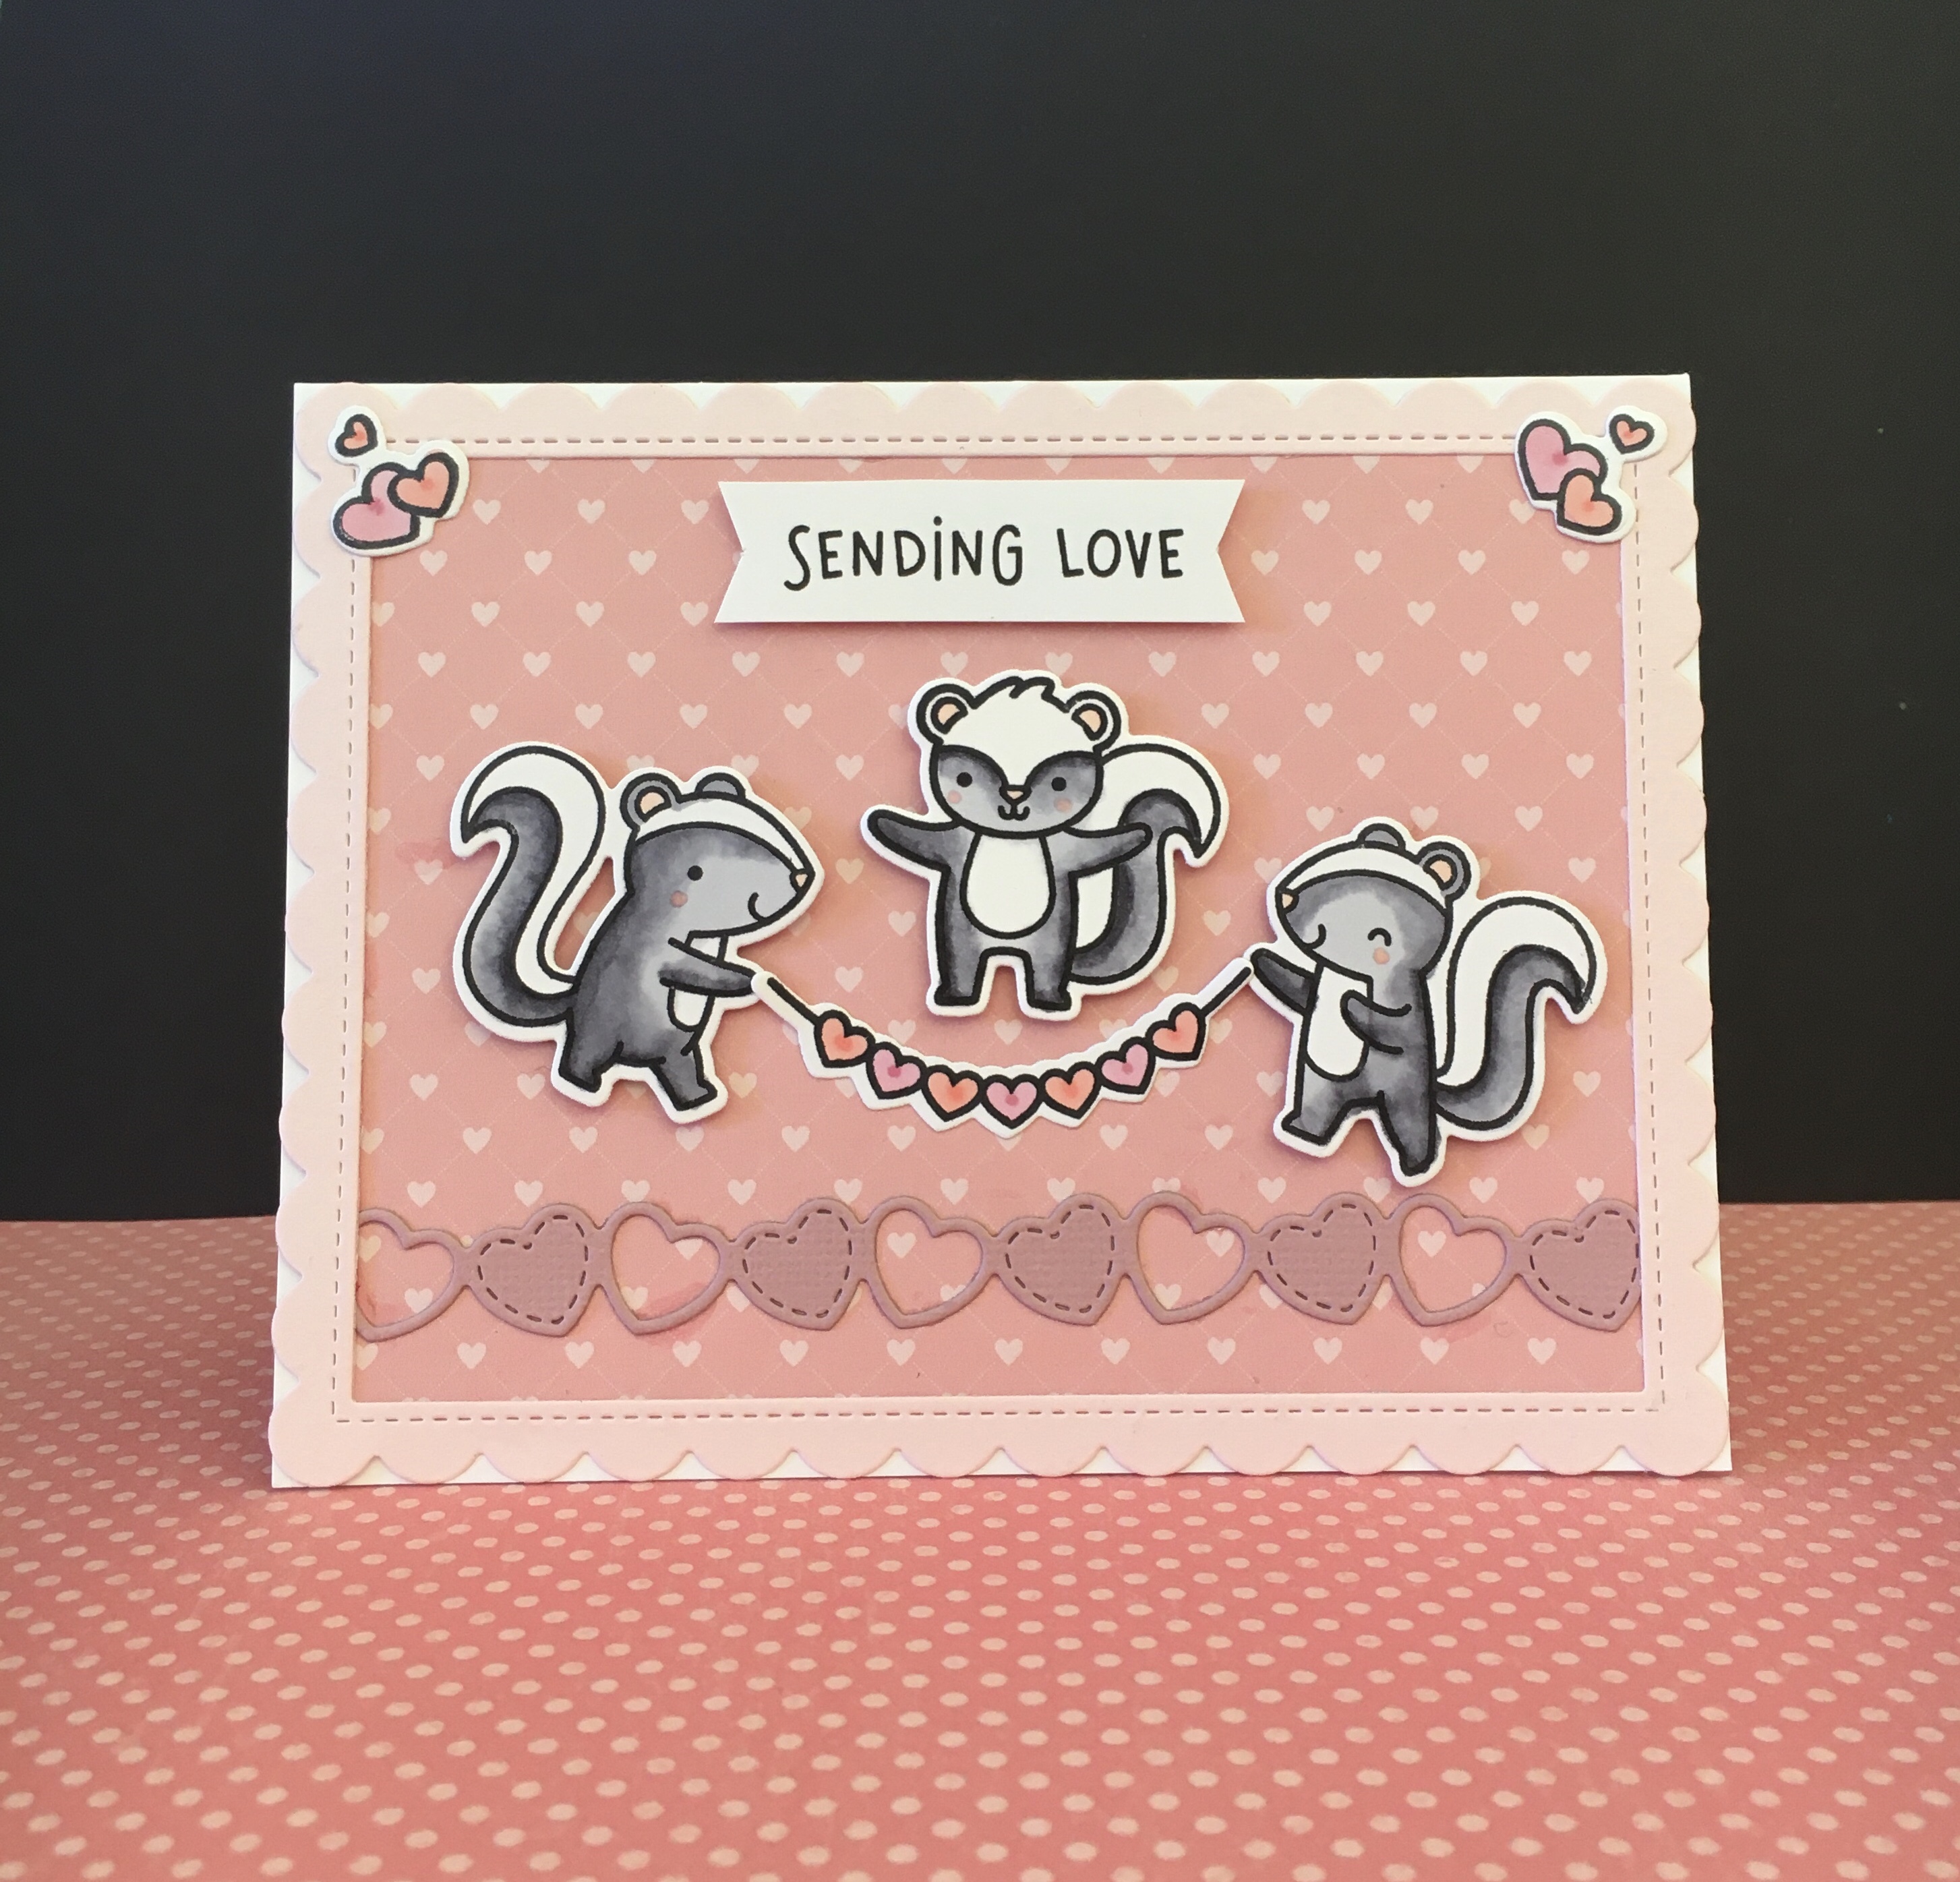
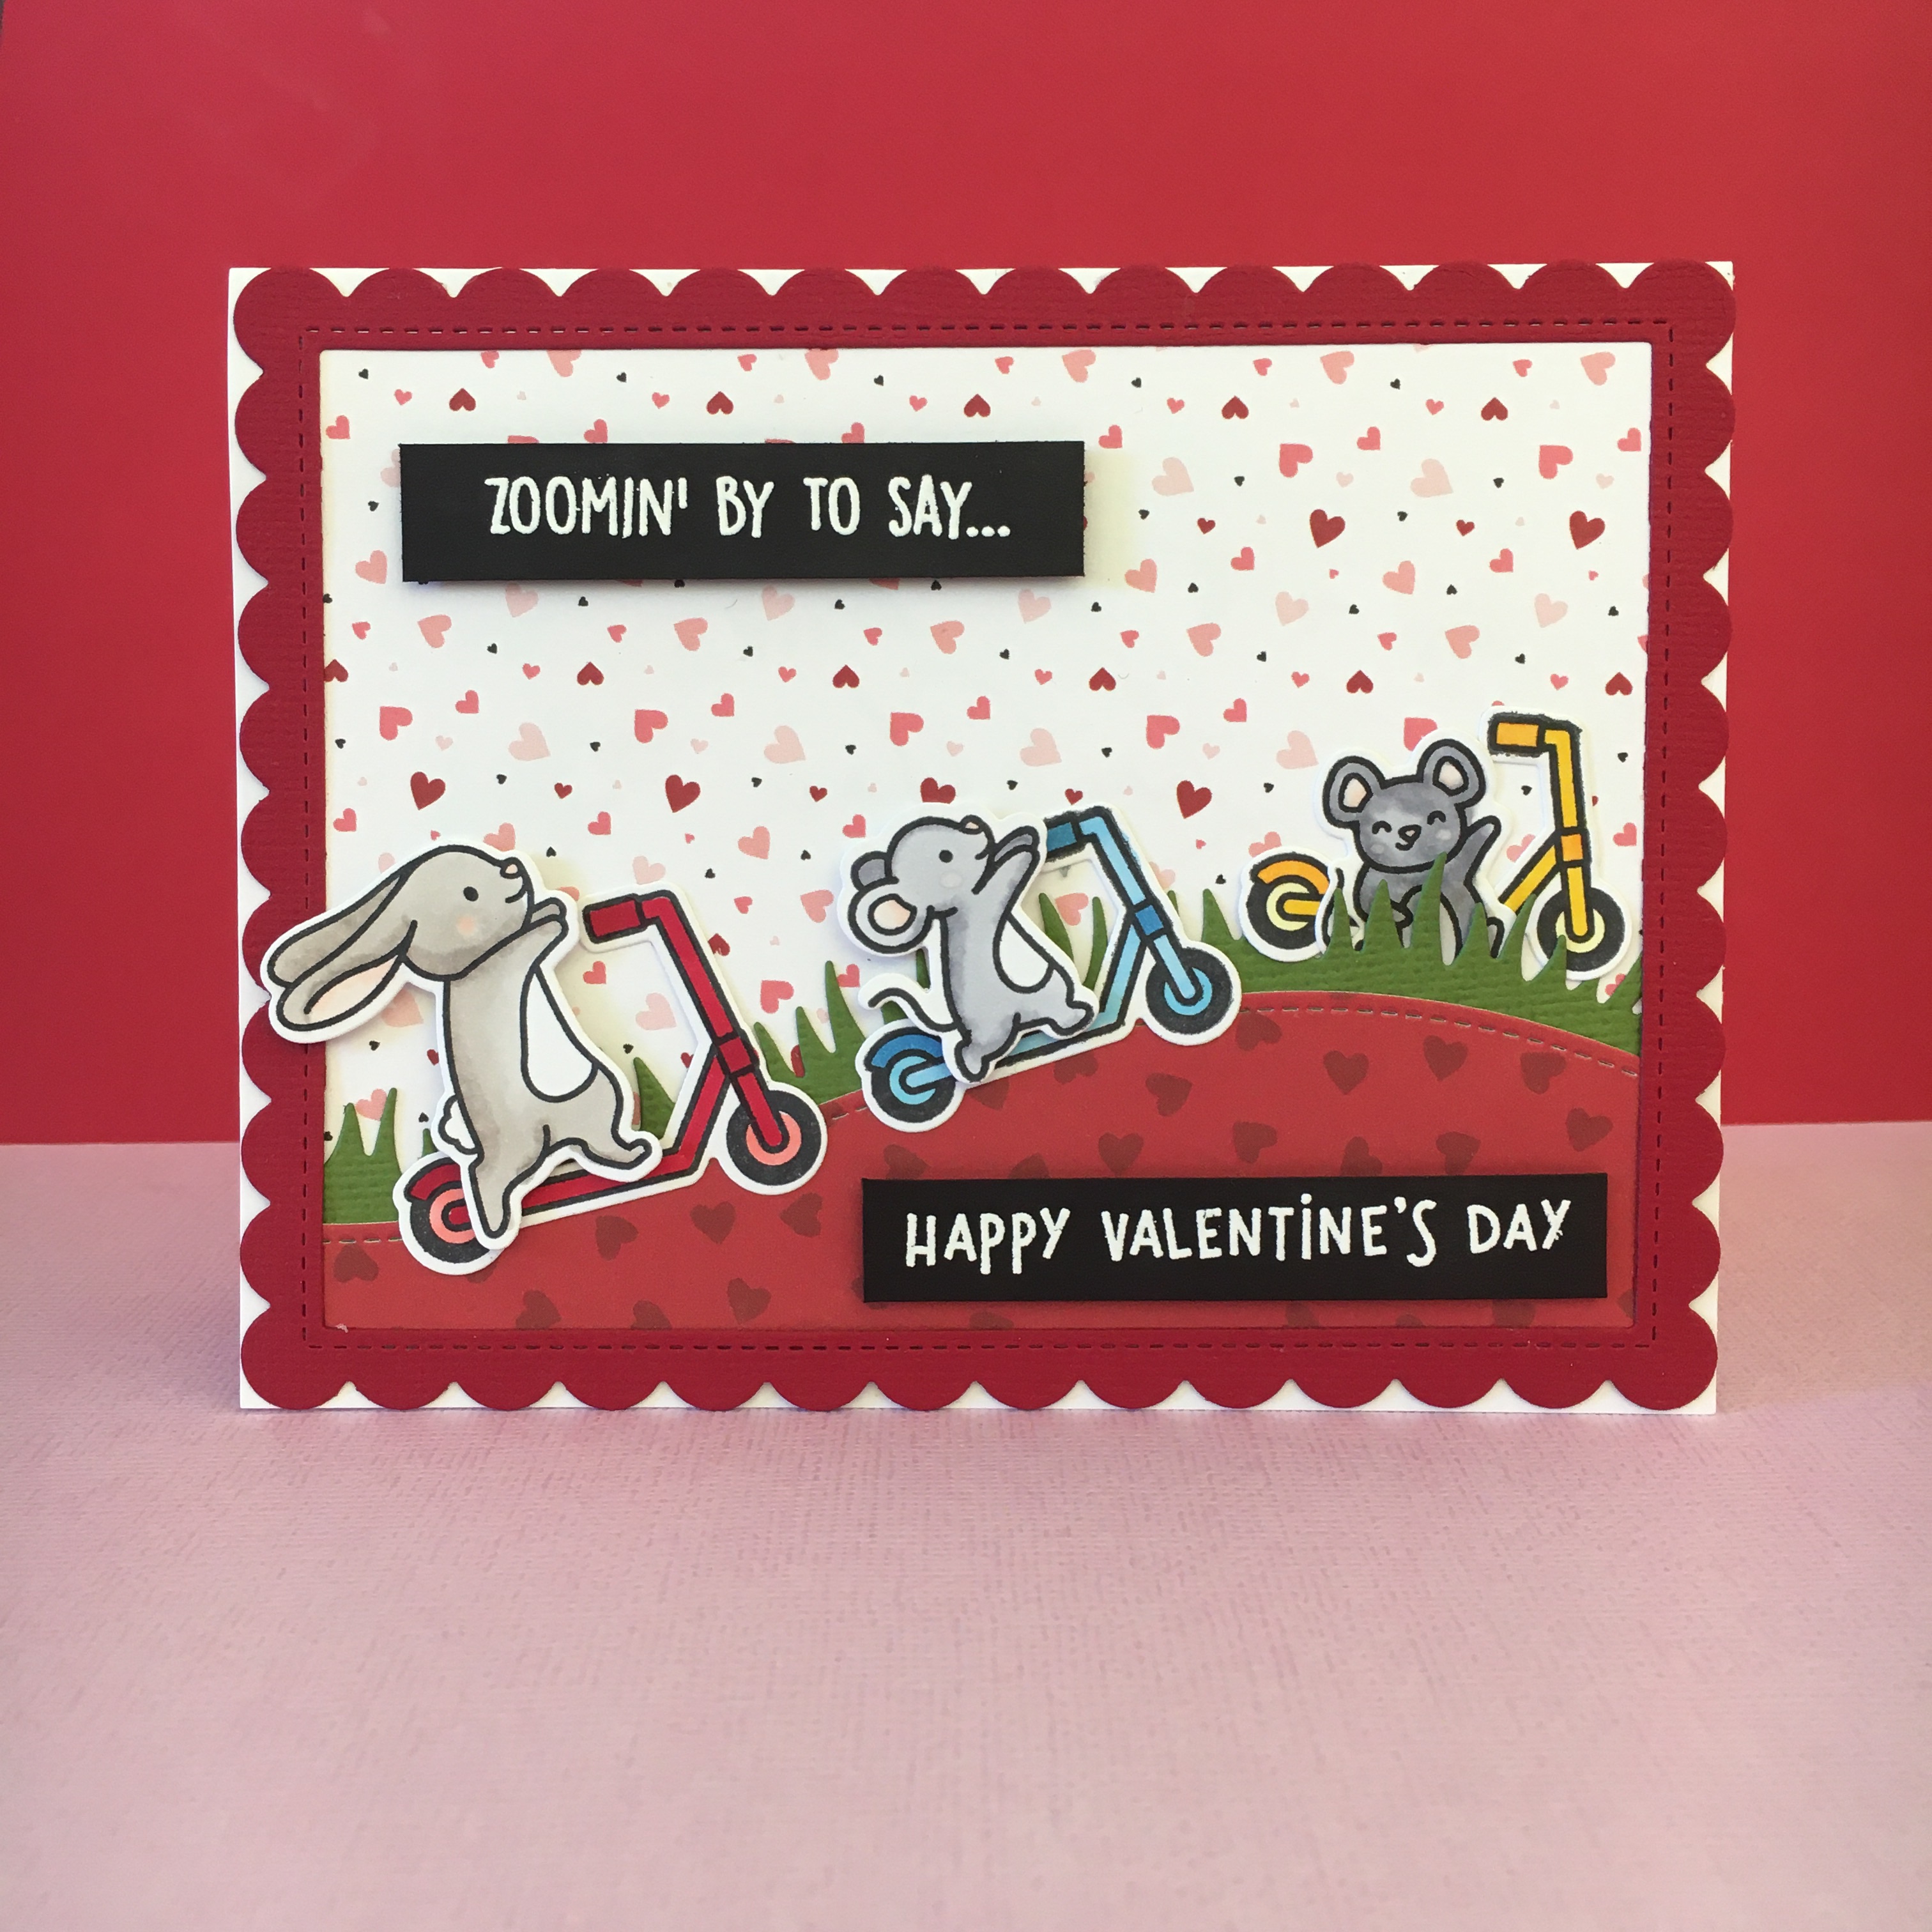
I made a little collection of critter Valentines this year featuring Lawn Fawn stamps and dies. I’m keeping them in the family since I’m giving them to my mom to share. Maybe if I’m good, I’ll get one back!
I colored all of the cute critters with Copic markers with very simple blending and I used some patterned papers I had on hand to add some festive backgrounds. I’ll provide my supply list below and then I’ll give you a look at each card individually.
Supplies
Lawn Fawn stamp and die sets:
Scent with Love stamps and dies
Scent with Love Add-on stamps and dies
Scootin’ By stamps and dies
Stud Puffin stamps (for Sending Love sentiment)
Stitched Hillside Borders die set
Valentine Hearts Border die set
Stitched Scalloped Rectangle Frames die set
Grassy Hillside Borders die set
Patterned papers:
Echo Park Hello Valentine Collection – Be Mine Bouquet and Special Delivery
American Crafts papers – 348946 and 359971
Translucent vellum
Cardstock
Copic markers
What better way to show you care than to share cupcakes?!
Of course, a skunk and fox would be playing together and celebrating Valentine’s Day!
We’ve got some skunk roping happening here.
Some critters are speed demons on their scooters; others prefer to rest on the sidelines!
We’ve got all kinds of happy here with a lovable skunk and fox.
Thanks for stopping by today. I really got into the card-making zone during the past few days. I hope you’ve enjoyed this little collection.
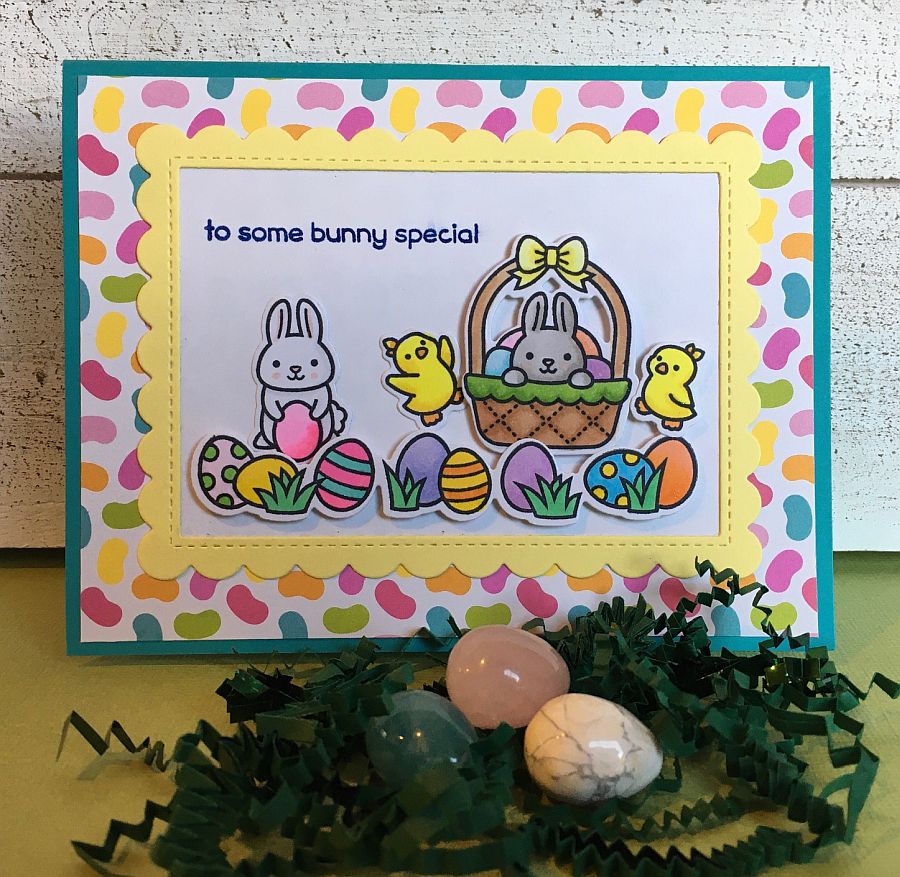
Patterned paper – Doodlebug Springtime Collection: 4128 Chickies
Cardstock
Copic markers
Lawn Fawn Glitter Pen
I colored the stamped images with Copic markers and added some glitter with the Lawn Fawndamentals glitter pen, which gave the eggs a nice sparkle. The jelly bean pattern on the paper picked up the colors I used in the scene. I liked how the scalloped edge on the frame repeated the same pattern as the edge of the Easter basket. It was fun to put together this scene for some Easter cheer. Thanks for stopping by.
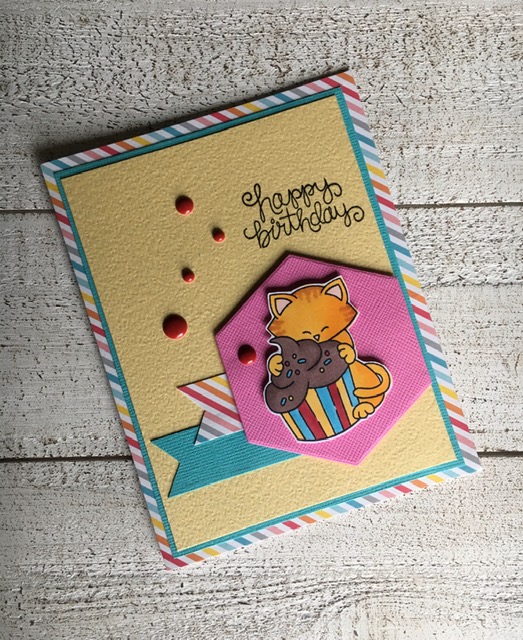
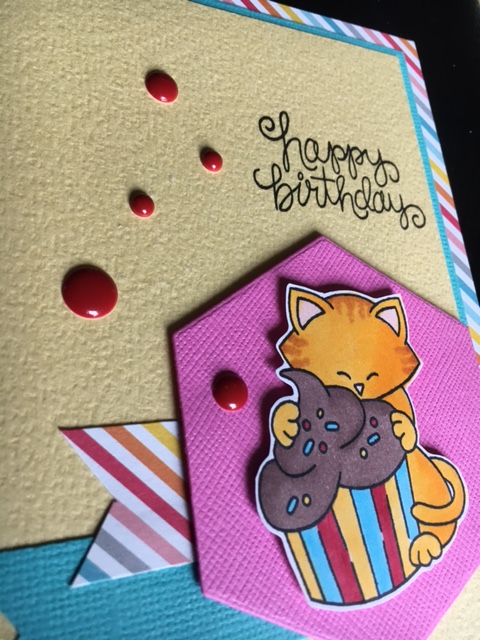
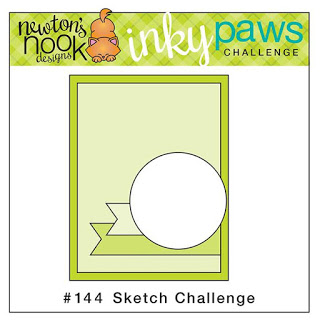
I participated in the *virtual* Crop on the Cape, hosted by Jenn Shurkus, last weekend. I always enjoy Jenn’s “Creative Chick” online classes and am always happy to support creative small businesses who have certainly been impacted during the last year. I highly recommend her classes. There were lots of demos and challenges during the three days which made it lots of fun. I created this card for one of the challenges that was based on a color scheme and group of photos for inspiration. I had this Newton’s Nook stamp set in my stash and decided to use the current sketch provided for the Inky Paws Challenge on the Newton’s Nook blog to make some birthday happiness.
I colored the kitty and cupcake with Copic markers. The Happy Birthday sentiment is part of the same stamp set, along with some other cute images and sentiments. I kept the card simple with just a little dimension added to the hexagon and some epoxy stickers (I love that shiny texture on a card!) to finish it off. Thanks for visiting.
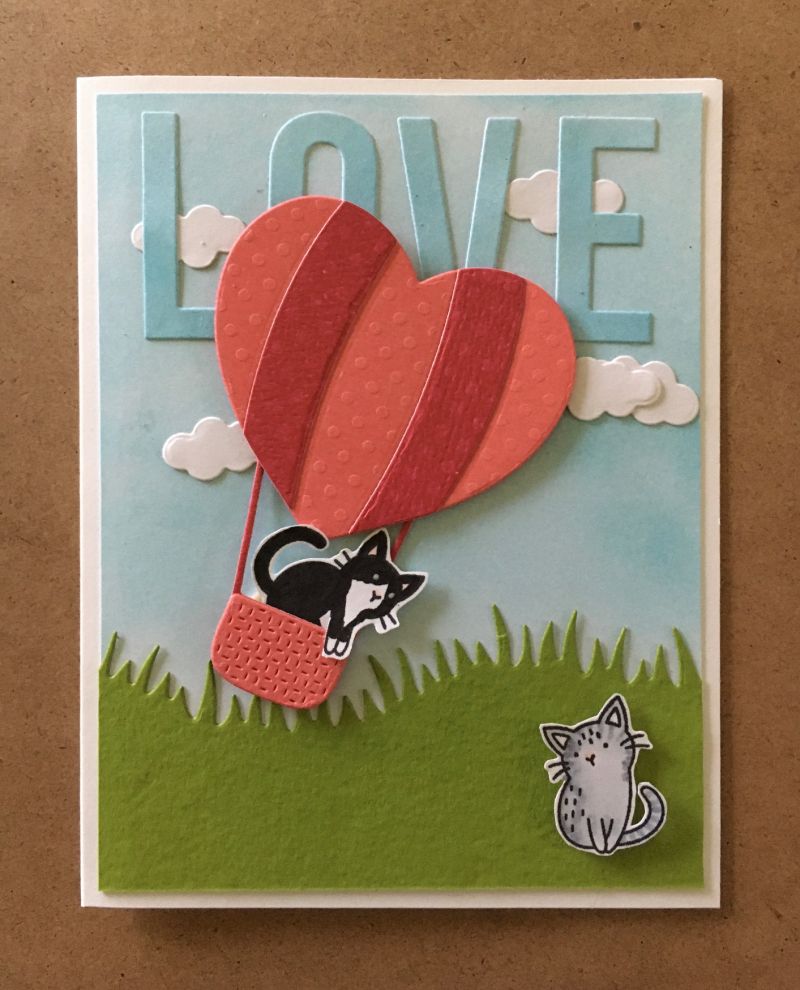
Dies – My Favorite Things – Heart Air Balloon, Huge Love; Lawn Fawn – Grassy Hillsides Borders
Stamps – My Favorite Things – Mini Meows
Ink – Ranger Distress Ink – Broken China
Copic Markers
Cardstock – Bazzill and BoBunny
Well, I’m very late in posting my Valentines. We had an ice storm here in the Willamette Valley on February 12th (freezing rain that accumulated to over an inch on everything) that caused lots of tree and power line damage. Our power was out for almost 8 days and I had very spotty internet access, so I didn’t even try to post anything during that time. I’m still catching up on things and adjusting to being able to turn on real lights! We were very fortunate here compared to many across the country who had much worse circumstances. But we did enjoy Valentine’s Day under different conditions with a grilled dinner!
So now on to the card. I have always loved hot air balloons and as soon as I saw this die set at our local store, I had to have it! I inked the background with Distress ink and inked some additional paper a little darker to use to die cut the LOVE sentiment. The little clouds were part of the Heart Air Balloon die set, so I cut some of those for the sky. Once I assembled the balloon and inserted cat 😉 I popped it up so it would look like it was floating. I colored the kitties with Copic markers in the colors of our two cats (Max in the balloon and Sissy on the ground). They are not exactly in love in real life, but we’ll just go for that effect for purposes of the Valentine! I really had fun making and giving this card (I made one for my husband and one for my son). Thanks for stopping by. Better late than never!
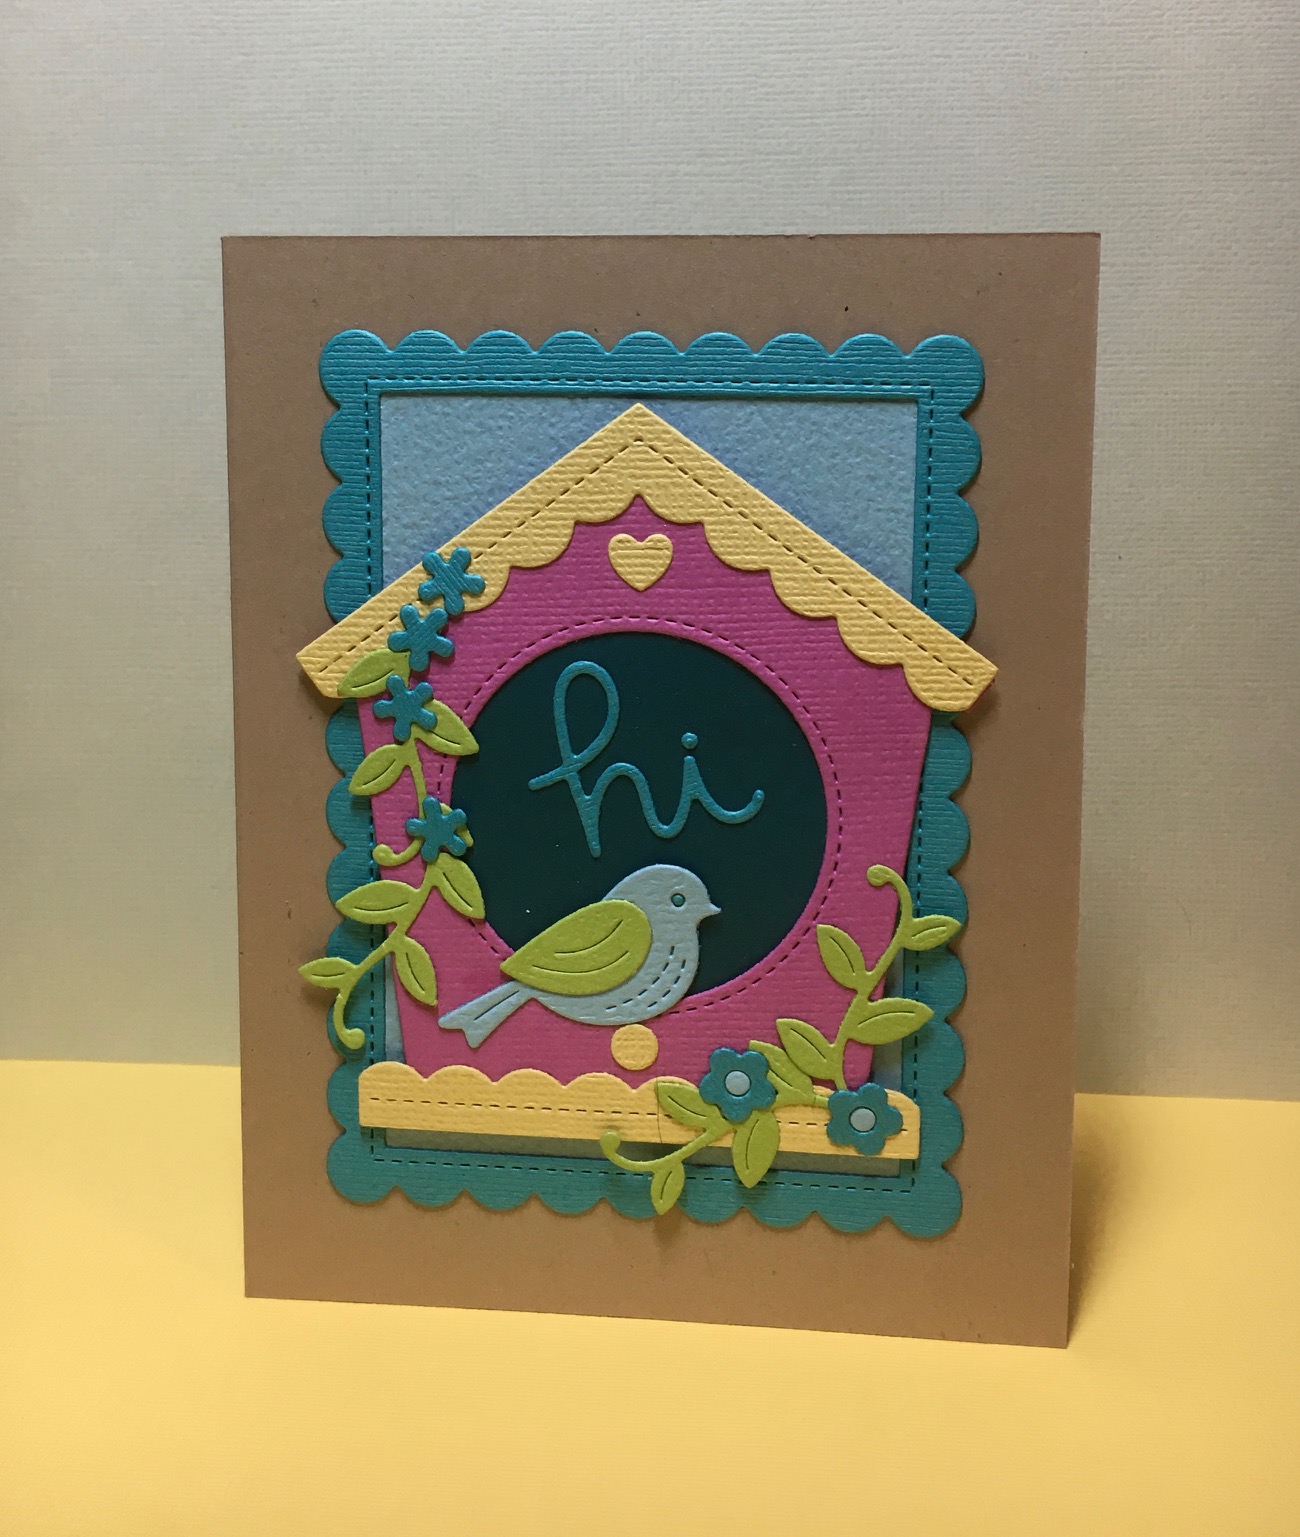
I’m jumping ahead to Spring for a short visit! We’ve had rain, hail and sunshine this first week of February here in the Willamette Valley (and the Groundhog did not see his shadow). So here is a cheerful birdhouse made completely with Lawn Fawn dies. I decided to die cut all of these pieces in lots of happy colors and do some mixing and matching. This card had absolutely no stamping either. That doesn’t happen very often.
Supplies:
Dies – Lawn Fawn Magic Iris Birdhouse Add-On, Stitched Scalloped Rectangle Frames and Outside In Stitched Bubbles (for the “hi.”)
Cardstock in a variety of colors, plus Kraft for the card base
I plan to make more of these with some other color combinations and also to make a version with the Magic Iris die in the birdhouse opening for a little interactive fun. Thanks for stopping by.
This is my most elaborate Halloween card this year. I’m not sure exactly what happened, but time got away from me and I just didn’t make many. I created this one for a swap that I participated in. We were to make a Halloween card that was a fun fold that the recipient could use for a decoration.
I had fun putting together several different Lawn Fawn stamp/die sets and patterned papers from different companies for a spooky night-time scene. I decided on a Z-fold card, and the beauty of this design is that it can stand up on its own but it folds up to easily fit into an envelope.
Supplies:
Lawn Fawn stamps and dies – Spooktacular, Hoppy Halloween, and Fox Costumes Before ‘n Afters and the Spooky Fence Border die
Papers – Authentique – Mysterious and Twilight collections, and Echo Park Bewitched collection (for the starry sky)
I colored the critters with Copic markers and backed the card with and cut the fence border from black cardstock.
This was very fun and quite easy to make. Have a Happy Halloween!
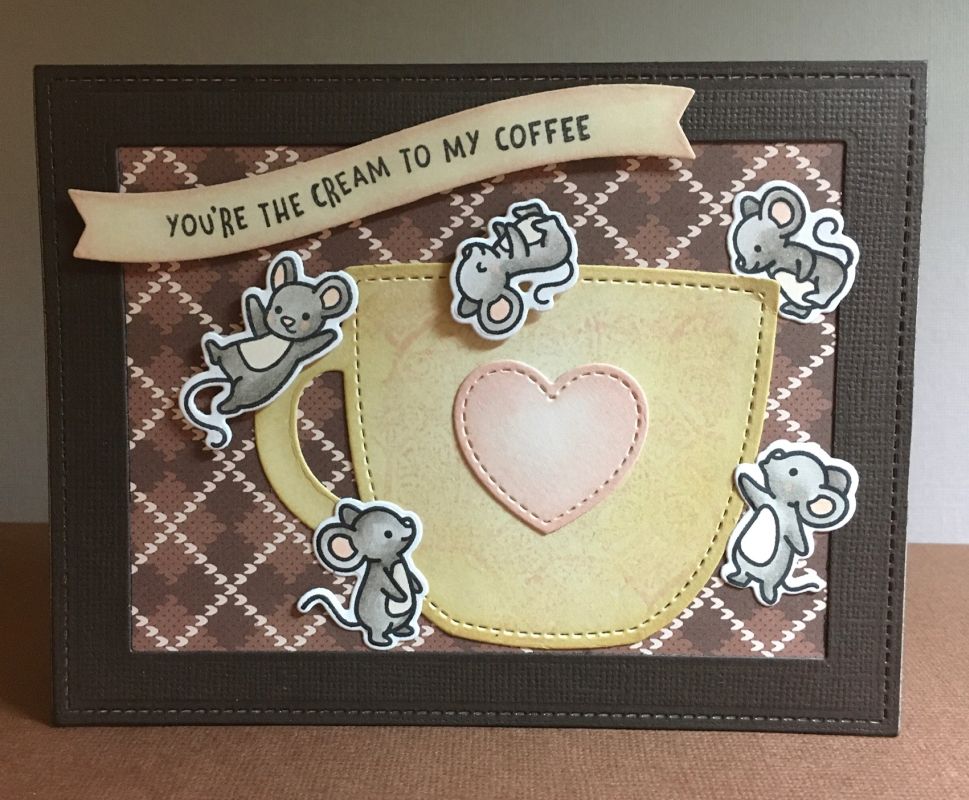
Yesterday was National Coffee Day, but I wasn’t quick enough to post the card I made to celebrate coffee. It was fun to make a little scene with multiple stamp sets, and of course, to include lots of critters. I pulled mice from three different sets (and there are more!).
Here’s what I used:
– Lawn Fawn stamp sets: Dandy Day, Thanks A Latte, Crazy Antics and Really High Five
– Lawn Fawn die sets: Outside In Stitched Mug, Large Stitched Rectangle Stackables, Simple Wavy Banners, Dandy Day, Crazy Antics and Really High Five
– Stampers Anonymous Tim Holtz Collection stamp set – Fragments
– Distress Inks: Antique Linen, Scattered Straw and Tattered Rose
– Copic Markers
– Lawn Fawn Patterned Paper
– Cardstock
I colored each mouse with Copic markers and used Distress Inks to color the mug and sentiment background. I lightly inked the Tim Holtz stamp and spritzed it with water to stamp a light pattern onto the mug (see below).
I had lots of fun with this and I appreciate your stopping by to take a look.
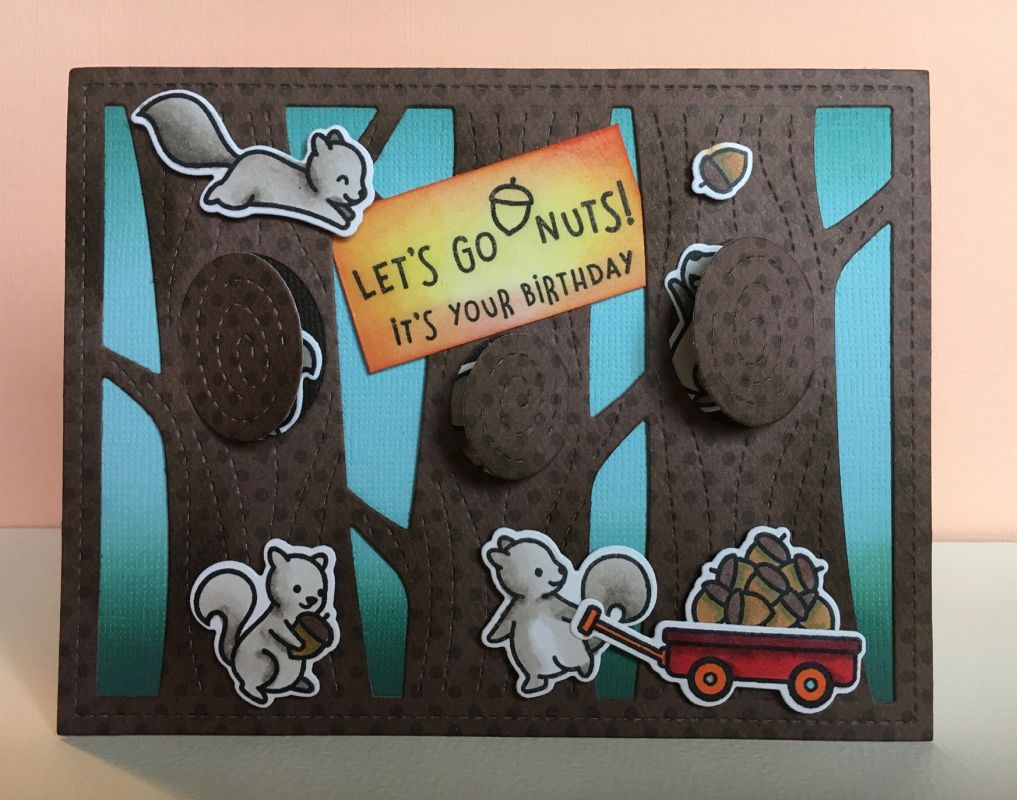
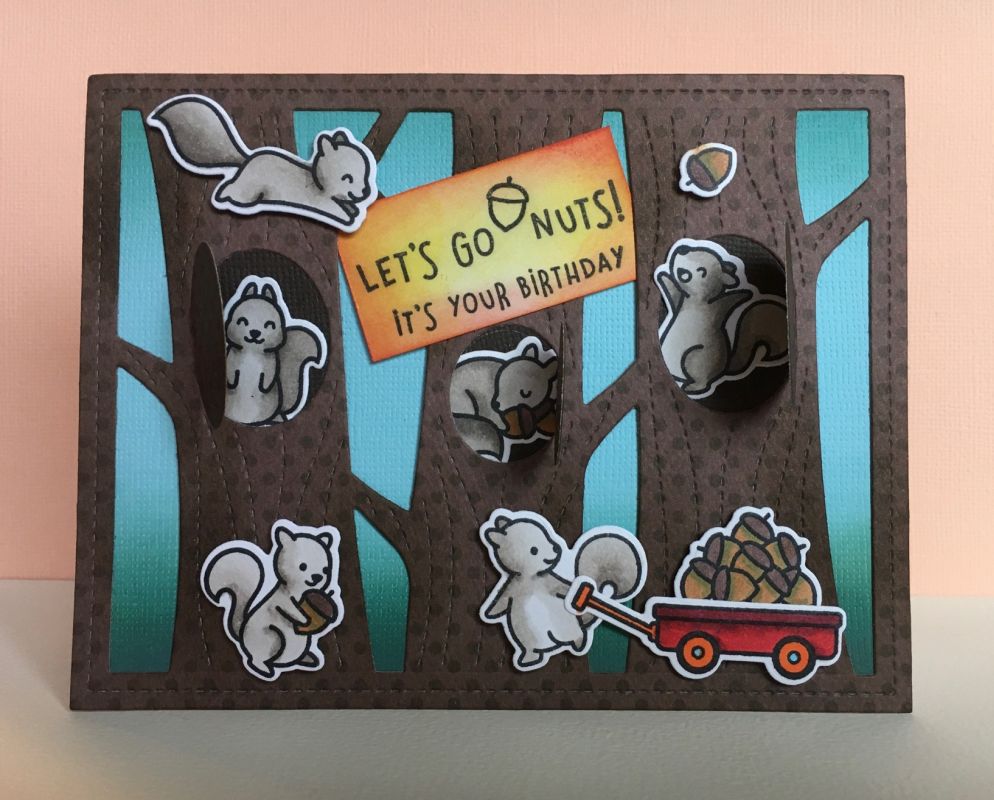
I couldn’t wait to make this birthday card for my son! He turned 22 on Friday, but he still likes cute animals! Plus he will forever be known as “Chipmunk” from his YMCA camp counselor days, so all things squirrely seem appropriate!
The fun thing about this card is the way that by using this die to cut the trees, you can hide surprises behind the flaps (in this case, more squirrels!), to make it interactive.
I used the Lawn Fawn Let’s Go Nuts stamp and die sets and the Lift the Flap Tree Backdrop die.
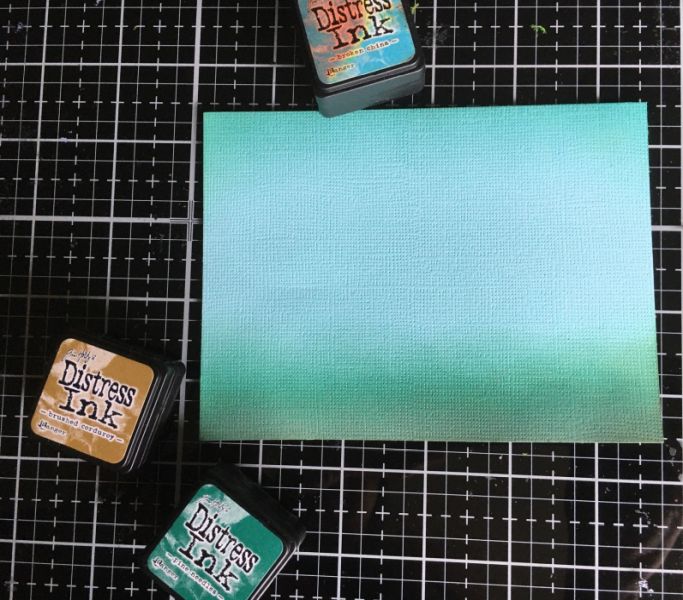
I did some simple ink blending with Distress inks for the background prior to adhering the trees. I used Broken China for the top of the sky and then blended Pine Needles, Brushed Corduroy and Broken China at the bottom. The sentiment is Squeezed Lemonade and Fired Brick.
I blended some Ground Espresso ink on the trees on the backdrop to make some subtle shadows. I colored the squirrels, wagon and acorn with Copic markers and created my scene by adhering everybody in the nooks and crannies and around the trees.
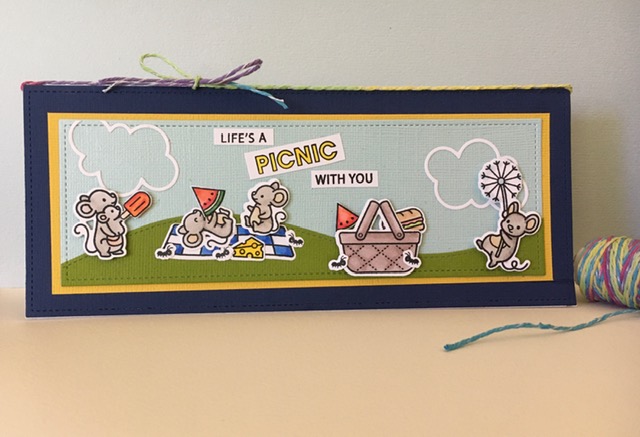
Lawn Fawn “Large Slimline with Sliders,” “Slimline Stitched Hillside Borders,” and “Simple Puffy Cloud Frames”
Twine – Lawn Fawn Trimmings – Unicorn Tail
Cardstock
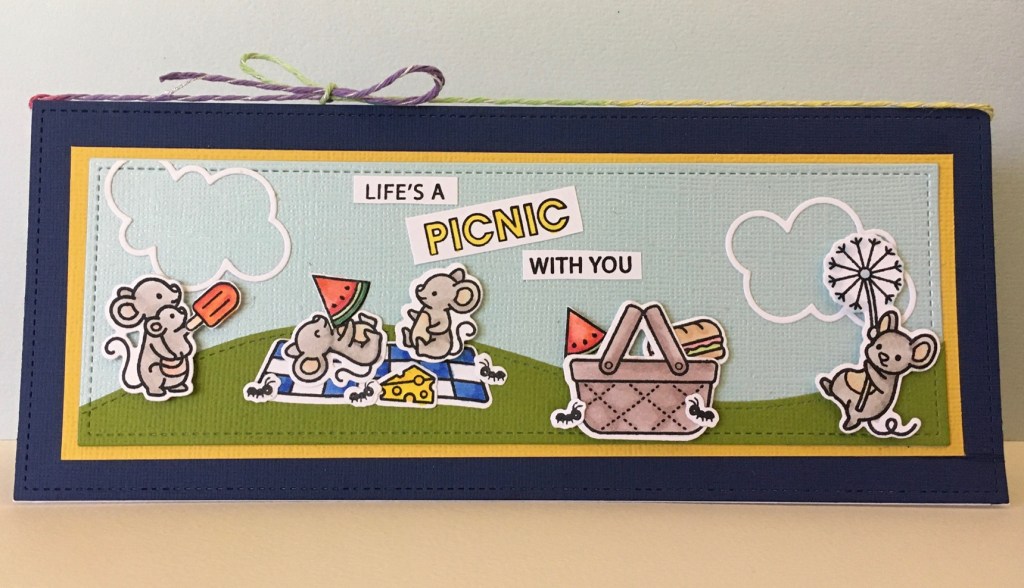
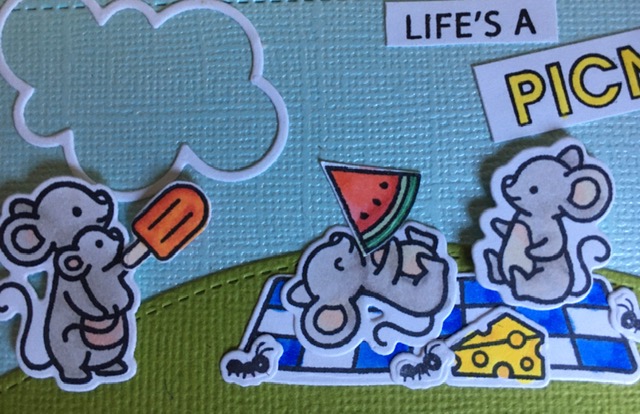
I had some fun with Lawn Fawn products today! All of the mice in their stamp designs are irresistible! I combined two different mouse-centric sets and three additional die sets as I put together this happy summer scene. And with a slimline card, you have lots of room to build! I colored all of the elements with Copic markers. Maybe today is a good day for a picnic, what do you think?