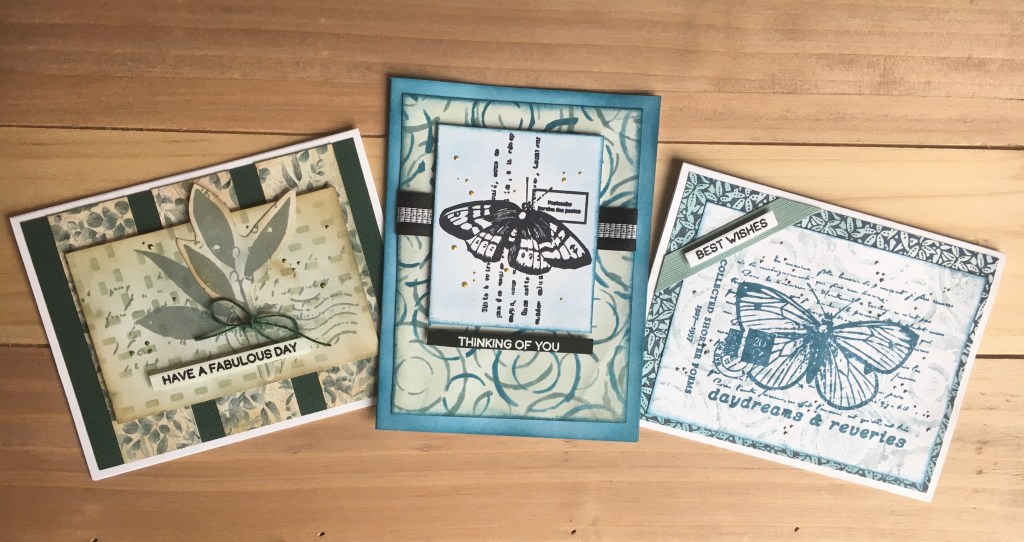
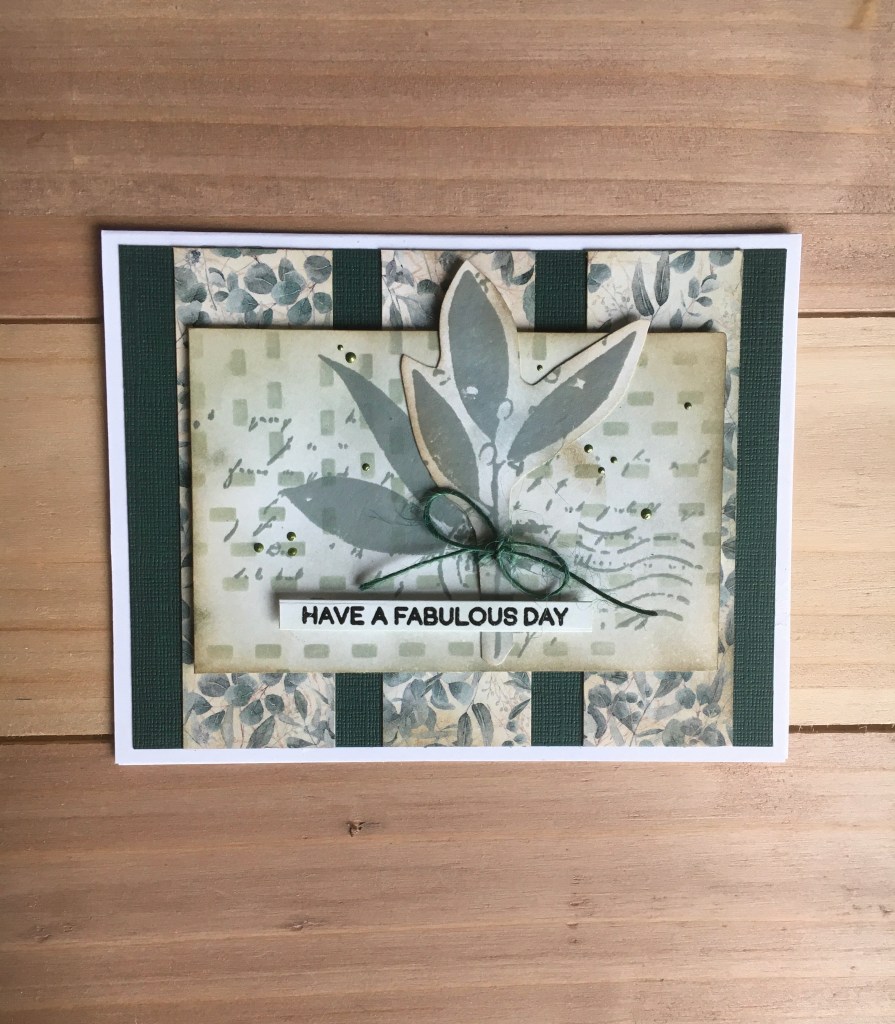
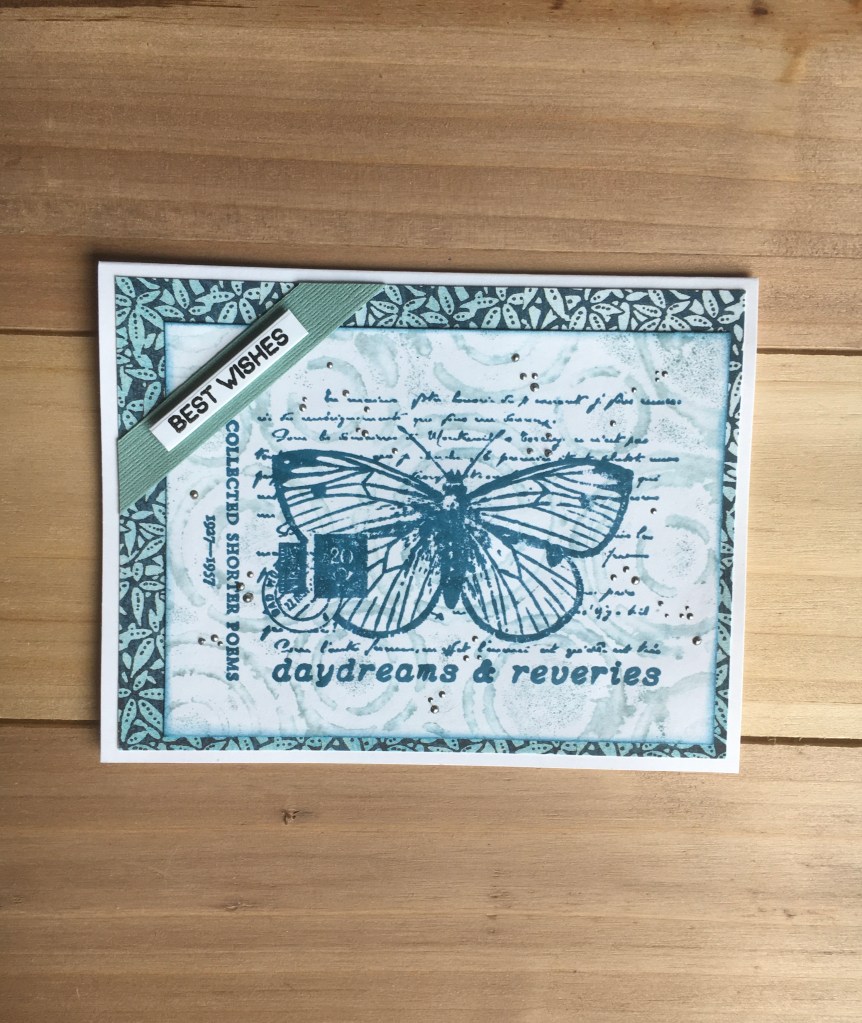
Summer has officially begun and I’m spending more time with my plants and (mostly) friendly bugs! To celebrate the great out-of-doors, I created three cards from some fantastic supplies recently! I’m teaching the particulars during an upcoming class at Runaway Art and Craft Studio. Right now class is scheduled for Tuesday, July 11th and we will add another date if there is lots of interest. I’m sharing a bit about the cards and the supplies I used here.
Supplies:
PaperArtsy stamps: ESN44, ESN62
PaperArtsy stencils: PS203, PS363
Hero Arts stamps and die: Everyday Sentiment Strips (CM673) and Sentiments Strips Fancy Die (DF087)
Patterned papers: Graphic45 P.S. I Love You: Hello Darling and Make a Splash: Ocean Dance
Hero Arts inks (for sentiments): Hero Hues Pigment Inks: Onyx and Unicorn
Liquid Pearls: Fern Green, Gold Pearl and Pewter
I created backgrounds using ink blending and stencils and I stamped the leaf image with Distress ink. Sentiments for all of these cards were stamped with Hero Hues pigment inks and then heat embossed before die cutting them all at once with the sentiment strip die.
The Distress ink colors I used for all cards blended well together. For this card I ink blended the card base to match one of the stenciled colors (Uncharted Mariner) and then very lightly blended the butterfly image with it as well. This image was stamped with Jet Black Archival ink.
I created a more subtle stenciled background this time around with Uncharted Mariner and also stamped the image with the same ink. The Graphic45 papers added nice visual interest to my cards with their sophisticated patterns.
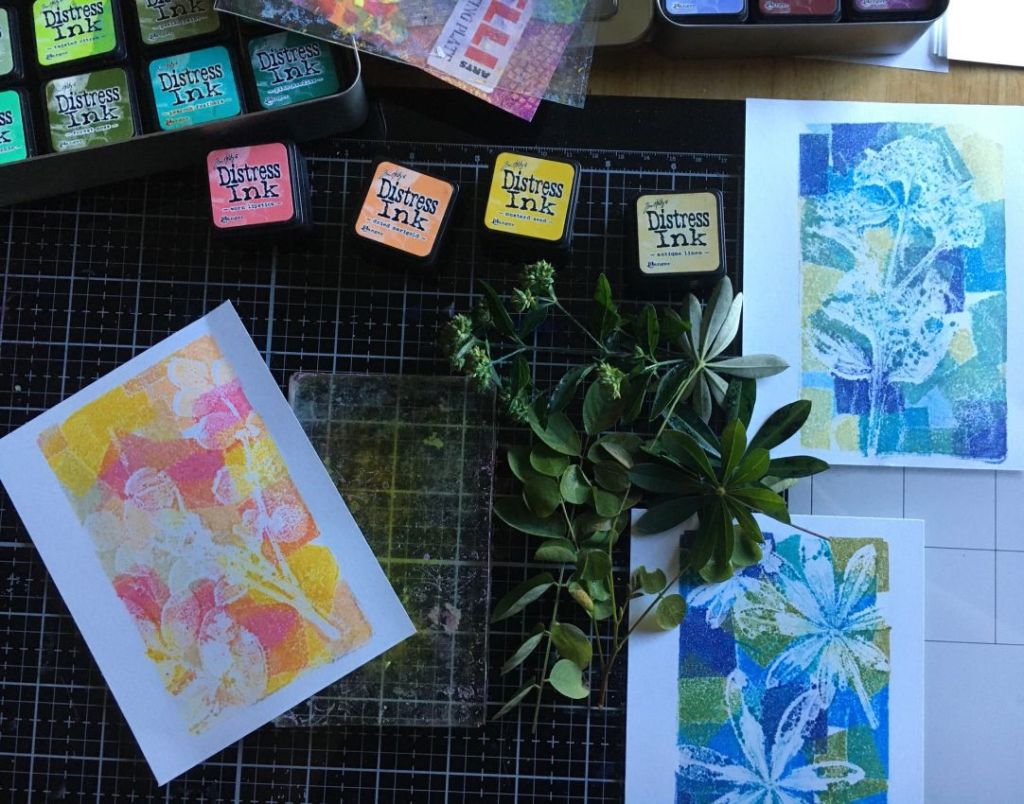
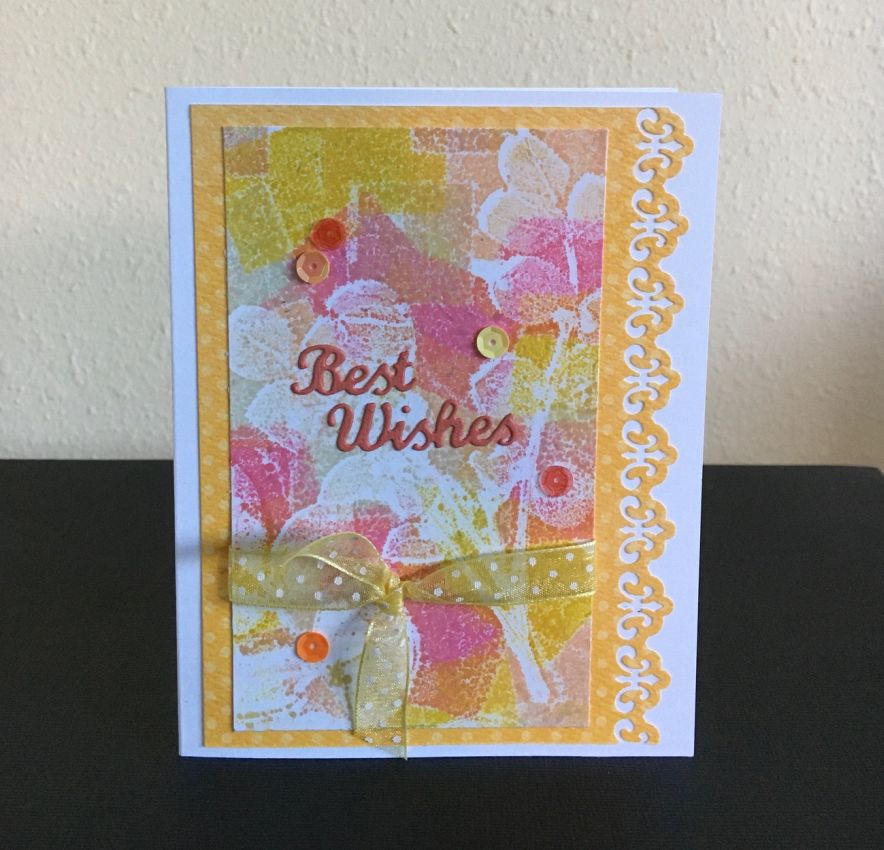
In my constant endeavor to find something positive in this highly unusual (okay, CRAZY!) year, at least we have a day dedicated to making cards! Right? So I spent today making a few gel plate prints and then I made three cards with some of them. Here’s what I did.
Above you can see the prints I made, using leaves from plants growing in my yard. Nothing exotic, to be sure! The difference in this gel printing experiment is that I used mini Distress Ink cubes direct to the gel plate to create kind of a geometric pattern. I didn’t brayer the ink out, but left it for a more distinct pattern.
I then placed the leaves on top of the inked plate and then pressed the paper over. Then I removed the paper and the leaves and replaced the paper, lining the paper onto the plate as it was before. This partially defined the leaves with remaining ink.
Here are the cards I made from the prints seen above.
I used sentiment dies respectively, from Sizzix, Elizabeth Craft Designs, and My Favorite Things. I layered the prints with cardstock and added some sequins. The center card also has ribbon and a border made with an EK Success “Fleur de Lis” border punch. I definitely shopped my stash with these cards!
Thanks for stopping by and Happy World Cardmaking Day!
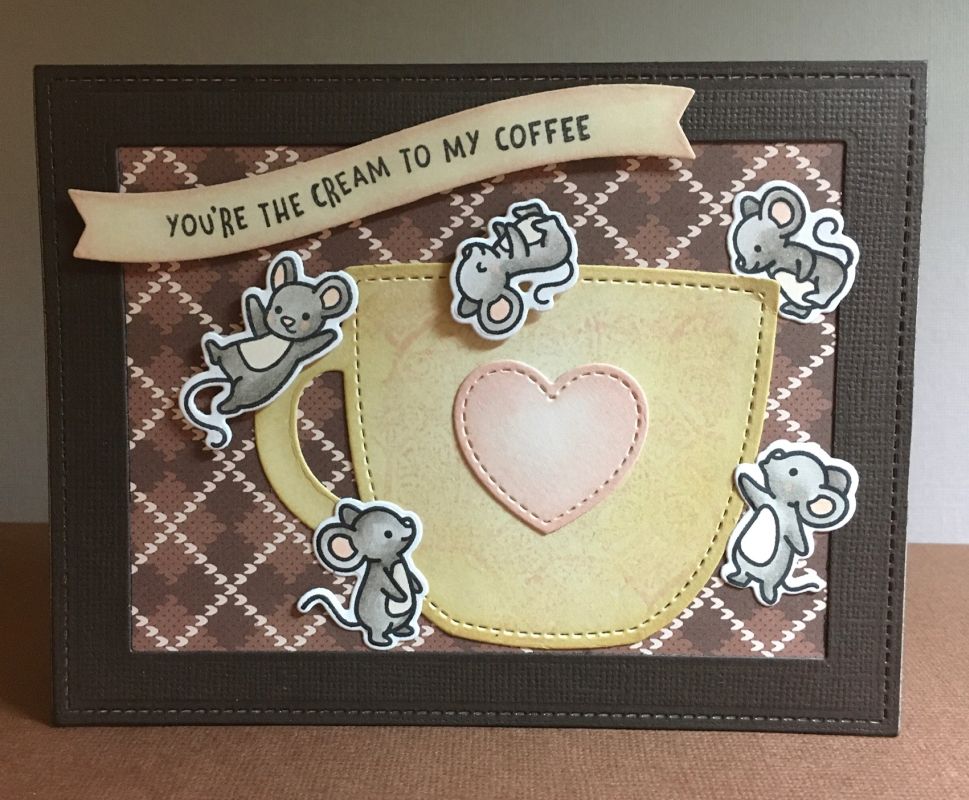
Yesterday was National Coffee Day, but I wasn’t quick enough to post the card I made to celebrate coffee. It was fun to make a little scene with multiple stamp sets, and of course, to include lots of critters. I pulled mice from three different sets (and there are more!).
Here’s what I used:
– Lawn Fawn stamp sets: Dandy Day, Thanks A Latte, Crazy Antics and Really High Five
– Lawn Fawn die sets: Outside In Stitched Mug, Large Stitched Rectangle Stackables, Simple Wavy Banners, Dandy Day, Crazy Antics and Really High Five
– Stampers Anonymous Tim Holtz Collection stamp set – Fragments
– Distress Inks: Antique Linen, Scattered Straw and Tattered Rose
– Copic Markers
– Lawn Fawn Patterned Paper
– Cardstock
I colored each mouse with Copic markers and used Distress Inks to color the mug and sentiment background. I lightly inked the Tim Holtz stamp and spritzed it with water to stamp a light pattern onto the mug (see below).
I had lots of fun with this and I appreciate your stopping by to take a look.
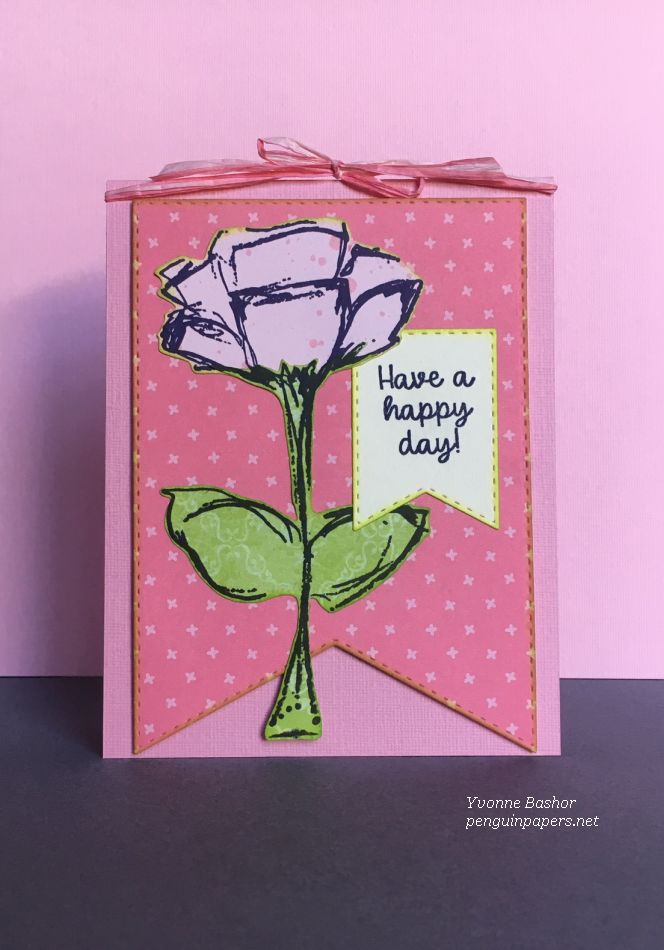
Lawn Fawn “Spiffy Speckles – Strawberry Frosting” and “Spring Fling-Debbie”
BoBunny “Serendipity”
Dies – Art Impressions “Banner Double Stitched Dies
Cardstock – Bazzill
Raffia – May Arts
Inks –
Versafine Clair – Twilight
Ranger – Tim Holtz Distress – Twisted Citron
This was a fun card to make. I am a huge fan of Dina Wakley and her lovely floral stamps. I designed this card for a recent class I taught at Runaway Art and Craft Studio in Salem. I hadn’t done any paper piecing in a long time, but it worked quite well with this stamp. I stamped the flower onto the patterned papers in black ink and fussy-cut the flower from the pink and the stem and leaves from the green. I edged all of the pieces, including the die-cut banners, in Twisted Citron Distress Ink to bring out the same color as the leaves. Then I layered all of the pieces together and tied a bow around the top of the (top folding) card with pink raffia. Thanks for visiting.
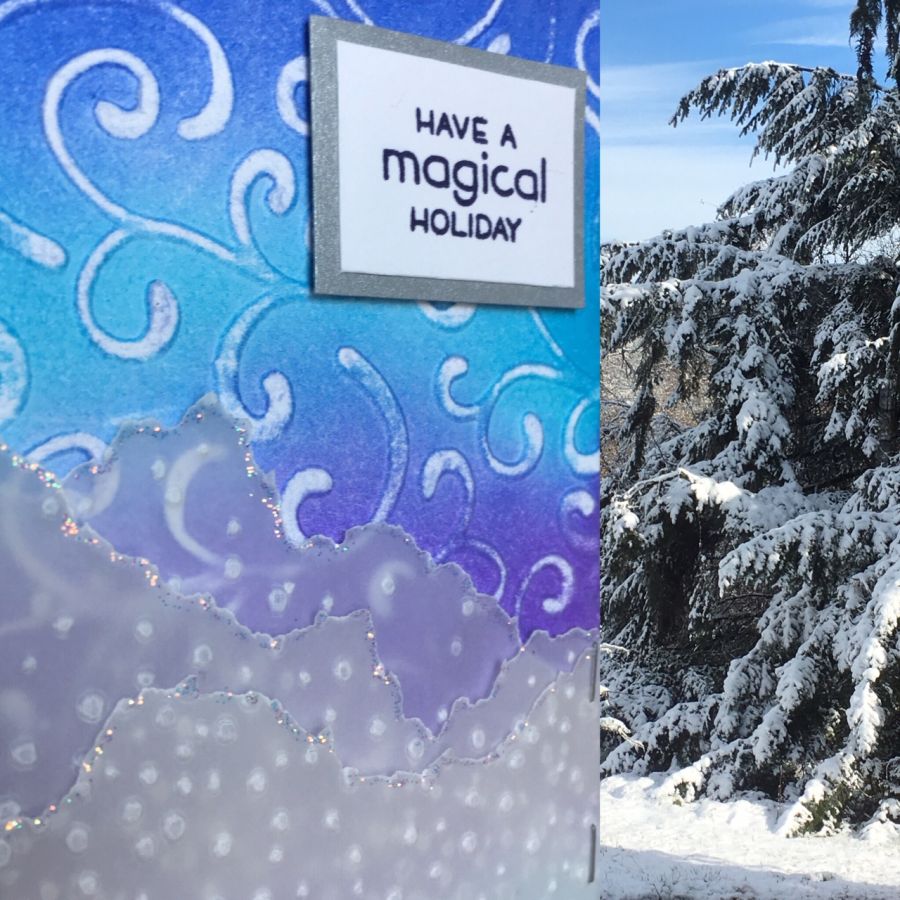
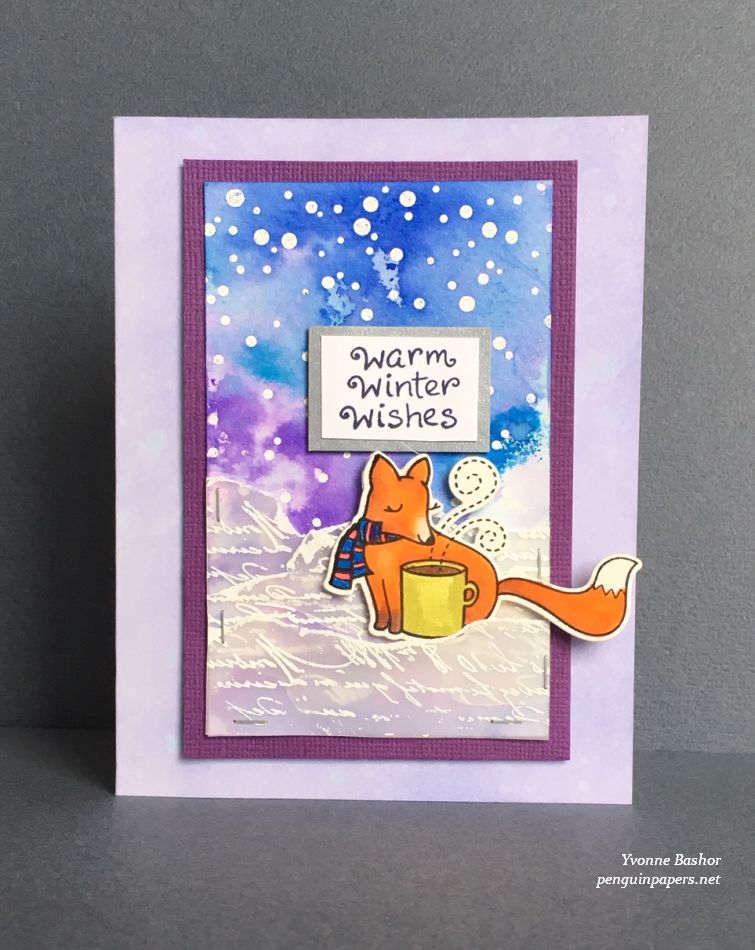
Lawn Fawn – Snow Cool, Say What? Christmas Critters and Winter Fox
Stampers Anonymous/Tim Holtz – Reflections
Embossing folders – Sizzix Snowfall and Swirls
Ranger Stickles – Diamond
Vellum
White embossing powder – Stampendous
Watercolor paper
Cardstock
I was on deck to present the demonstration at our Craft Stamper group last week. We select something from an issue of Craft Stamper magazine and present it to the group and then we all make the project. It just so happened that I selected the masterclass that featured snowy hills from the January 2019 issue. While I was working on my sample cards, it snowed here, in March. This isn’t the first time we’ve had snow in March in Oregon’s Willamette Valley, but we’ve had at least four doses in the past two weeks. That is a little unusual. We are in the midst of one more snow shower today and that may be the end of it for this winter. Crazy!
For the first card I used two different embossing folders. I first applied Distress Inks, blending four colors. I then dry-embossed it with the Swirls embossing folder and then sanded it to expose the swirls. For the snow drifts, I embossed the snow onto vellum with the Snowfall embossing folder. I then tore the vellum into pieces to resemble snowy drifts and layered them together. When I liked the composition, I stapled the vellum onto the background with the Tim Holtz Tiny Attacher and applied Stickles glitter glue to the edges of the vellum. I added a layered sentiment and a layer of silver cardstock and adhered it to a white card base. You can see the sparkle in the photo below.
For the second card (below), I used the Distress Inks like watercolor. I heat-embossed the snow on watercolor paper using the Lawn Fawn Snow Cool stamp set and white embossing powder. Then I applied the Distress Inks to my craft sheet and spritzed the ink with water. By dragging the watercolor paper through the wet ink, drying, and reapplying, I created the colorful and snowy background. The embossing powder resists the “snow” that is heat embossed. I heat embossed the Tim Holtz script stamp on the vellum for this card and tore it to make the drifts again this time. I also applied embossing powder to the torn edges to give the appearance of snow. Again, I attached the vellum to the background with the Tim Holtz Tiny Attacher. To finish off this card, I stamped and colored the Lawn Fawn fox and popped it up onto the scene. I liked having his tail go off the background. I colored the card base by applying Milled Lavender and Shaded Lilac Distress Oxide inks to white cardstock. Finally I layered all of the pieces together and added the sentiment.
Thanks for visiting. I still have some catching up to do with posting here!
This was a fun card to make, partly because of the subject matter (more cute animals!) and also because I pulled out supplies from multiple companies. It is fun to mix it up sometimes. It was way too difficult to resist making a raccoon Valentine for my mom. Many people don’t know this, but she has several friends who are raccoons.
I started by coloring the raccoon image with Copic markers and fussy cutting it. I made the tree stump (slice?) by applying Distress Ink through a stencil and cutting it out, then using it for a backdrop. I assembled the various elements, finishing with the sentiment and tying a ribbon at the top. Thanks for stopping by.
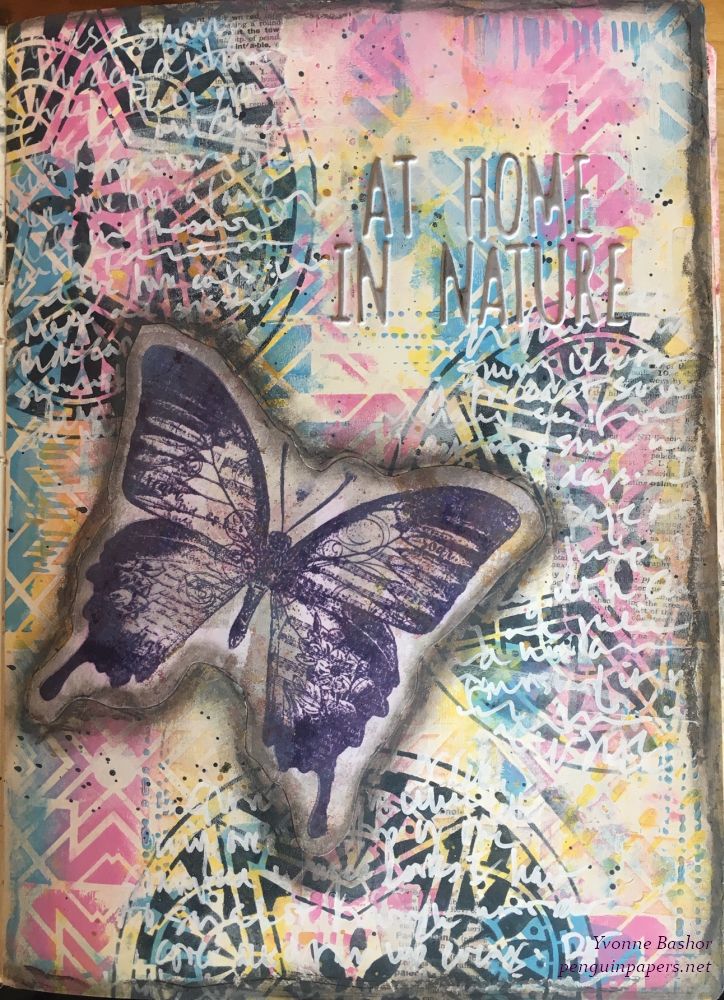
Impression Obsession – Dina Kowal design – Big Butterfly
Stencil – Stencil Girl S610 – Gwen LaFleur design – Boho Star Circle
Posca pen – White
Ranger/Tim Holtz Distress Crayon – Hickory Smoke
Paper Artsy Fresco paints – Bubble Gum, Chalk, Smurf, Zesty Zing, Pea Coat
Ranger Archival Ink / Dina Wakley Media – Night
White foam stickers – American Craft Thickers – Memento White
I created this art journal page as part of Creative Jumpstart 2019. This particular lesson was presented by Tania Ahmed, which I used as a jumping off point. I really enjoyed her approach and highly recommend that anyone interested in mixed media jump into Creative Jumpstart!
My main focal image was a gel print from my stash that I stamped over with the IO butterfly stamp. I so enjoyed Tania’s lesson and all of the layering involved. Thanks for visiting today!
Stamps – Stampers Anonymous Tim Holtz Collection: Winter Watercolor and Festive Overlay
Patterned paper – Pebbles – Cozy & Bright Collection – Winter Green
Ranger Distress Ink – Evergreen Bough
Silver Mirror Cardstock – Paper Accents
Cardstock – Neenah
Ribbon
For this card, I started out with a Distress Ink background and then stamped the bird and sentiment on top. The detail of the chickadee stamp is really lovely and I didn’t want to detract from it with a lot of fussy stuff. I did add some glitz by layering the image with some patterned paper and then a layer of silver mirror cardstock. I added the silver ribbon for some visual interest and to repeat the silver again to tie it altogether while still keeping it clean and simple. I was inspired by the current sketch at CAS(E) this Sketch. Thanks for visiting.
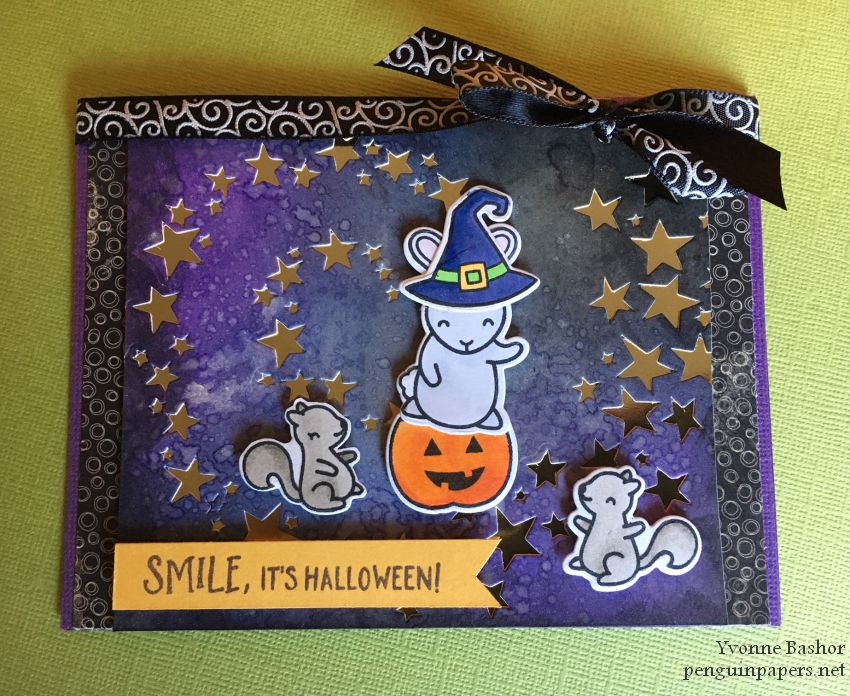
Today I’ve got a two-fer! I’ve made two Halloween cards with Lawn Fawn products featuring a number of cute creatures!
Stamps – Lawn Fawn – Spooktacular
Dies –
Lawn Fawn – Spooktacular, Stitched Windy Backdrop, Stitched Hillside Borders, Spooky Fence Border, and Trick or Treat Border
My Favorite Things – Inside & Out Stitched Rounded Square
Cardstock – Bazzill and Lawn Fawn Sparkle Cardstock (Autumn)
Sequins – Doodlebug Designs
I created a spooky scene with some cute stamped images and a lot of dies! I colored the creatures with Copic markers. I cut the spooky fence from Lawn Fawn sparkle cardstock (Autumn collection). It provided nice contrast among the matte black cardstock layers. The sequins provided a bit more sparkle to spice up the card.
Stamps – Lawn Fawn – Pick of the Patch, Spooktacular and Some Bunny
Dies –
Lawn Fawn – Pick of the Patch, Spooktacular and Some Bunny
Tim Holtz/Sizzix – Swirling Stars
Ranger Distress Oxide inks -Seedless Preserves, Black Soot and Peeled Paint
Patterned paper – Authentique Nightfall Five
Cardstock – Paper Arts gold metallic mirror paper and Bazzill
Ribbon – Offray
I began this card by making a Ranger Distress Oxide ink background and then die-cut it so that the shiny gold below peeks through the star openings. I colored the bunny, pumpkin and squirrels with Copic markers. I created this card with a bunny witch for a swap. The recipient is a fan of rabbits, so I wanted to be sure to incorporate one into the scene. It is always fun to combine several sets to build the perfect scene and I did that for both of these cards.
I created the background with several Distress Oxide inks and then stamped the Inkadinkado image in black onto it. I layered the patterned paper and the stamped image onto the card base. I cut the Trick or Treat sentiment from a piece of printed cardstock. I distressed the edges of the image and sentiment just by running scissors over the edge of the paper until it got a bit ragged. I adhered the stickers that really look like candy along the right hand side of the card (it must have flown out of the trick or treat bags!).