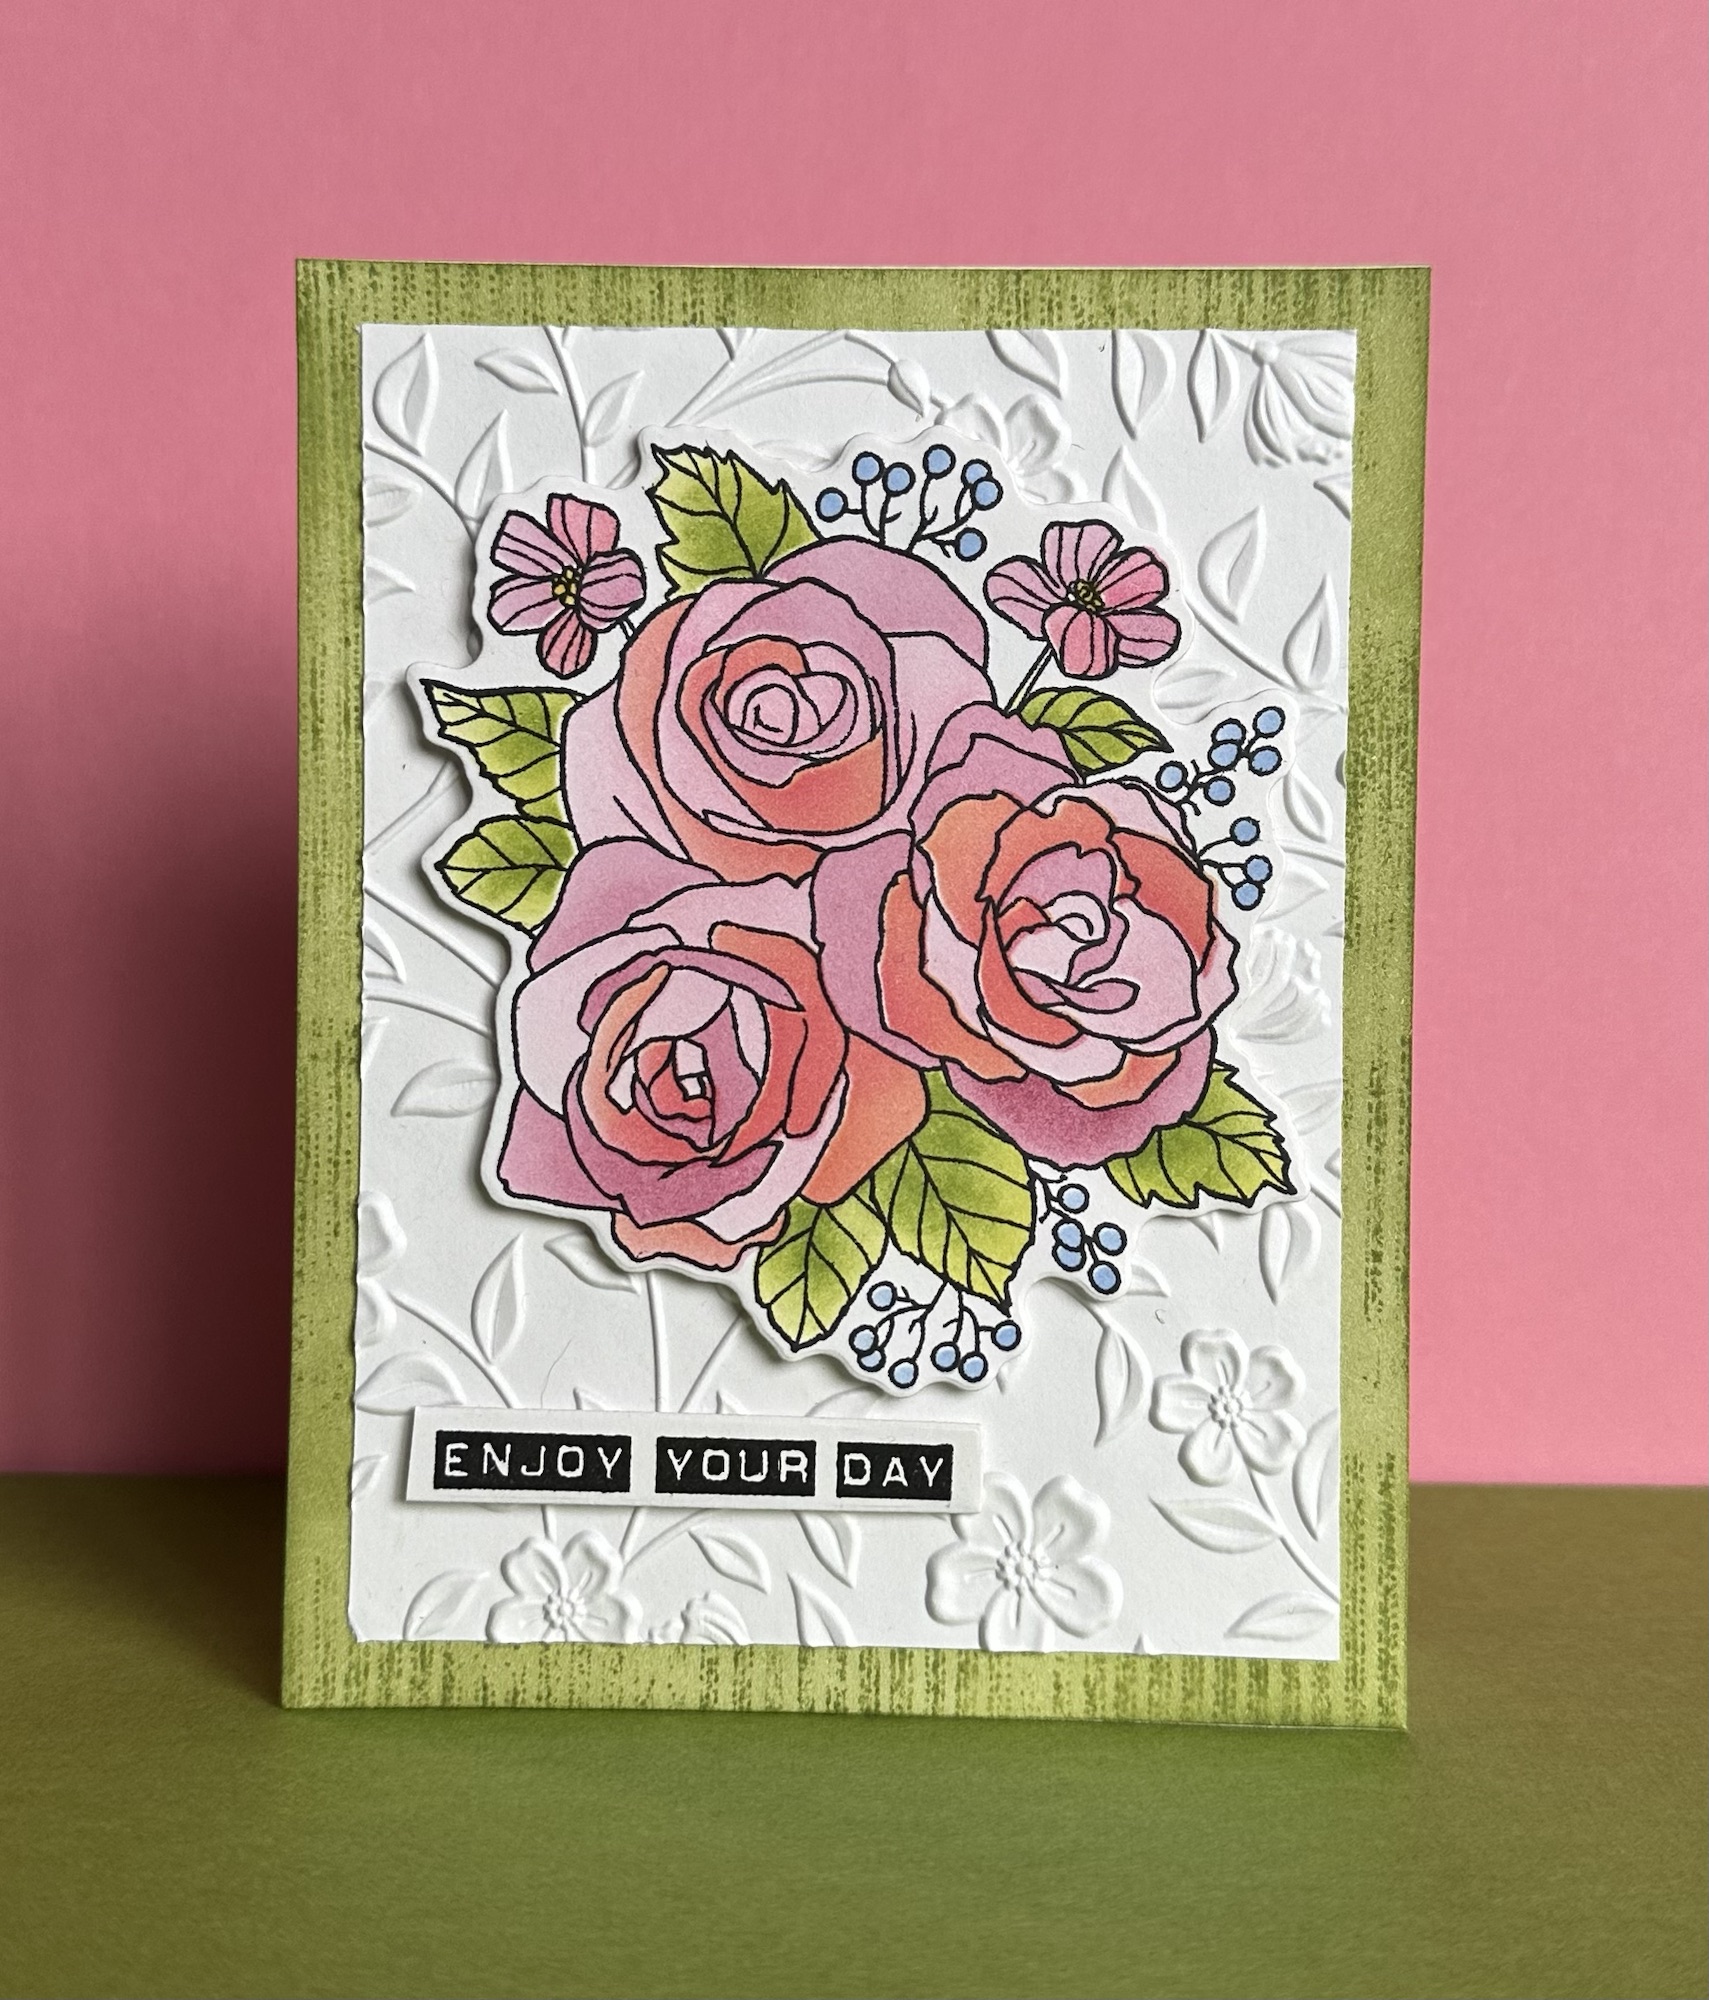
I was so happy to get these new supplies for the new year! Wendy Vecchi has joined forces with Spellbinders Paper Arts and designed a beautiful release! I’ve used some of the items from her new release to create this clean and simple card. First, here are the supplies I used:
Stamps and Dies – Spellbinders Garden Party
Stencils – Spellbinders Layered Garden Party
3-D Embossing Folder – Spellbinders Flowers and Foliage
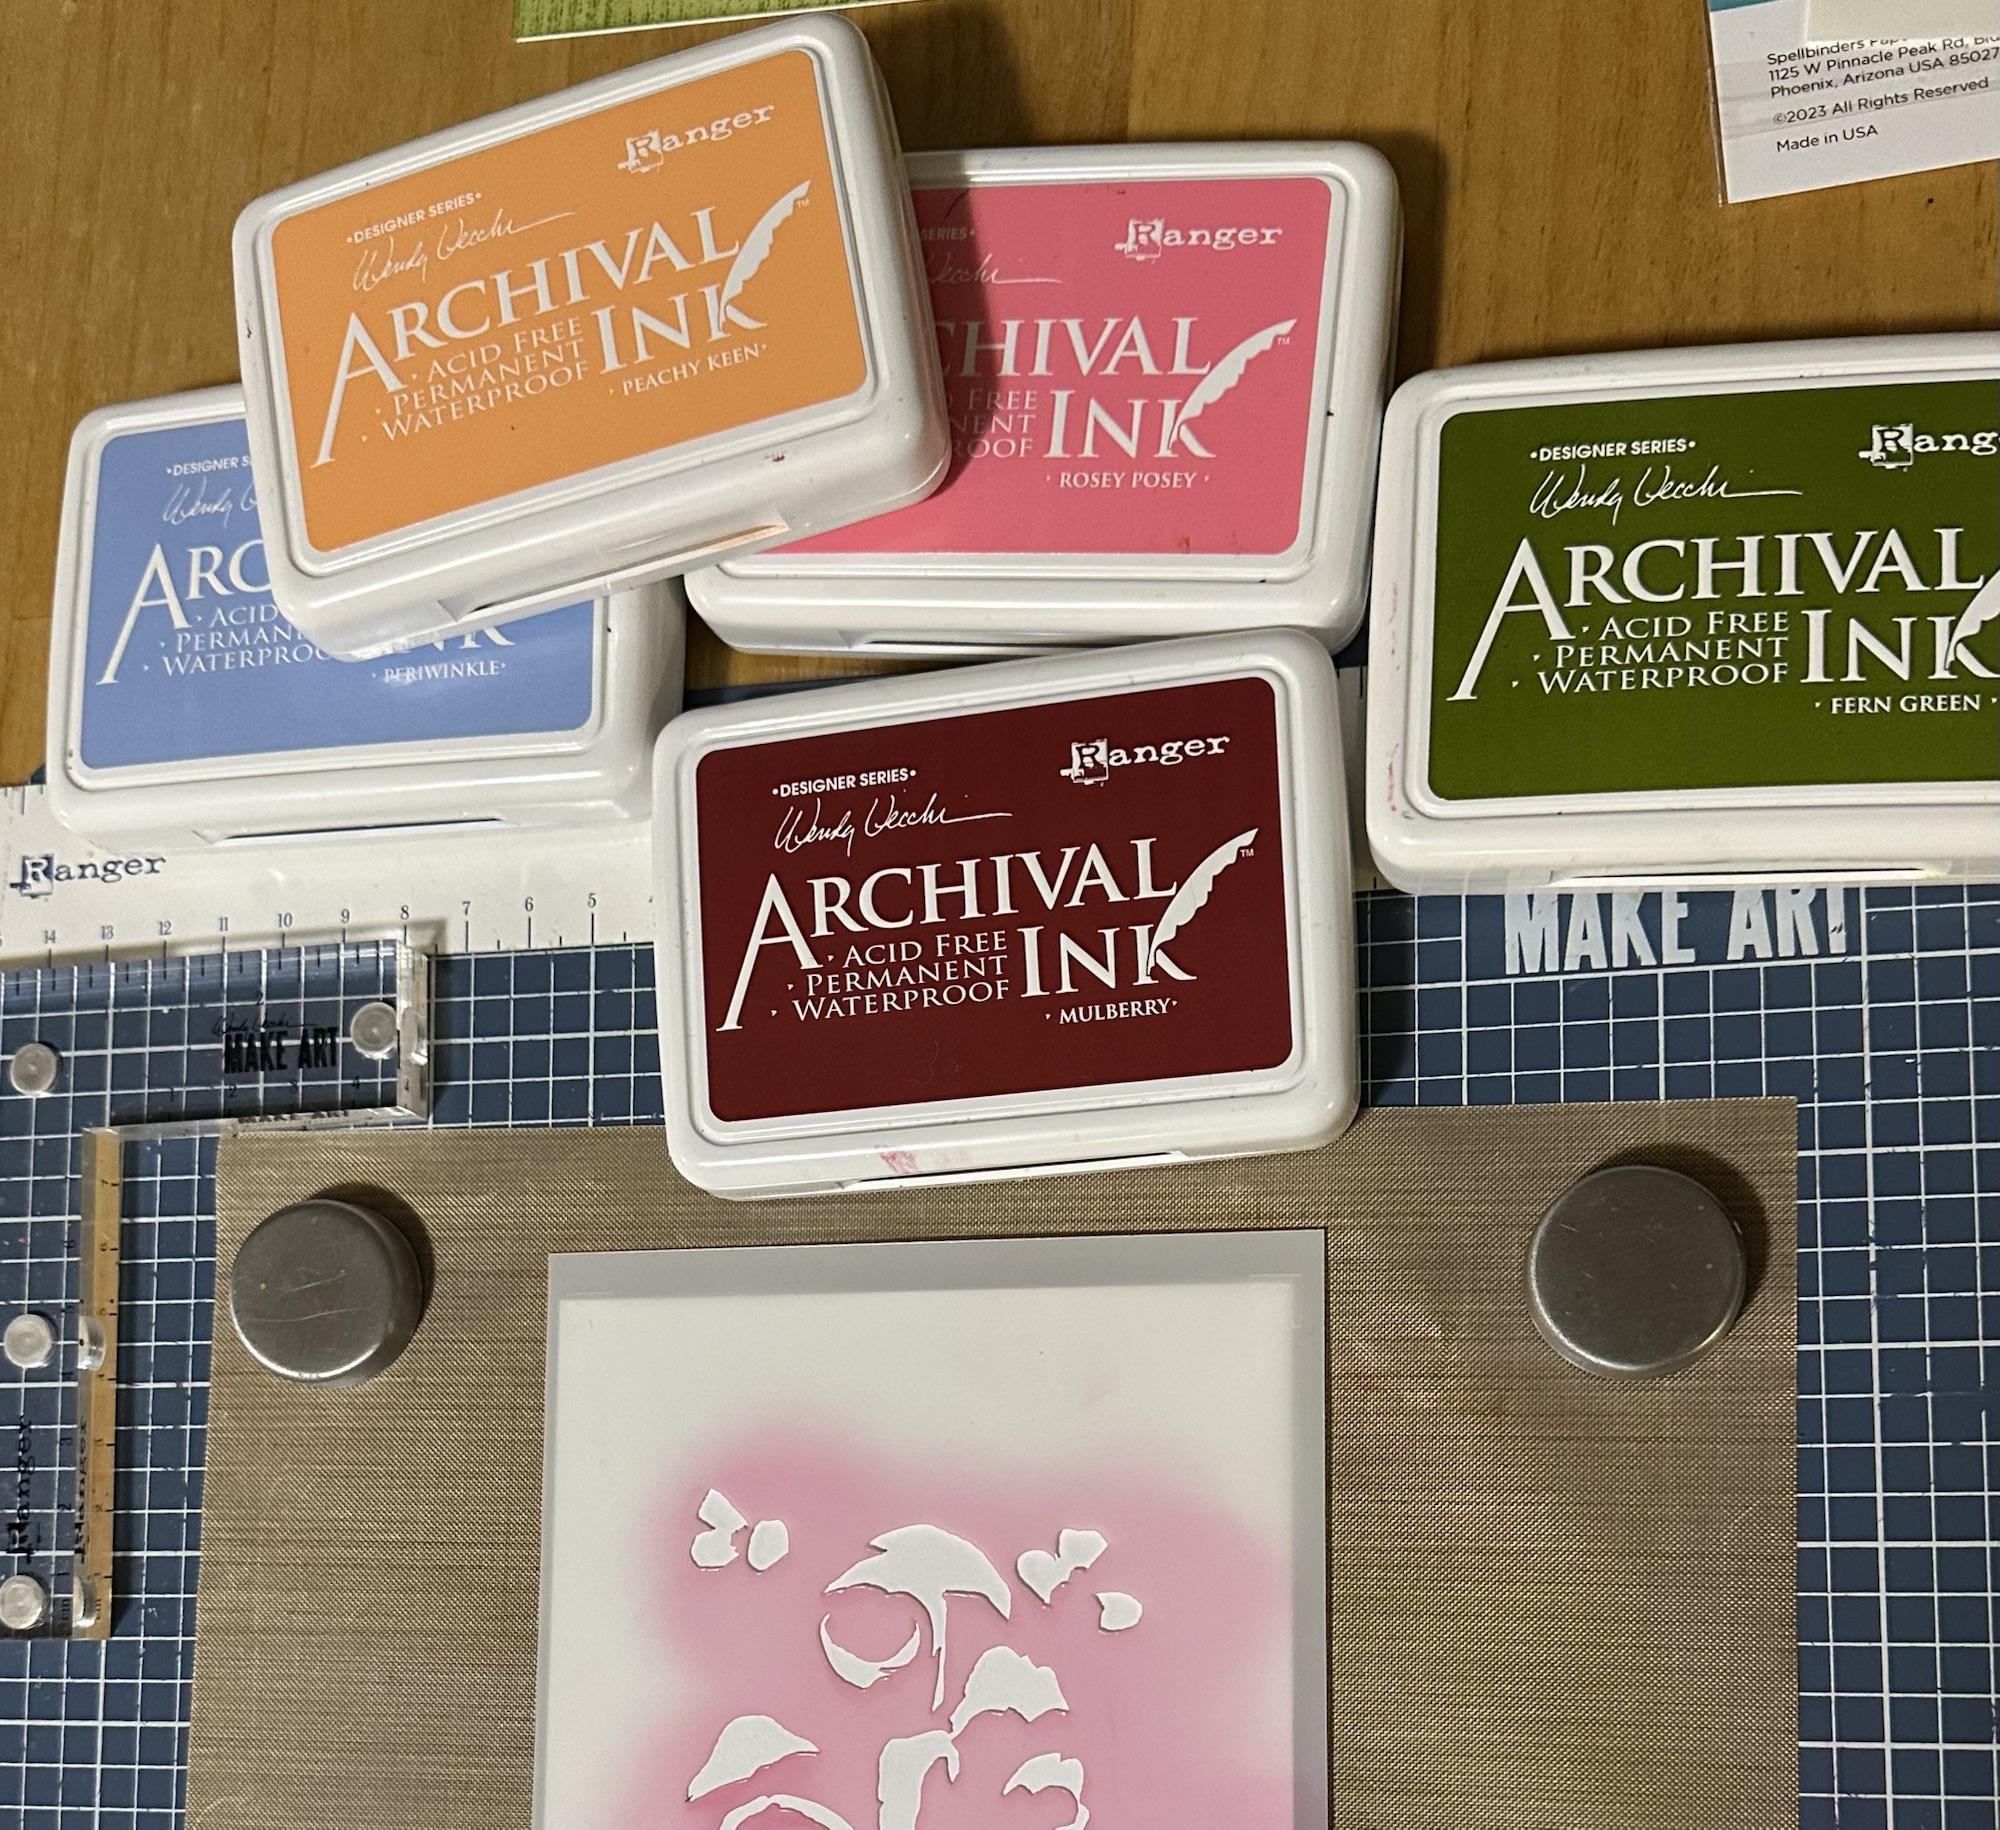
I began by stamping the floral image with a black Memento ink pad. I colored the stamped image with Ranger Archival inks using the layering stencil set. There are five stencils altogether in the set, so you can incorporate a lot of detail and many colors! I used blending brushes for laying down large areas of color, but to add some more shading and detail, I used the Detail Blending Tools (it is easiest to see on the leaves). The Archival inks The stencils line up like a dream and are very heavyweight. I used Wendy’s Make Art Staytion and magnets to hold my stencils in place and it worked beautifully as always. I never use layering stencils without it!
Once all of the coloring was done, I cut the image out with the accompanying die. I selected a sentiment from the set and stamped and die cut it as well. I decided to use the 3-D embossing folder from the new release and kept it white to show off the gorgeous image. To add another layer of color though, I created a striped background using Fern Green Archival ink blended onto white cardstock, and then I stamped it with Wendy’s Ticking background stamp from Stampers Anonymous. After I applied ink to the stamp, I spritzed it with a bit of rubbing alcohol to add a little interest and stamped it onto the green inked paper.
To assemble the card, I adhered the striped background to the card base, added the embossed layer on top of that and then I popped up both the image and the sentiment with dimensional foam tape. Very simple and elegant.
There are more die sets in the new Spellbinders release, so I am excited to create some more with those and to use these supplies some more as well.
I have a simple card to share today, using the latest sketch at the My Favorite Things blog. This was a fun card that I made using some supplies that I’ve had for awhile, but never used.
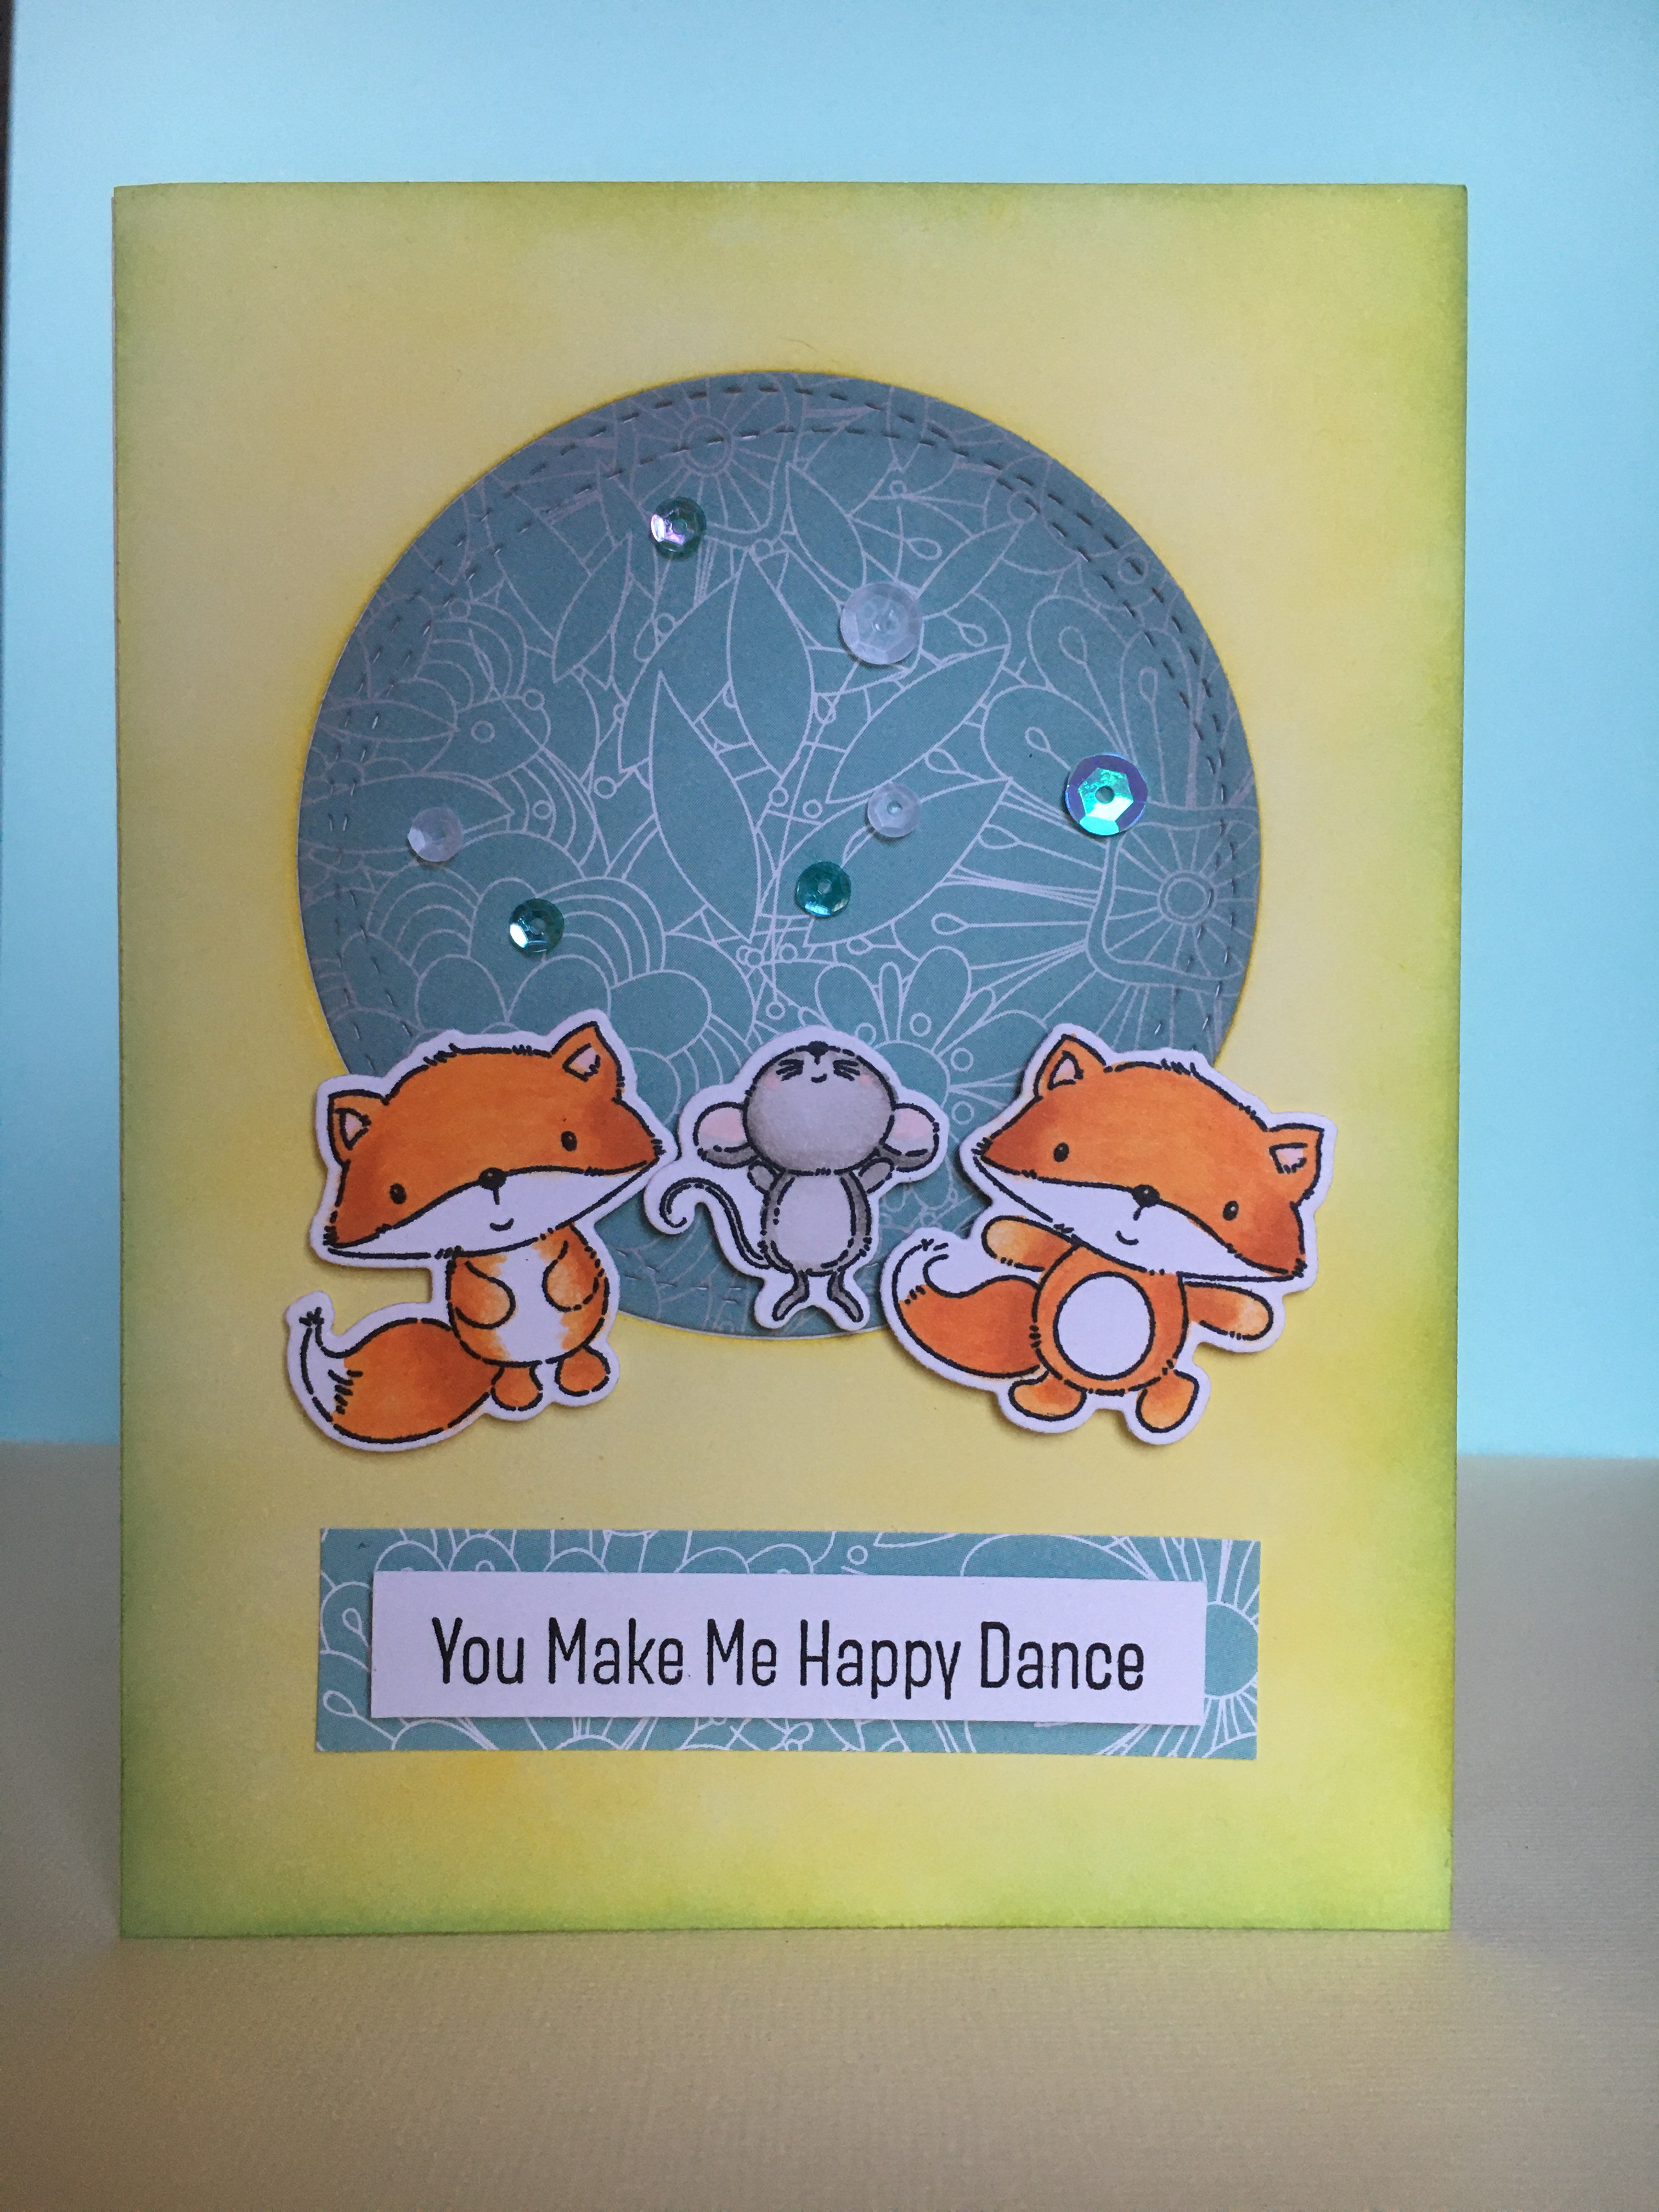
For this card, I did a simple ink blended background using Mustard Seed and Tumbled Glass Distress inks. I cut out the round window from the panel and adhered it to a card base. Then I added a Wonky Stitched Circle die-cut from the patterned paper that I edged with Hickory Smoke Distress Oxide ink. I then colored the critters with Copic markers and popped them up near the bottom of the floral circle. To add a little more interest, I scattered a few sequins at the top of the circle. To finish the card off, I stamped the sentiment on white and layered it onto a strip of the same patterned paper used in the circle. Clean and simple and done!
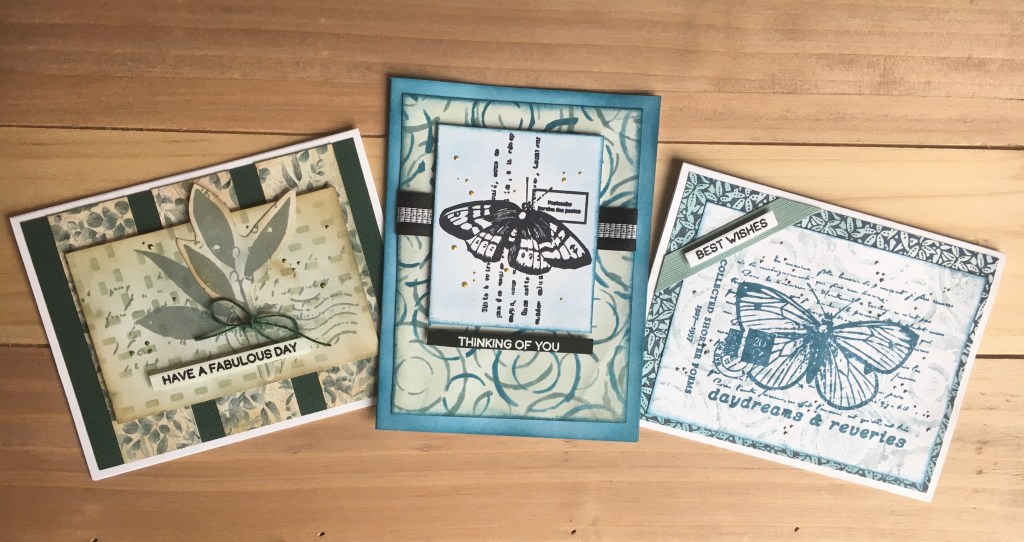
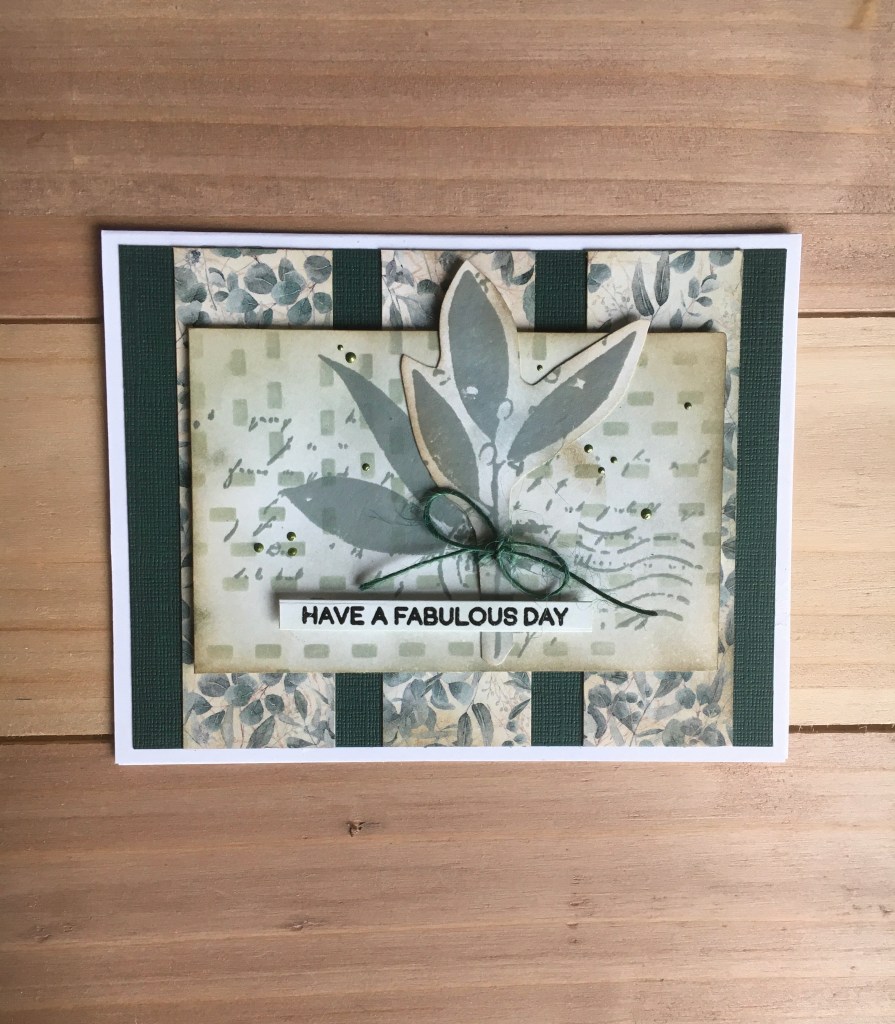
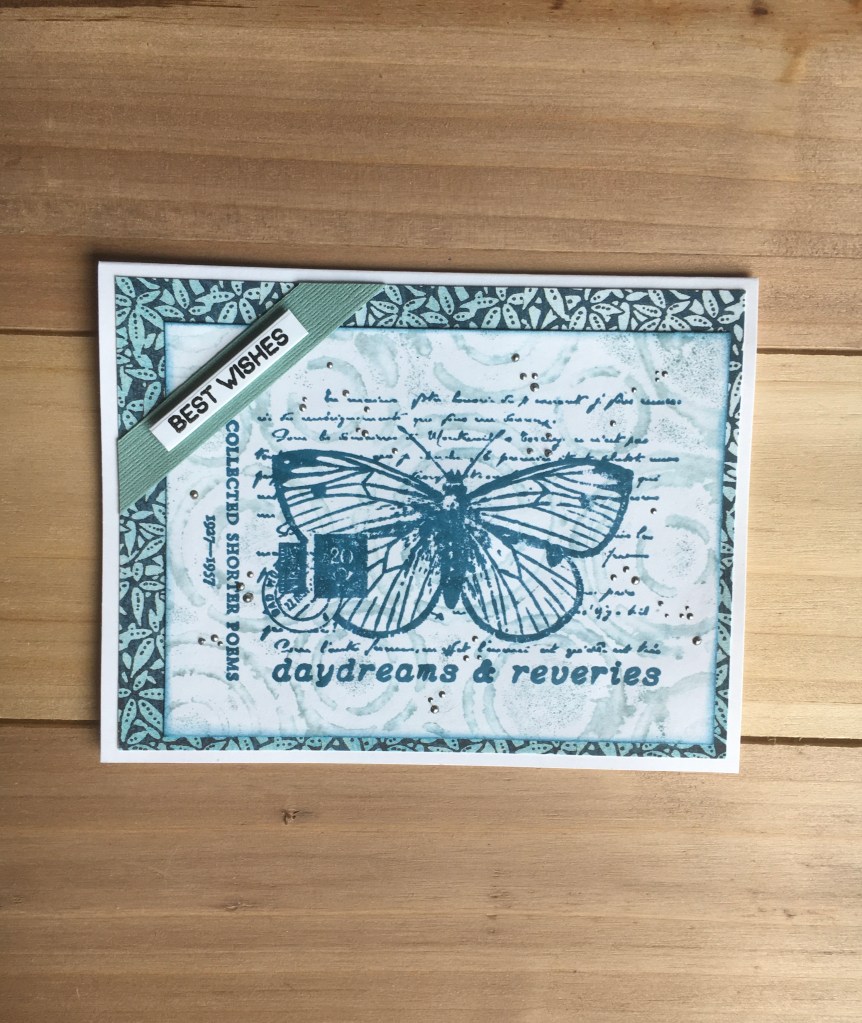
Summer has officially begun and I’m spending more time with my plants and (mostly) friendly bugs! To celebrate the great out-of-doors, I created three cards from some fantastic supplies recently! I’m teaching the particulars during an upcoming class at Runaway Art and Craft Studio. Right now class is scheduled for Tuesday, July 11th and we will add another date if there is lots of interest. I’m sharing a bit about the cards and the supplies I used here.
Supplies:
PaperArtsy stamps: ESN44, ESN62
PaperArtsy stencils: PS203, PS363
Hero Arts stamps and die: Everyday Sentiment Strips (CM673) and Sentiments Strips Fancy Die (DF087)
Patterned papers: Graphic45 P.S. I Love You: Hello Darling and Make a Splash: Ocean Dance
Hero Arts inks (for sentiments): Hero Hues Pigment Inks: Onyx and Unicorn
Liquid Pearls: Fern Green, Gold Pearl and Pewter
I created backgrounds using ink blending and stencils and I stamped the leaf image with Distress ink. Sentiments for all of these cards were stamped with Hero Hues pigment inks and then heat embossed before die cutting them all at once with the sentiment strip die.
The Distress ink colors I used for all cards blended well together. For this card I ink blended the card base to match one of the stenciled colors (Uncharted Mariner) and then very lightly blended the butterfly image with it as well. This image was stamped with Jet Black Archival ink.
I created a more subtle stenciled background this time around with Uncharted Mariner and also stamped the image with the same ink. The Graphic45 papers added nice visual interest to my cards with their sophisticated patterns.
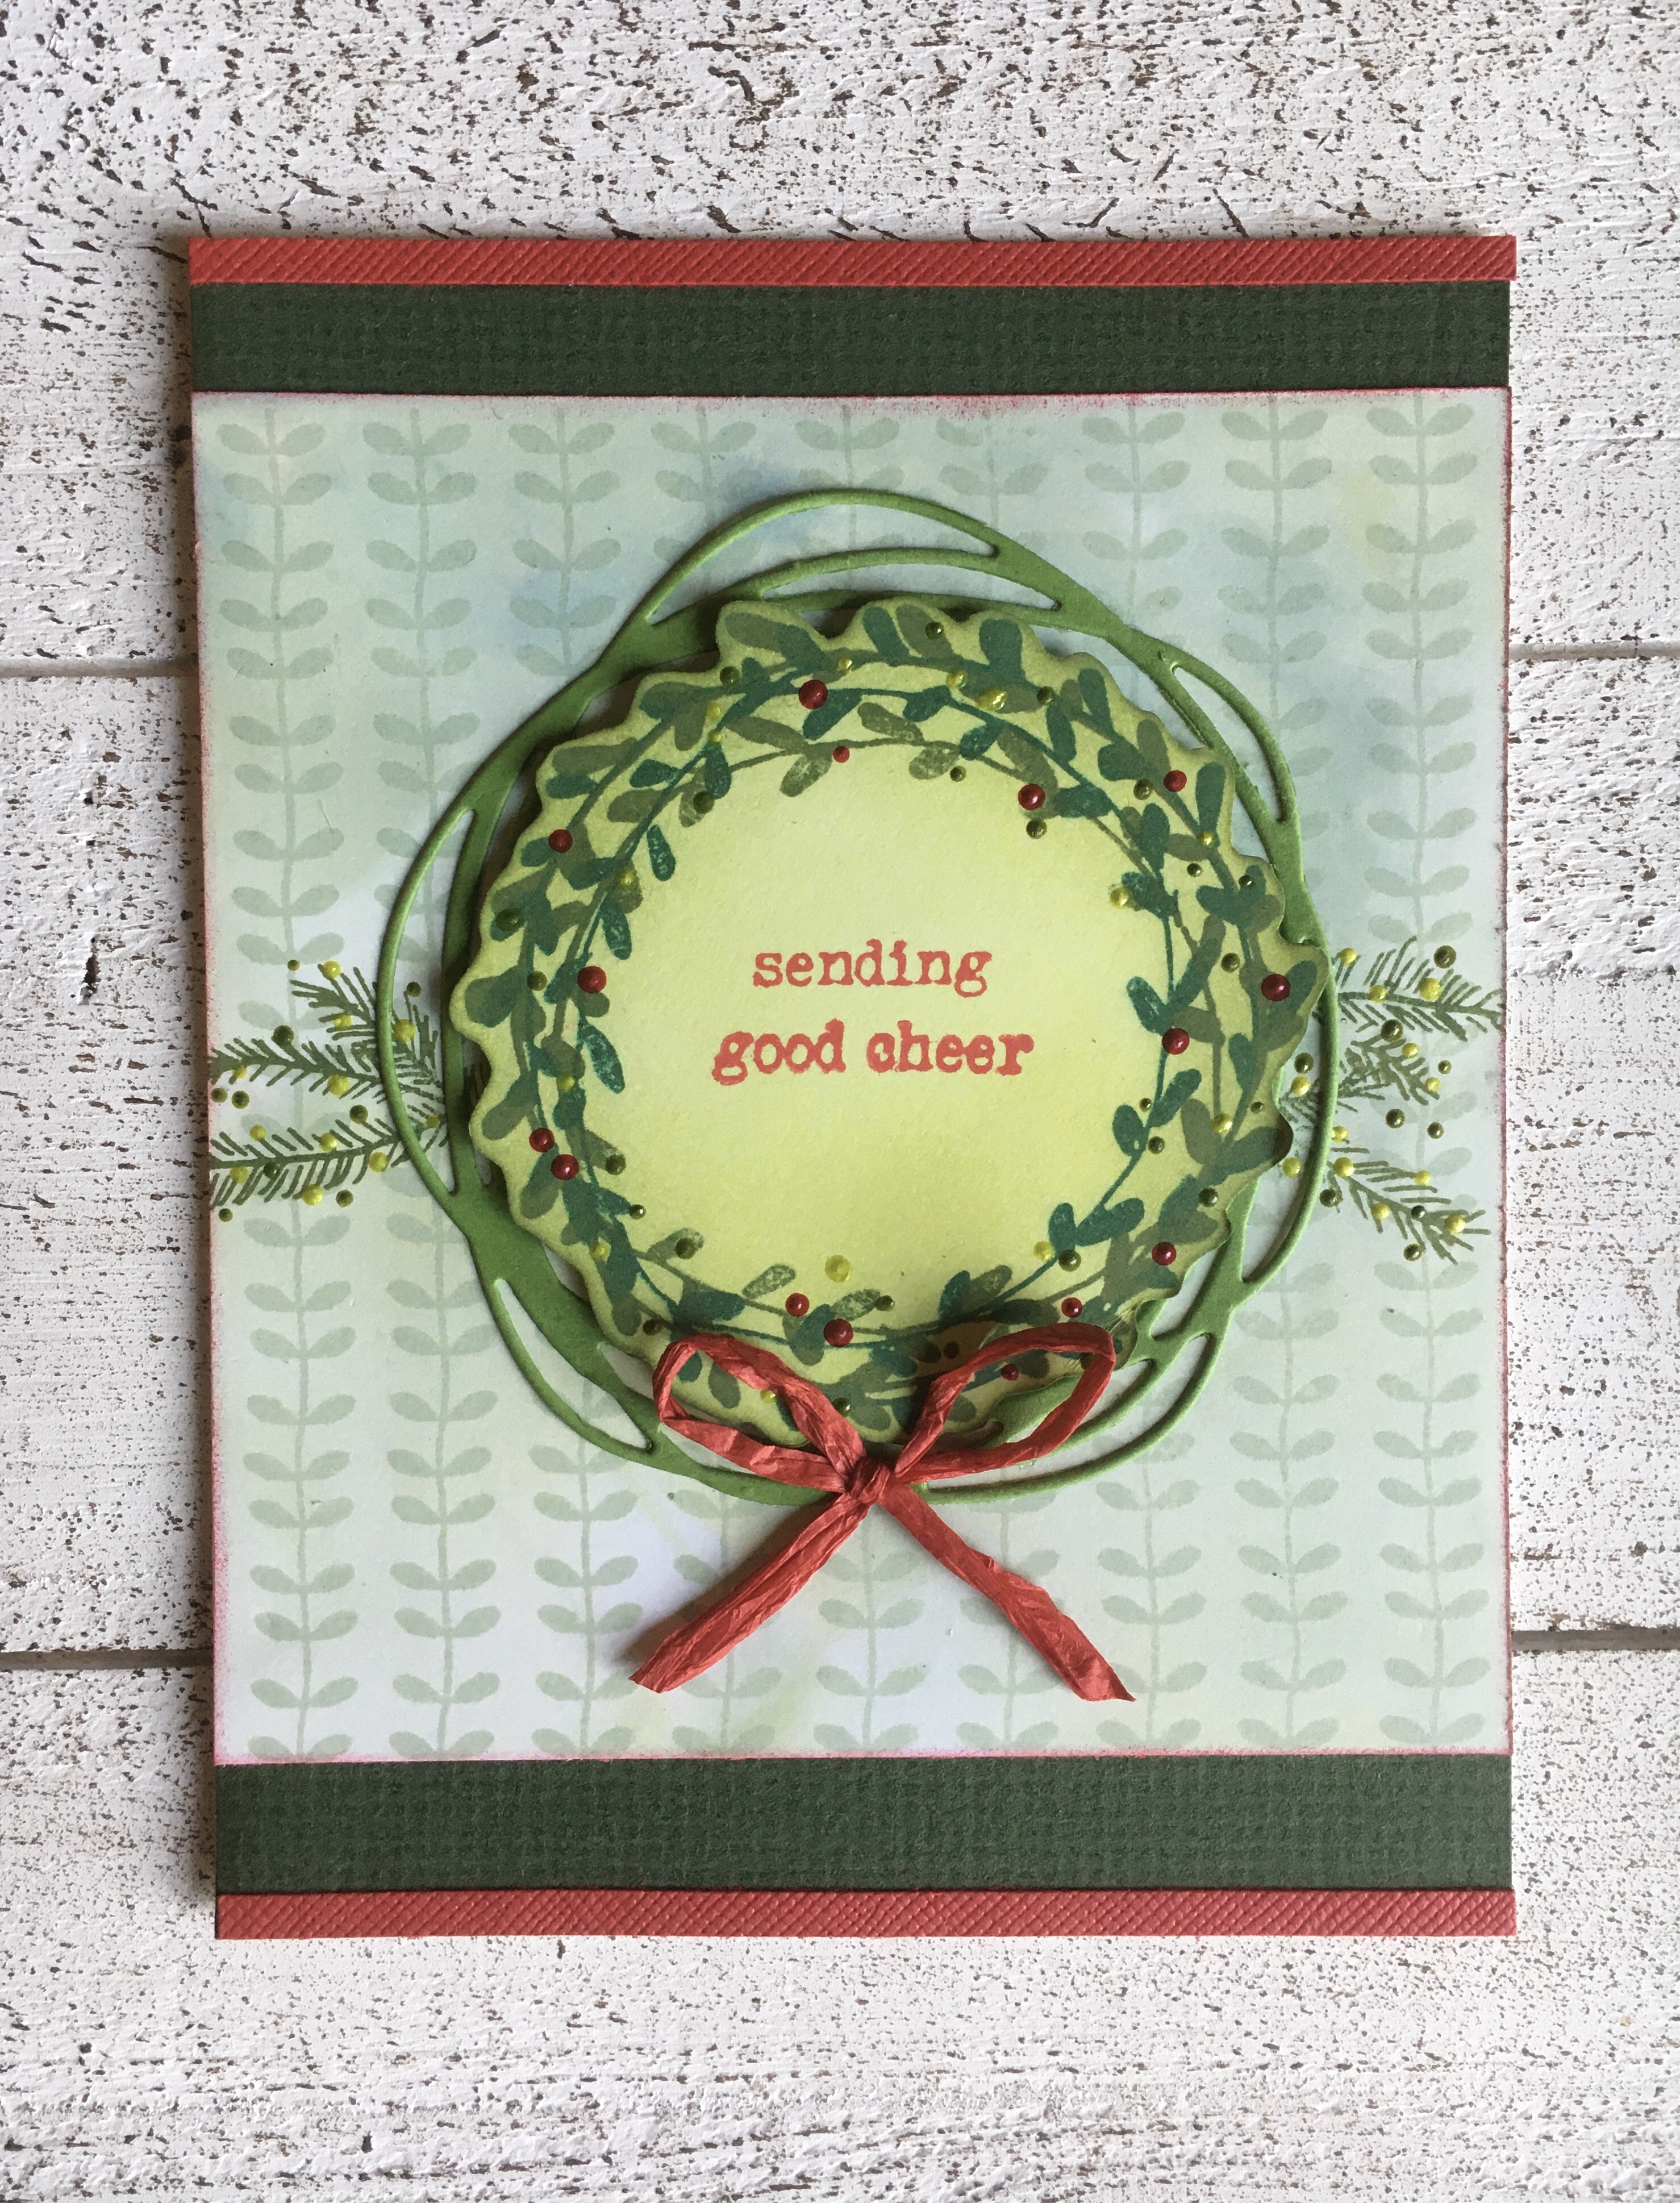
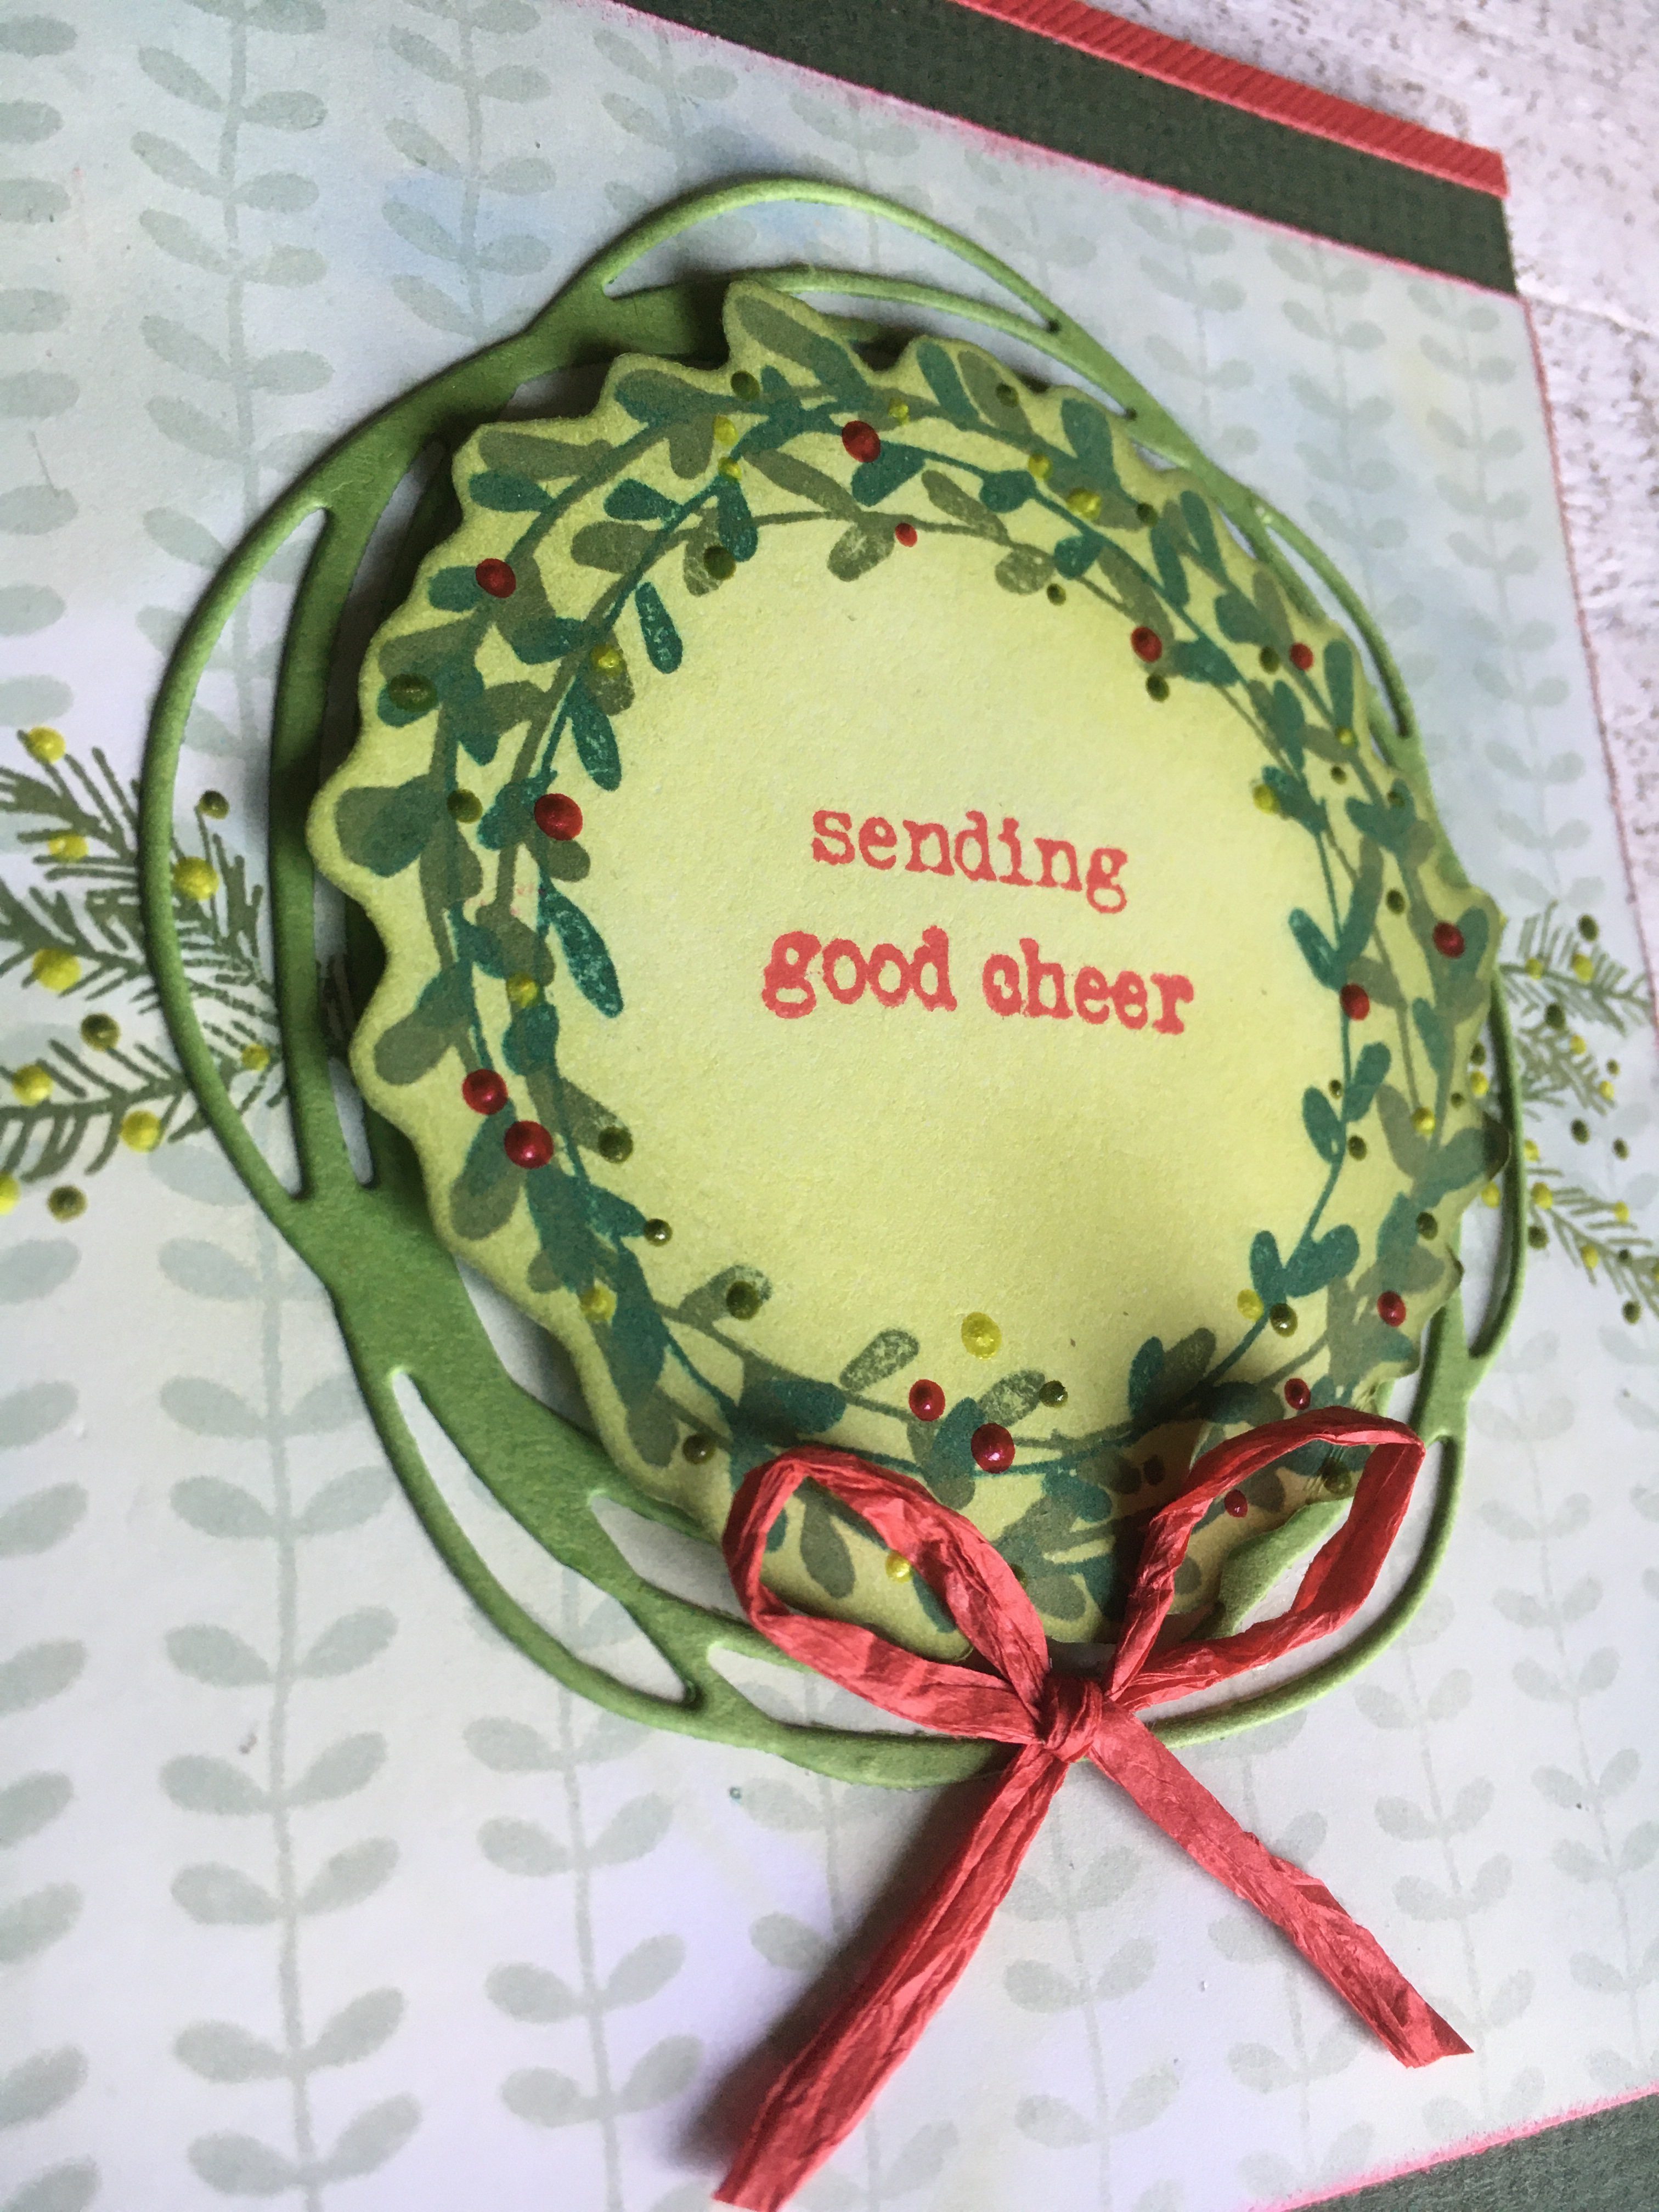
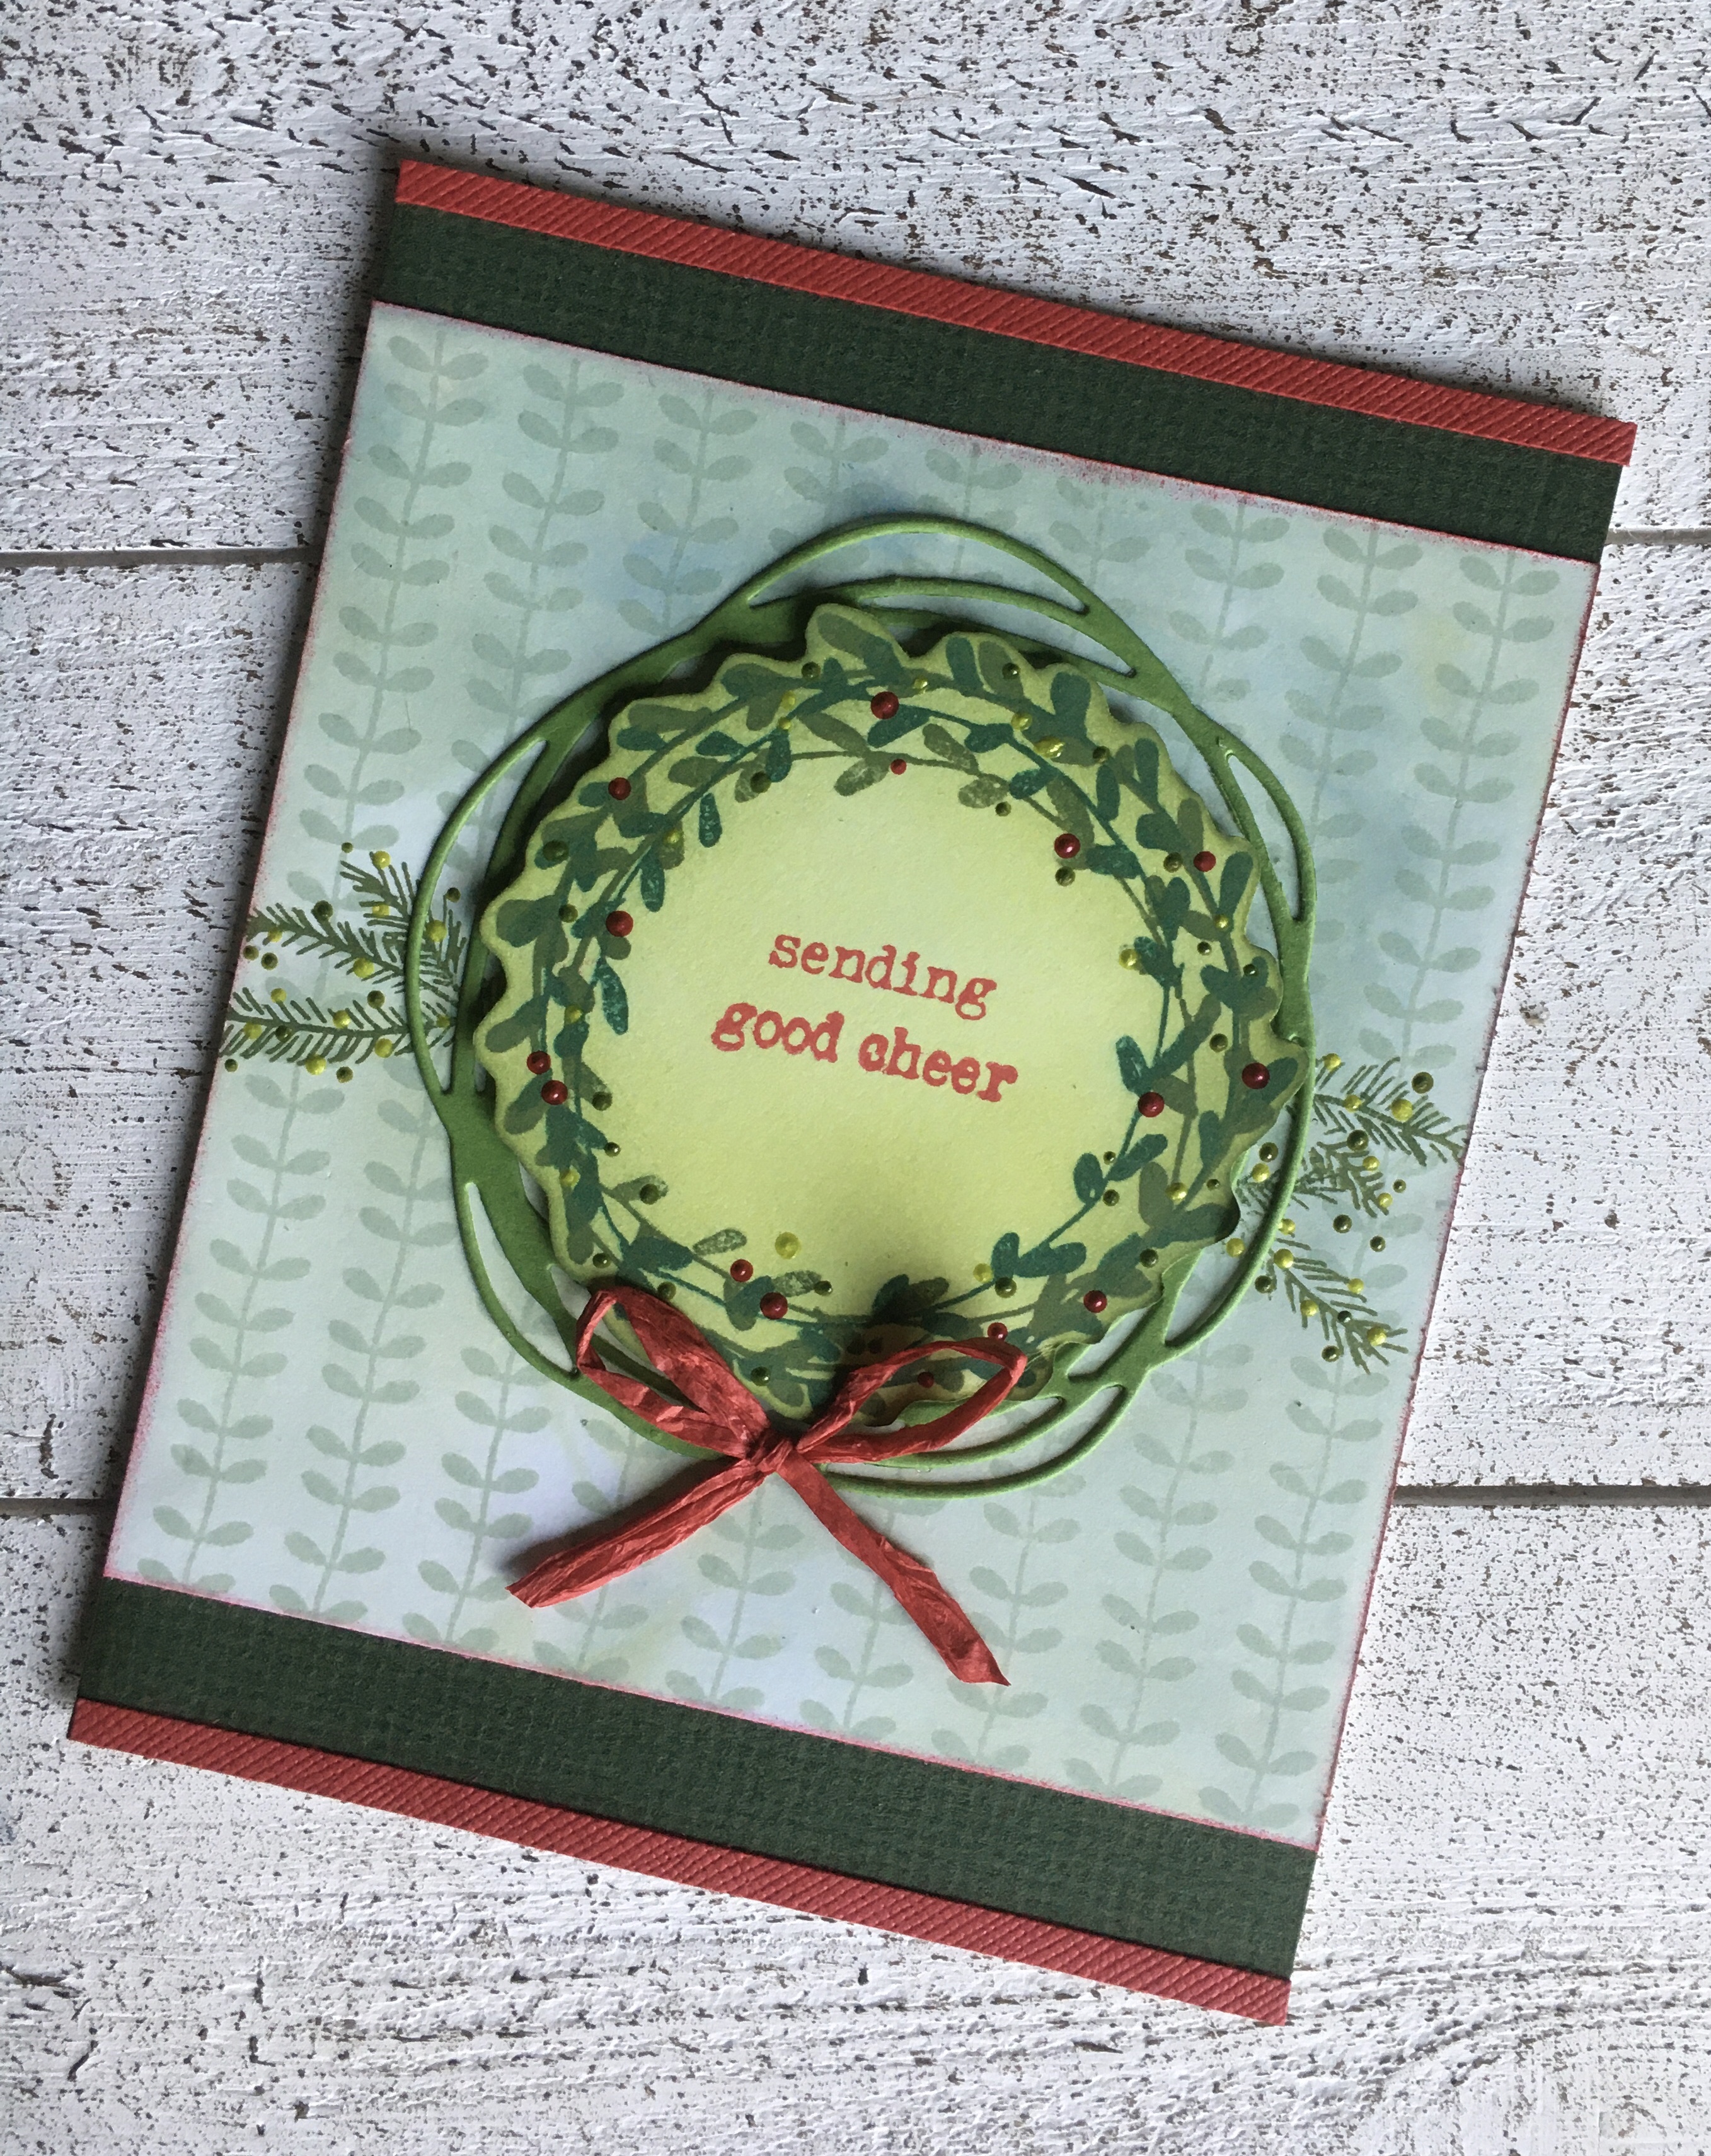
Ranger Ink Wendy Vecchi Make Art – Doodle Christmas (wreath and branches) and Warm Wishes (sentiment)
Stampers Anonymous WVBG016 – Lots of Leaves (background)
Die:
Penny Black 51-731 – Soaring
Inks:
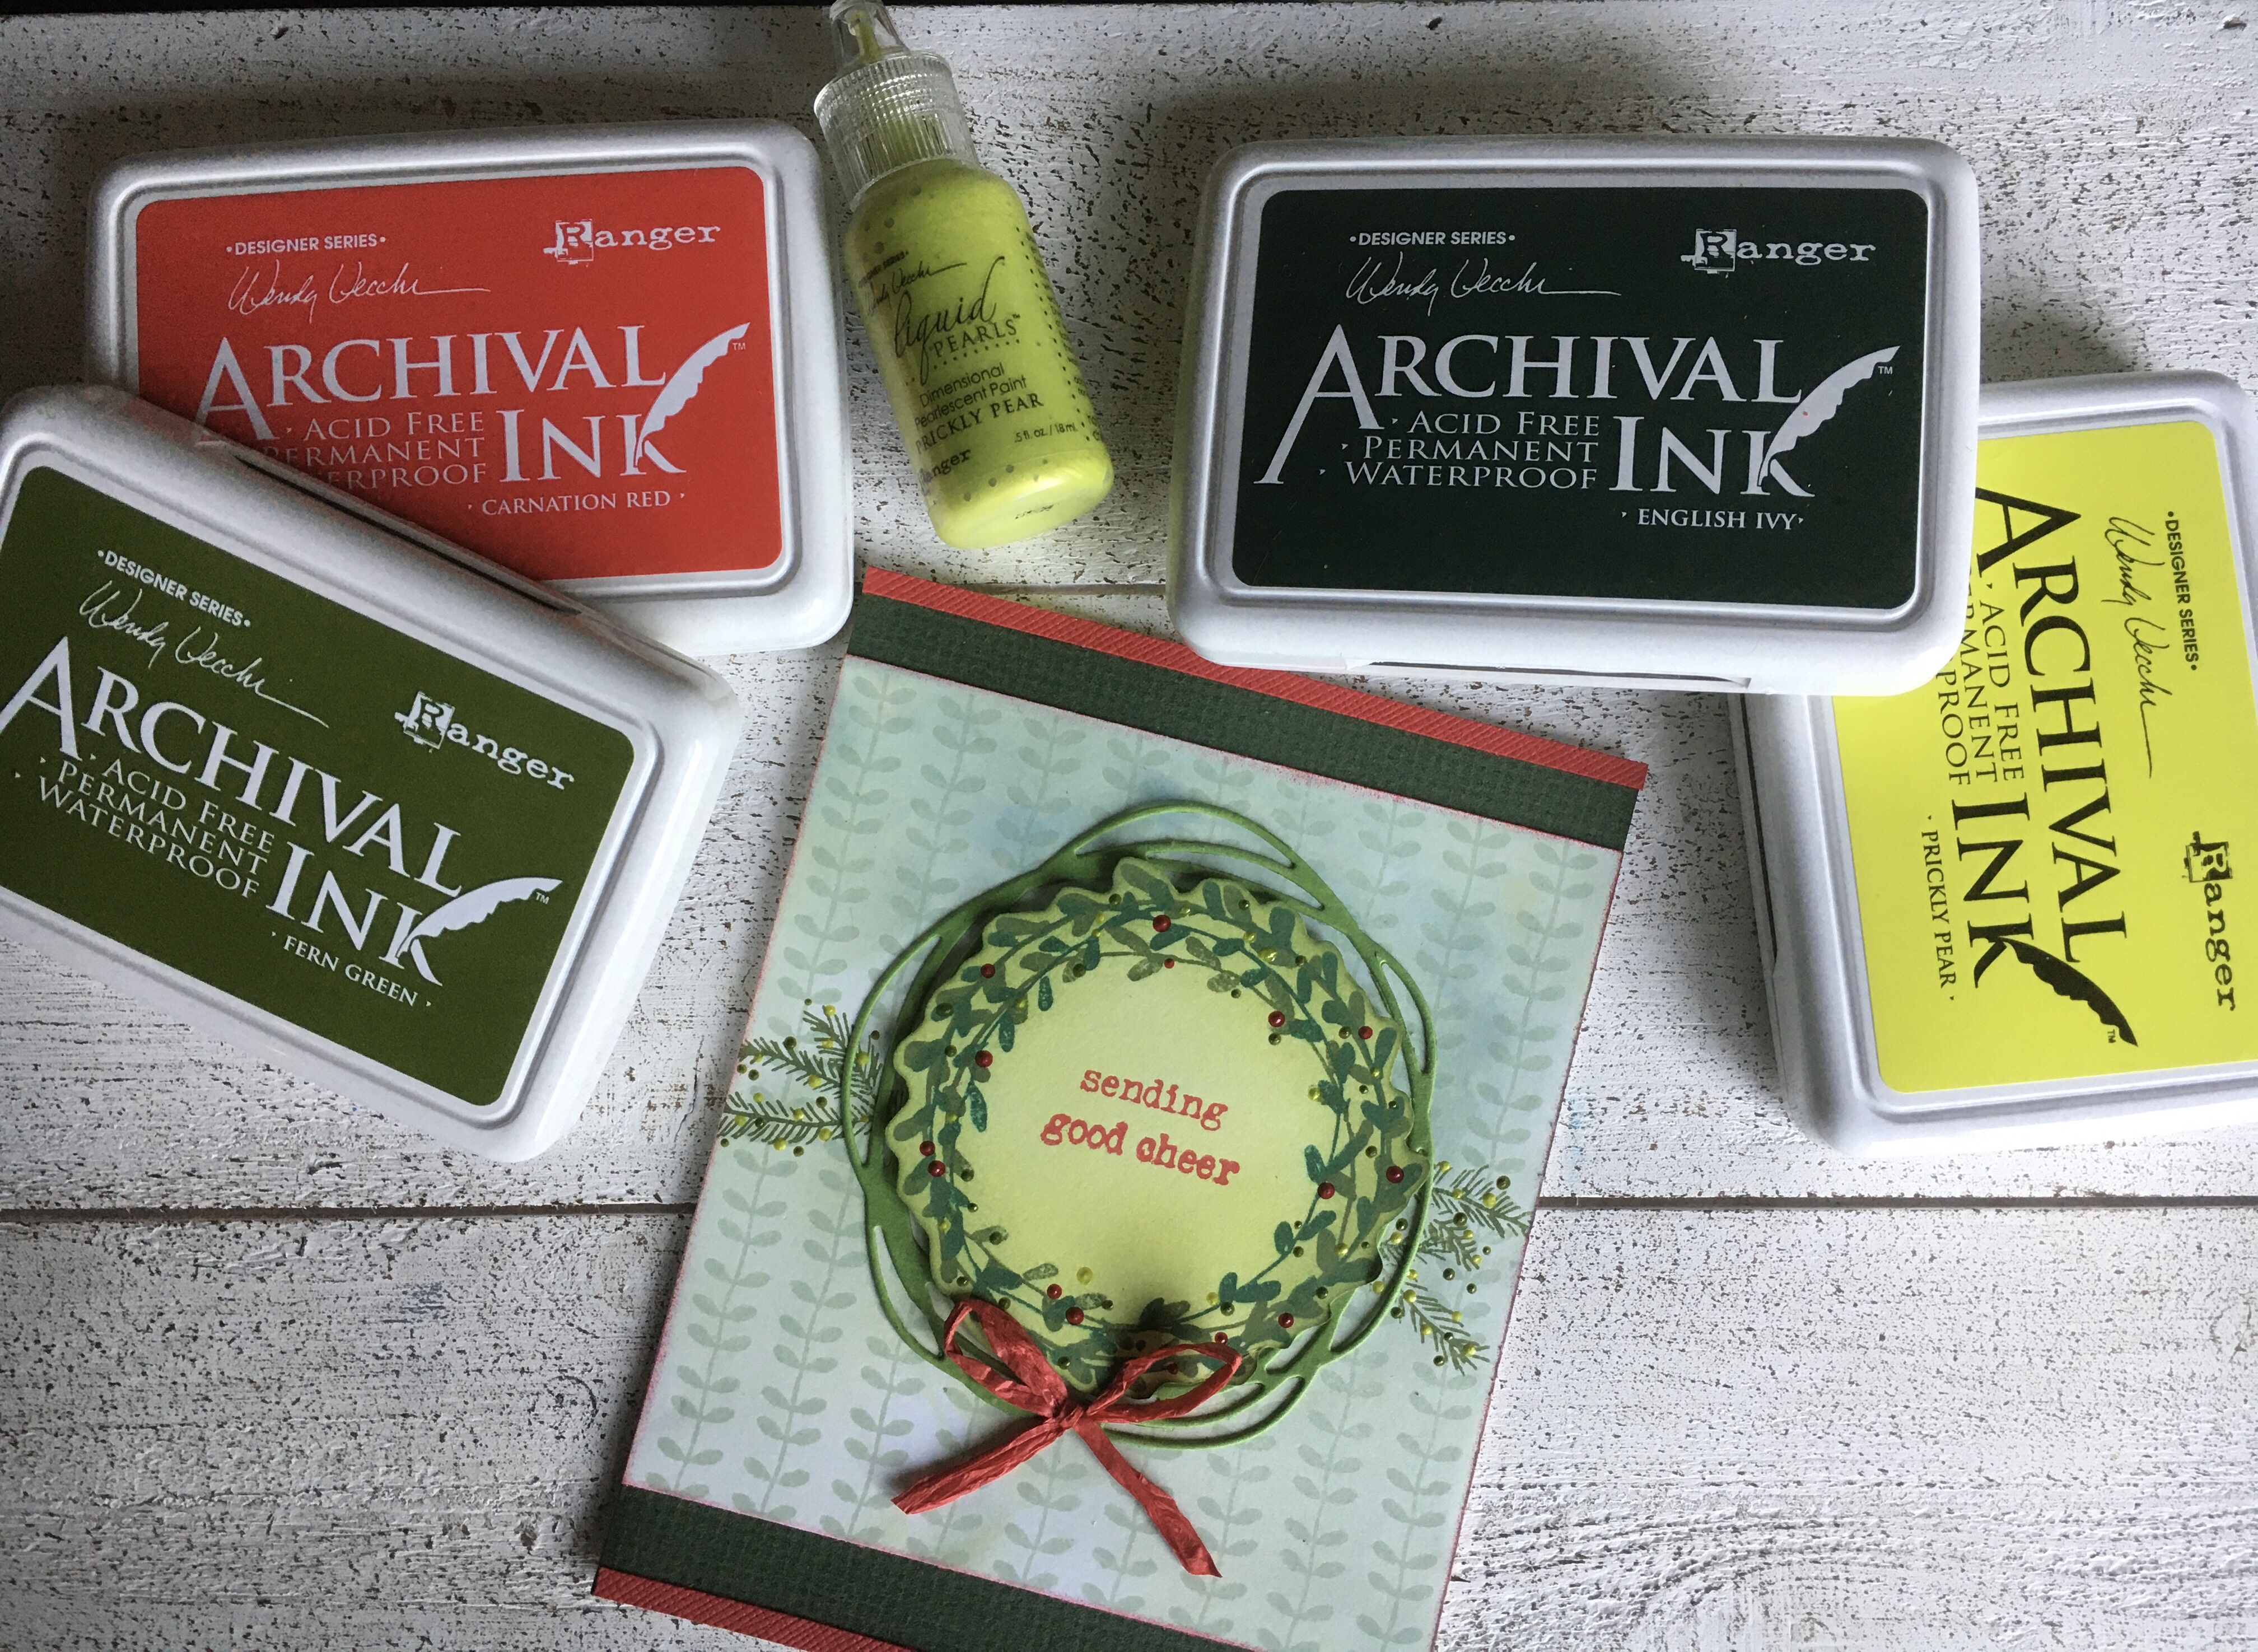
Ranger Ink Wendy Vecchi Designer Archival Ink Series: Fern Green, Prickly Pear, English Ivy, Carnation Red
Ranger Ink Leaf Green, Sap Green, Cornflower Blue
Embellishments:
Ranger Ink Wendy Vecchi Designer Series Liquid Pearls – Prickly Pear, Fern Green, Carnation Red
I’m excited about the new Wendy Vecchi Make Art release from Ranger Ink that just came out today! So many possibilities for holiday cards, tags, and decorations. But the stamps are versatile enough that some “everyday” cards will be easy to make with them.
I got my hands on the new products today and immediately made a simple card. I started out with the background using Wendy Vecchi’s archival ink and alcohol technique. I used Cornflower Blue and Lead Green re-inkers and rubbing alcohol and once dry, I stamped The background stamp in Sap Green.
To create the wreath, I stamped Wendy’s wreath stamp in English Ivy and then turned it 90 degrees or so and stamped it again in Fern Green. I trimmed it out and then blended Prickly Pear ink over the whole image. Meanwhile, I stamped the branches across the center of my background. I adhered the die-cut wreath onto the background. Once the wreath was completely dry, I stamped the sentiment and then added the Liquid Pearls “berries” on the wreath and the branches. I then popped up the wreath with dimensional adhesive and added a red raffia bow. I trimmed the card with red and dark green cardstock strips.
Thanks for stopping by today (Hi, Mom!). I do regularly post on Instagram (@penguinpapers) if you want to see what I’m up to. I still plan to post here when I can–especially cards!
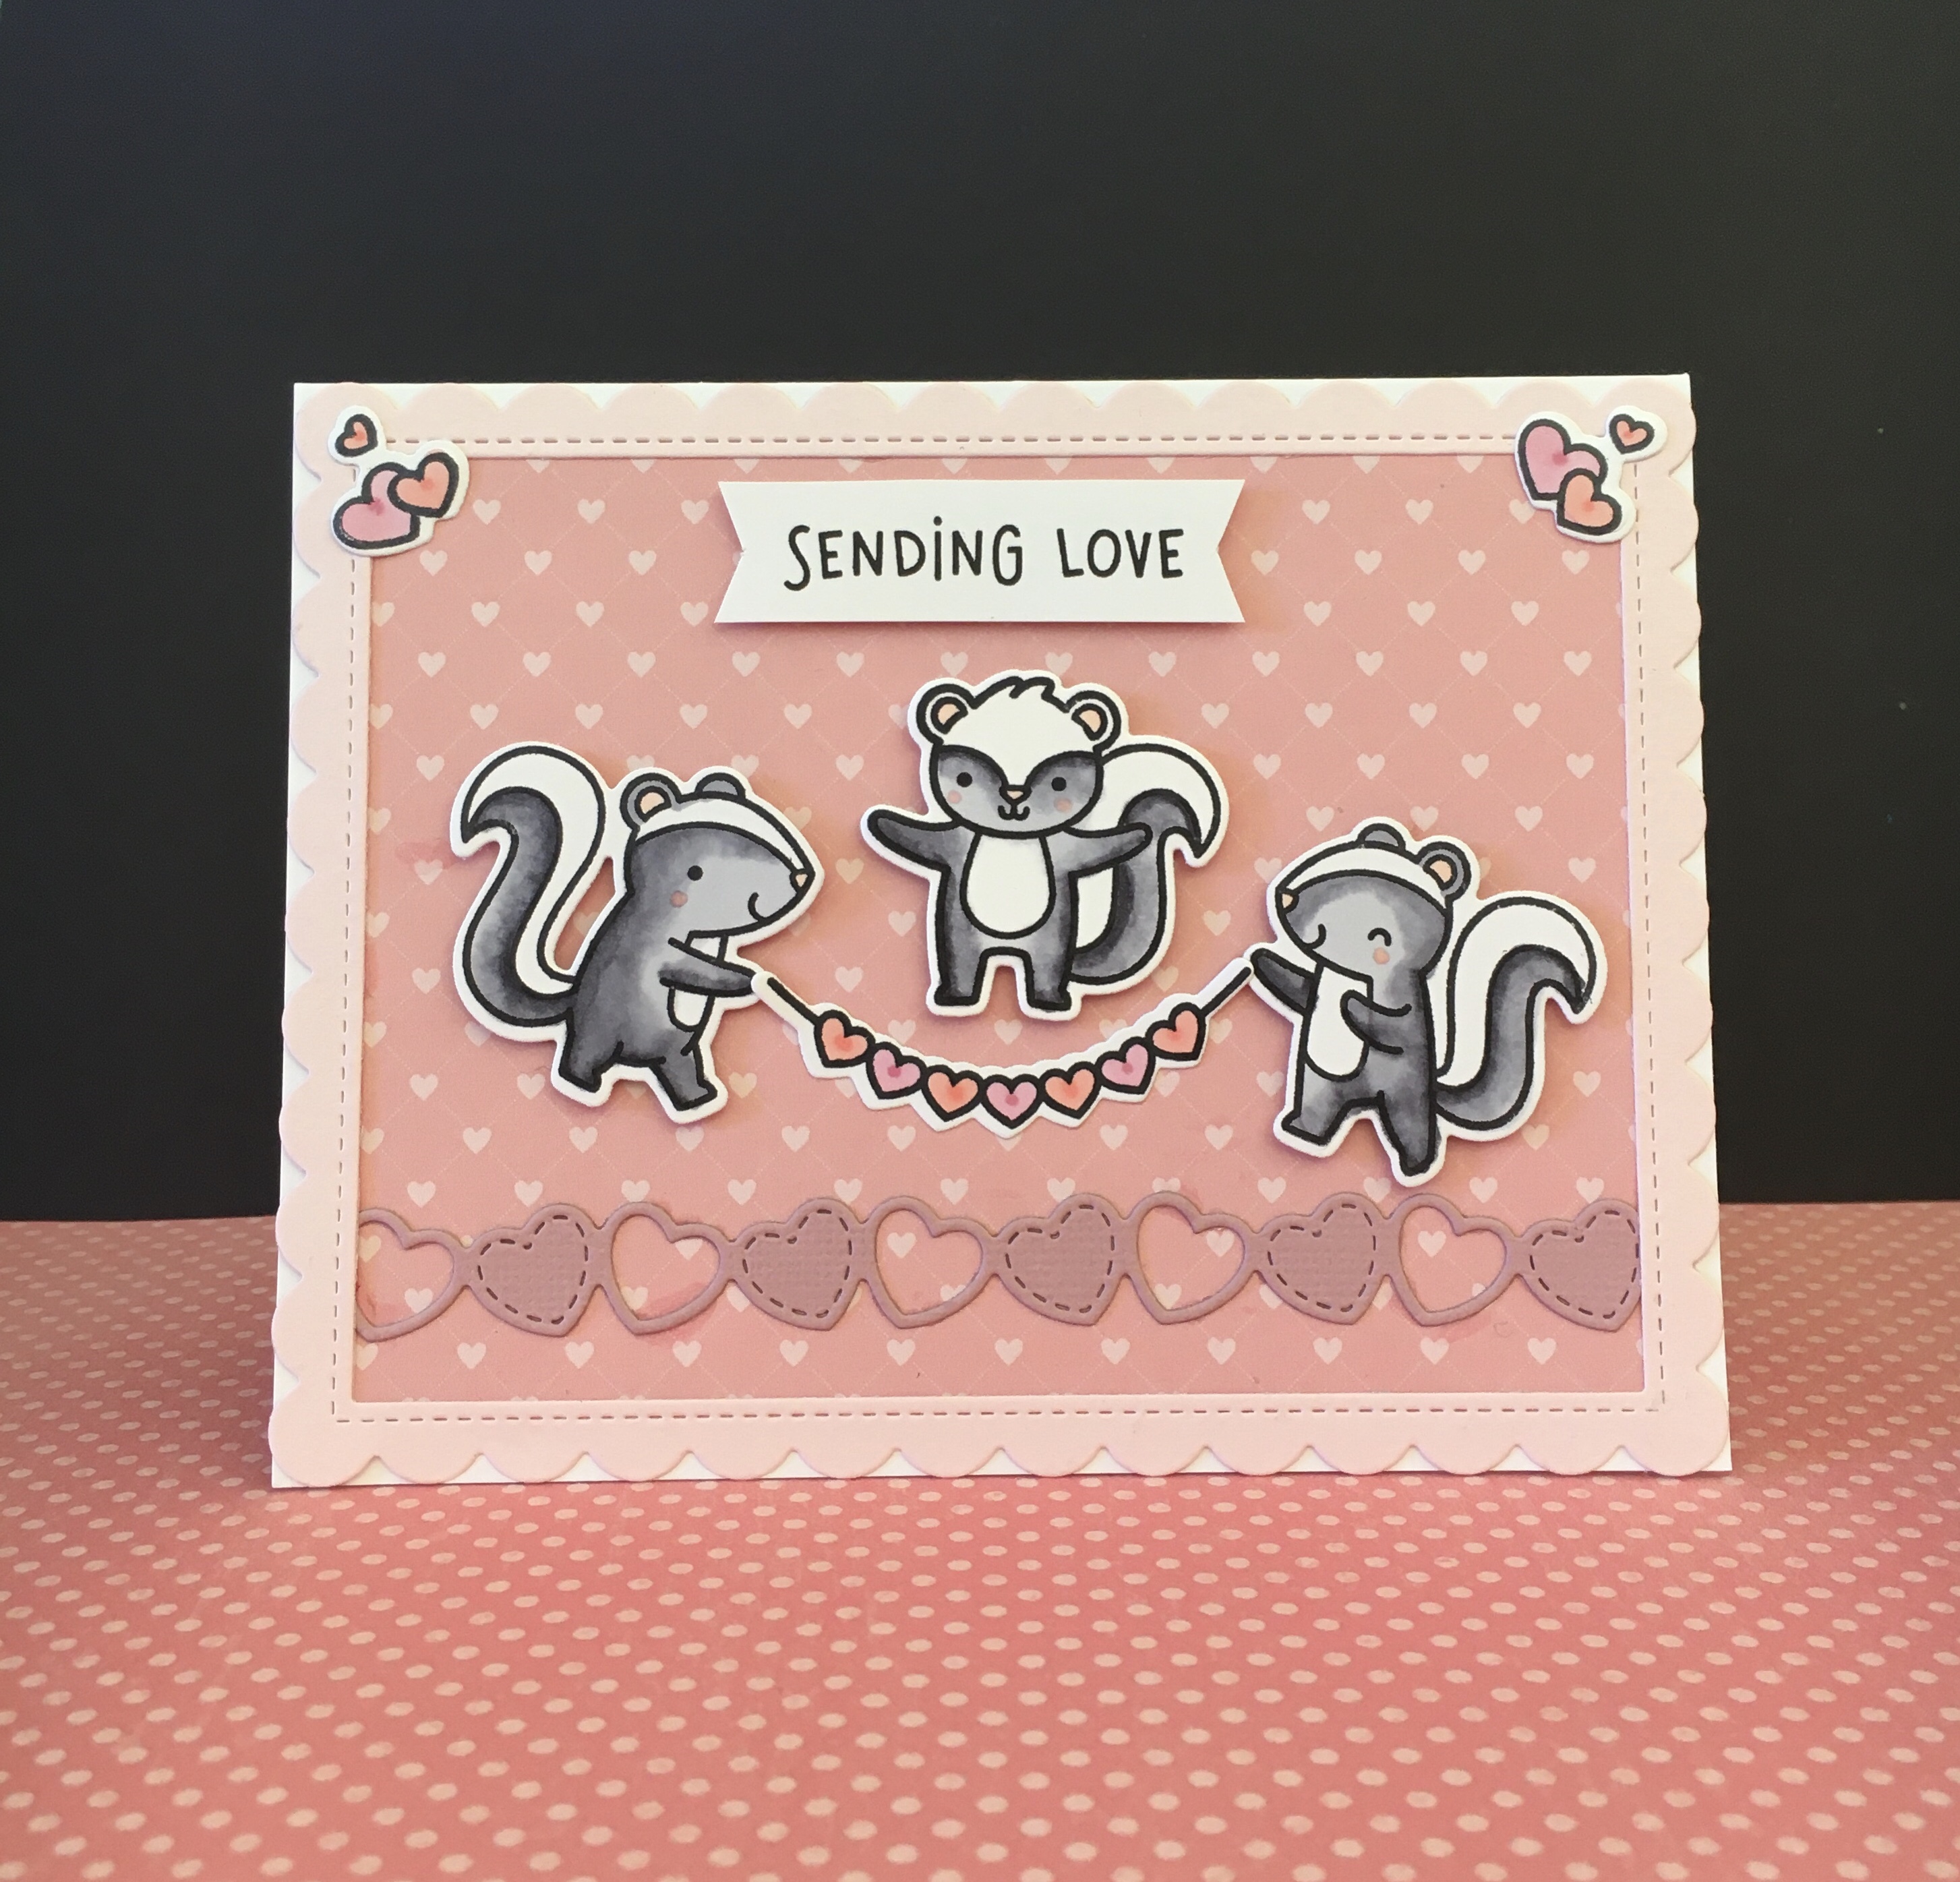
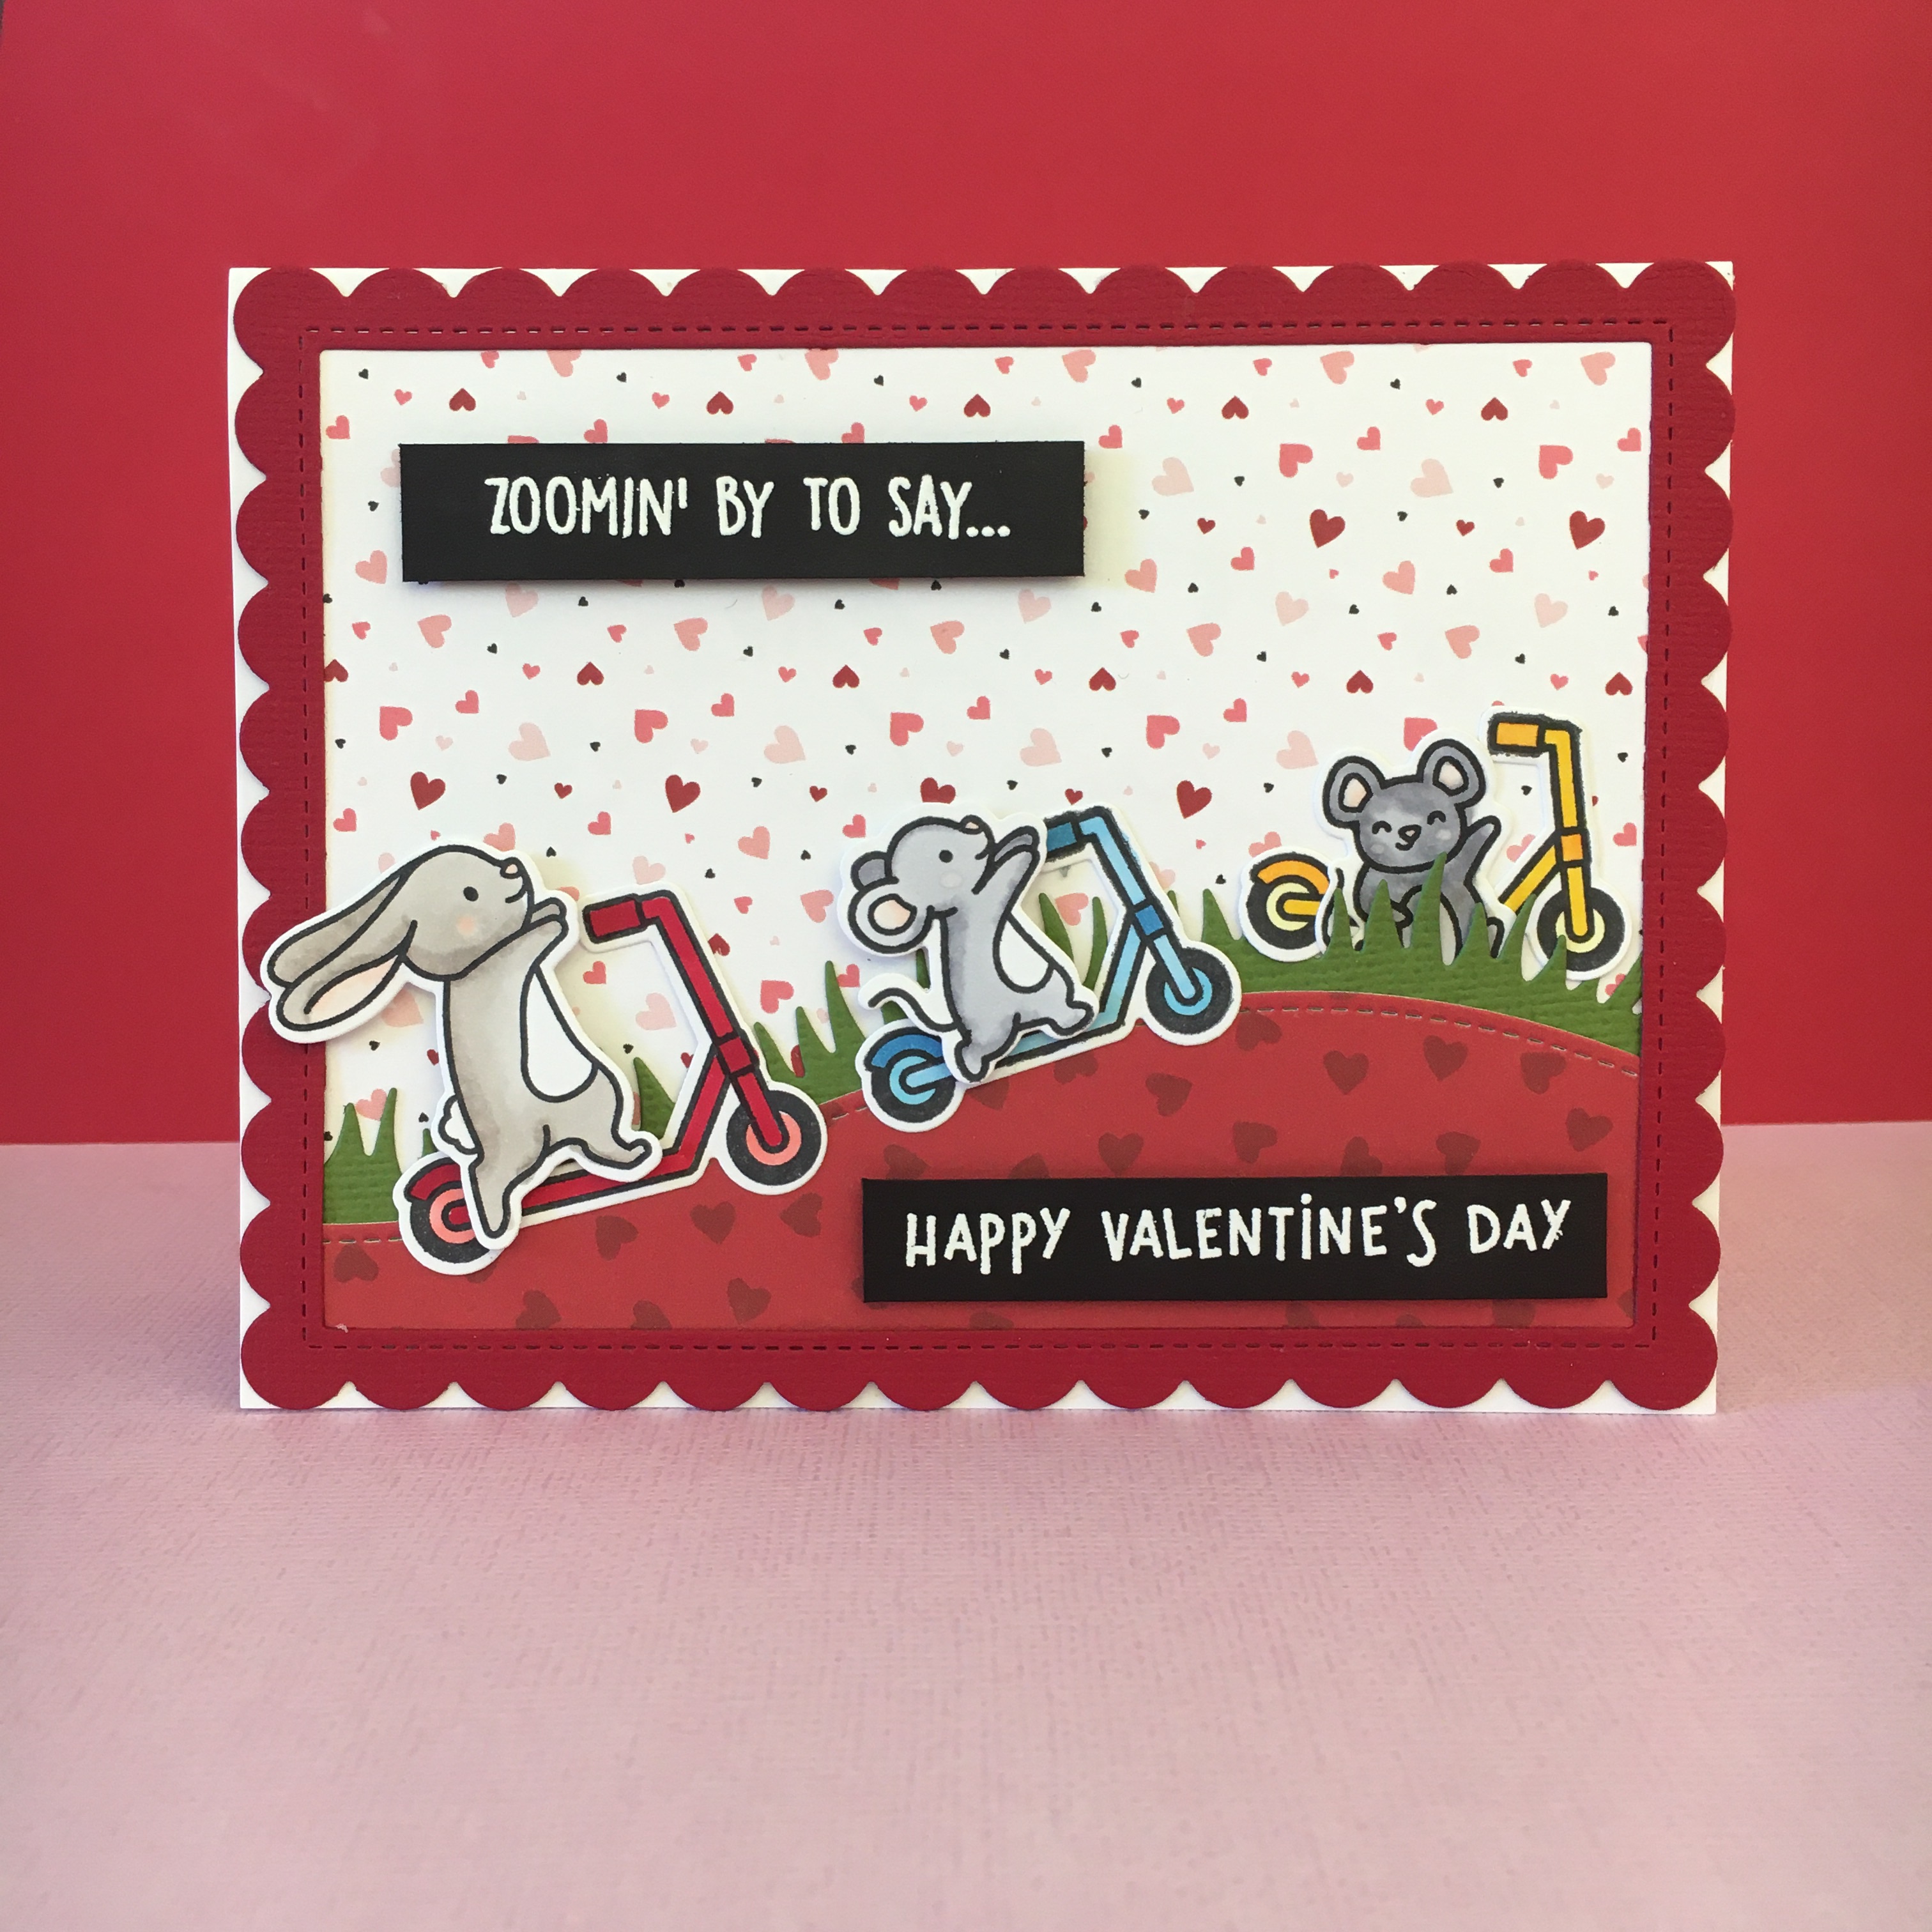
I made a little collection of critter Valentines this year featuring Lawn Fawn stamps and dies. I’m keeping them in the family since I’m giving them to my mom to share. Maybe if I’m good, I’ll get one back!
I colored all of the cute critters with Copic markers with very simple blending and I used some patterned papers I had on hand to add some festive backgrounds. I’ll provide my supply list below and then I’ll give you a look at each card individually.
Supplies
Lawn Fawn stamp and die sets:
Scent with Love stamps and dies
Scent with Love Add-on stamps and dies
Scootin’ By stamps and dies
Stud Puffin stamps (for Sending Love sentiment)
Stitched Hillside Borders die set
Valentine Hearts Border die set
Stitched Scalloped Rectangle Frames die set
Grassy Hillside Borders die set
Patterned papers:
Echo Park Hello Valentine Collection – Be Mine Bouquet and Special Delivery
American Crafts papers – 348946 and 359971
Translucent vellum
Cardstock
Copic markers
What better way to show you care than to share cupcakes?!
Of course, a skunk and fox would be playing together and celebrating Valentine’s Day!
We’ve got some skunk roping happening here.
Some critters are speed demons on their scooters; others prefer to rest on the sidelines!
We’ve got all kinds of happy here with a lovable skunk and fox.
Thanks for stopping by today. I really got into the card-making zone during the past few days. I hope you’ve enjoyed this little collection.
Recently I took advantage of the nice weather (pre-wildfire smoke) and wandered around in my yard to get some leaves to use for gel printing. Leaves are probably my favorite texture to add to paint of ink to create botanical prints. So I used Distress Oxide inks and brayered them onto my hexagon gel plate, then added leaves that I’d collected. Some time later, I added stamped or die-cut sentiments and a few insects and sequins and made some lovely, simple cards.
Here is a closer look at a few of them.
I associate leaves with Fall cards, so I imagine I’ll be doing some more of this! Thanks for visiting today.
Dies – Lawn Fawn Snow Globe Gift Tag and Mini Snowflakes
Patterned papers – Lawn Fawn
Peace Joy Love collection: Rudolph
Snow Day collection: Chunky Scarf
Glitter paper – Lawn Fawn Pixie Dust and Gold Rush
Red cardstock – Bazzill
Ribbon
White embossing powder
I really like this snow globe die set from Lawn Fawn! You can make adorable gift tags with it, but I had fun using the globe as a focal point on this simple card front. For the layout of this card, I used a sketch featured in CAS(E) this Sketch #350 challenge. I combined two small prints on the patterned papers for a little spice and tied a ribbon through the tag to keep it authentic. Thanks for stopping by.
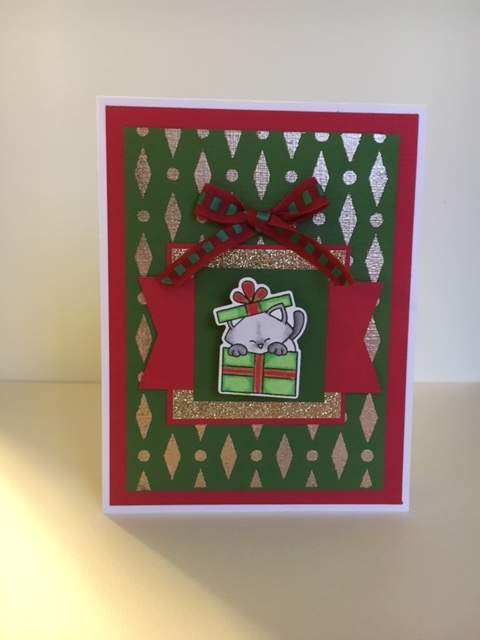
I created this following the sketch for this month’s Inky Paws Challenge 111 on the Newton’s Nook blog. I really liked the layout of this sketch so when I saw it I knew I had to make a card! I colored the kitty with Copic markers and heat embossed some green cardstock with gold embossing powder for some elegant pattern. The really fun thing about this is that I attached an Action Wobble to the cat–so he wiggles! See below for a wiggly video! The small things in life make me happy!
I’ll be teaching how to make this card in early December at Runaway Art and Craft Studio, along with two other Christmas cards. Have a great day and thanks for stopping by!
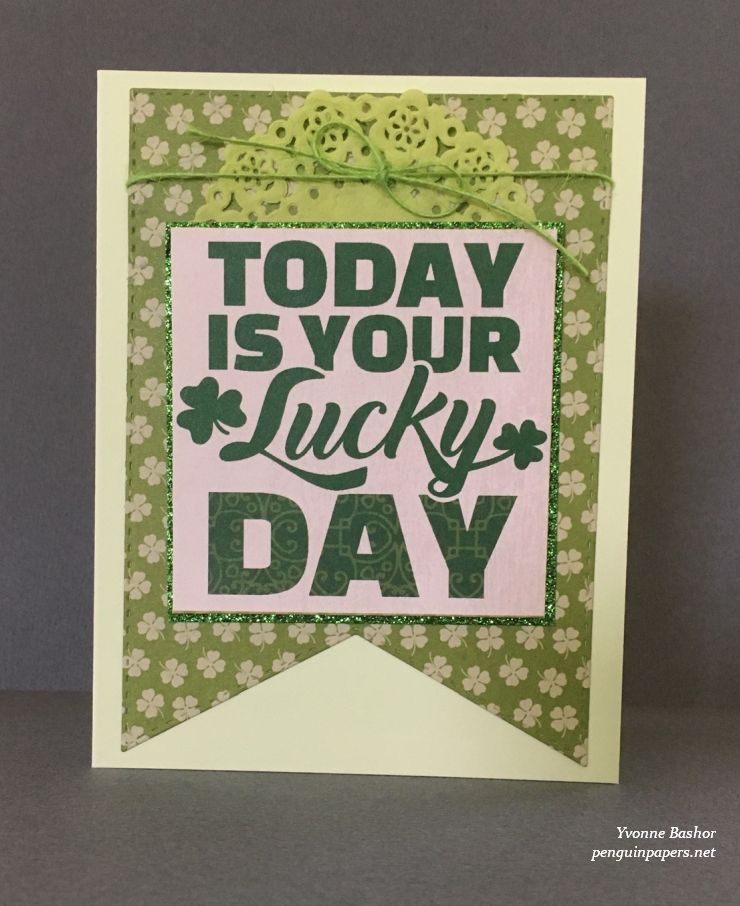
Authentique Clover Collection – Clover Five (focal image)
Die – Art Impressions – Banner Double Stitched Dies
Doily – Doodlebug Designs
Twine – May Arts
Cardsotck –
Bazzill
Paper Accents Glitter Cardstock – Green
I really like the color green, so when I had a chance to use these Authentique papers to create a card for Runaway Art and Craft Studio, I was excited. This is a very simple card with small touches that make it special: glitter paper matting around the focal image, lovely patterned paper from Authentique, the doily and twine at the top, and that eye-catching banner die-cut I made with the new Art Impressions die. And everything is green! Thanks for visiting today.
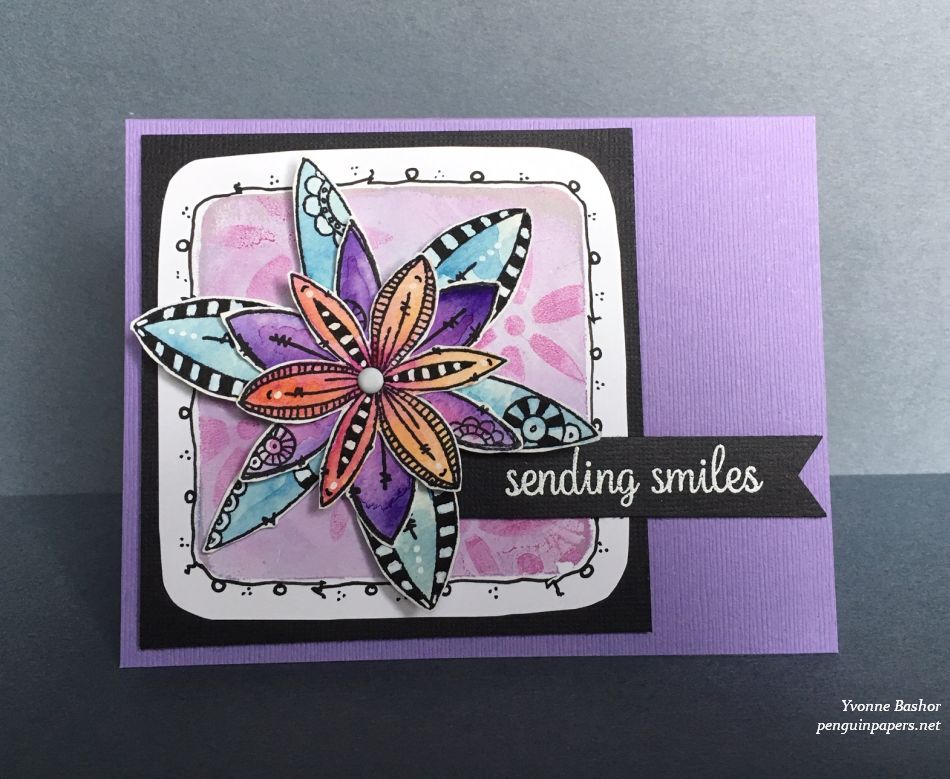
I created this mixed media card in phases. First I stamped out the flower stamps onto watercolor paper with Archival ink and added color with some watercolors. Once dry, I colored in areas with black and white Posca pens and added a few doodles of my own. After fussy-cutting the flowers out, I began working on the background. I made a number of gel plate prints using PaperArtsy Fresco paints and the JOFY stencil that matched the flower stamps. I selected one that I made with a small plate that framed the flowers nicely, then doodled around the perimeter and trimmed it out. I layered the flowers together and attached them in the center with a brad. I finished the card by adhering the flower to the background and adding a sentiment that I heat embossed. Thanks for stopping by.