I have a simple card to share today, using the latest sketch at the My Favorite Things blog. This was a fun card that I made using some supplies that I’ve had for awhile, but never used.
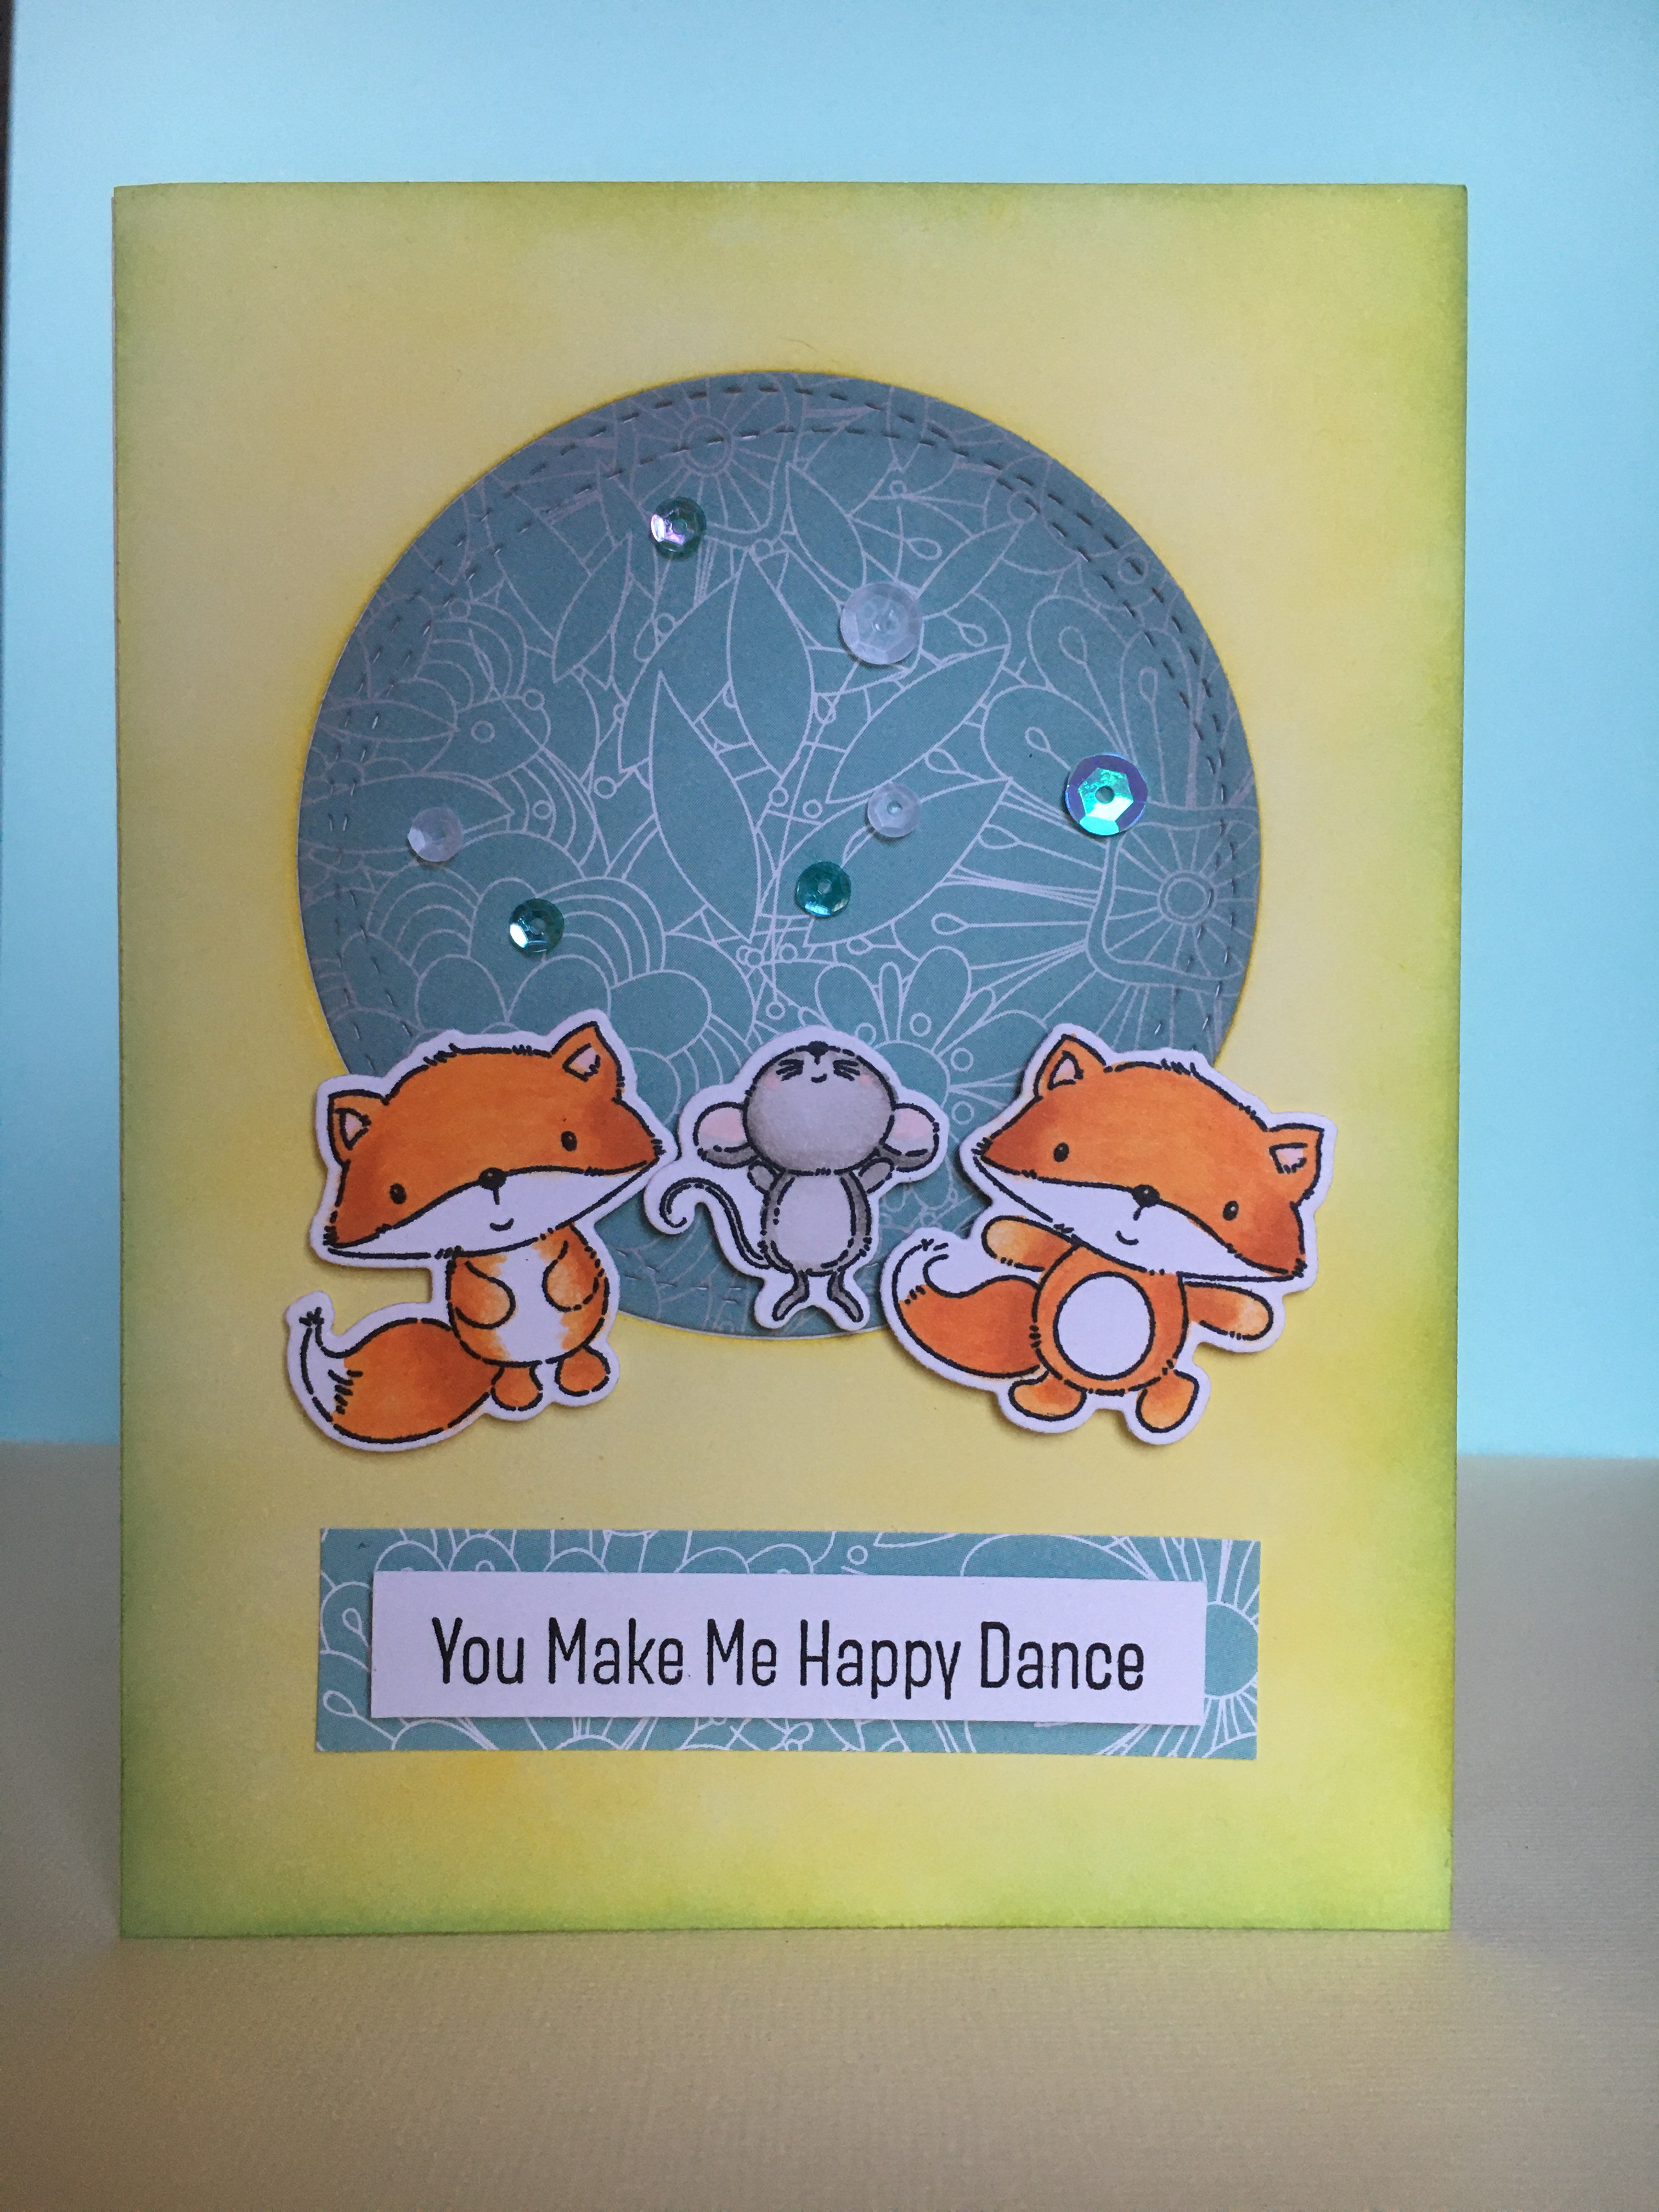
For this card, I did a simple ink blended background using Mustard Seed and Tumbled Glass Distress inks. I cut out the round window from the panel and adhered it to a card base. Then I added a Wonky Stitched Circle die-cut from the patterned paper that I edged with Hickory Smoke Distress Oxide ink. I then colored the critters with Copic markers and popped them up near the bottom of the floral circle. To add a little more interest, I scattered a few sequins at the top of the circle. To finish the card off, I stamped the sentiment on white and layered it onto a strip of the same patterned paper used in the circle. Clean and simple and done!
Recently I took advantage of the nice weather (pre-wildfire smoke) and wandered around in my yard to get some leaves to use for gel printing. Leaves are probably my favorite texture to add to paint of ink to create botanical prints. So I used Distress Oxide inks and brayered them onto my hexagon gel plate, then added leaves that I’d collected. Some time later, I added stamped or die-cut sentiments and a few insects and sequins and made some lovely, simple cards.
Here is a closer look at a few of them.
I associate leaves with Fall cards, so I imagine I’ll be doing some more of this! Thanks for visiting today.
Lawn Fawn “Spiffy Speckles – Strawberry Frosting” and “Spring Fling-Debbie”
BoBunny “Serendipity”
Dies – Art Impressions “Banner Double Stitched Dies
Cardstock – Bazzill
Raffia – May Arts
Inks –
Versafine Clair – Twilight
Ranger – Tim Holtz Distress – Twisted Citron
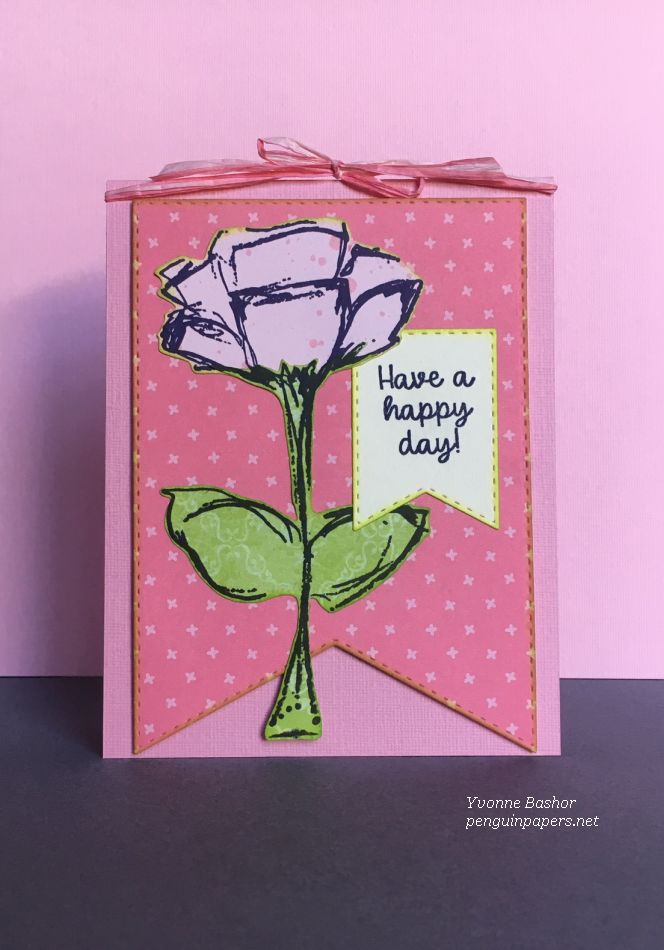
This was a fun card to make. I am a huge fan of Dina Wakley and her lovely floral stamps. I designed this card for a recent class I taught at Runaway Art and Craft Studio in Salem. I hadn’t done any paper piecing in a long time, but it worked quite well with this stamp. I stamped the flower onto the patterned papers in black ink and fussy-cut the flower from the pink and the stem and leaves from the green. I edged all of the pieces, including the die-cut banners, in Twisted Citron Distress Ink to bring out the same color as the leaves. Then I layered all of the pieces together and tied a bow around the top of the (top folding) card with pink raffia. Thanks for visiting.
Lawn Fawn – Snow Cool, Say What? Christmas Critters and Winter Fox
Stampers Anonymous/Tim Holtz – Reflections
Embossing folders – Sizzix Snowfall and Swirls
Ranger Stickles – Diamond
Vellum
White embossing powder – Stampendous
Watercolor paper
Cardstock
I was on deck to present the demonstration at our Craft Stamper group last week. We select something from an issue of Craft Stamper magazine and present it to the group and then we all make the project. It just so happened that I selected the masterclass that featured snowy hills from the January 2019 issue. While I was working on my sample cards, it snowed here, in March. This isn’t the first time we’ve had snow in March in Oregon’s Willamette Valley, but we’ve had at least four doses in the past two weeks. That is a little unusual. We are in the midst of one more snow shower today and that may be the end of it for this winter. Crazy!
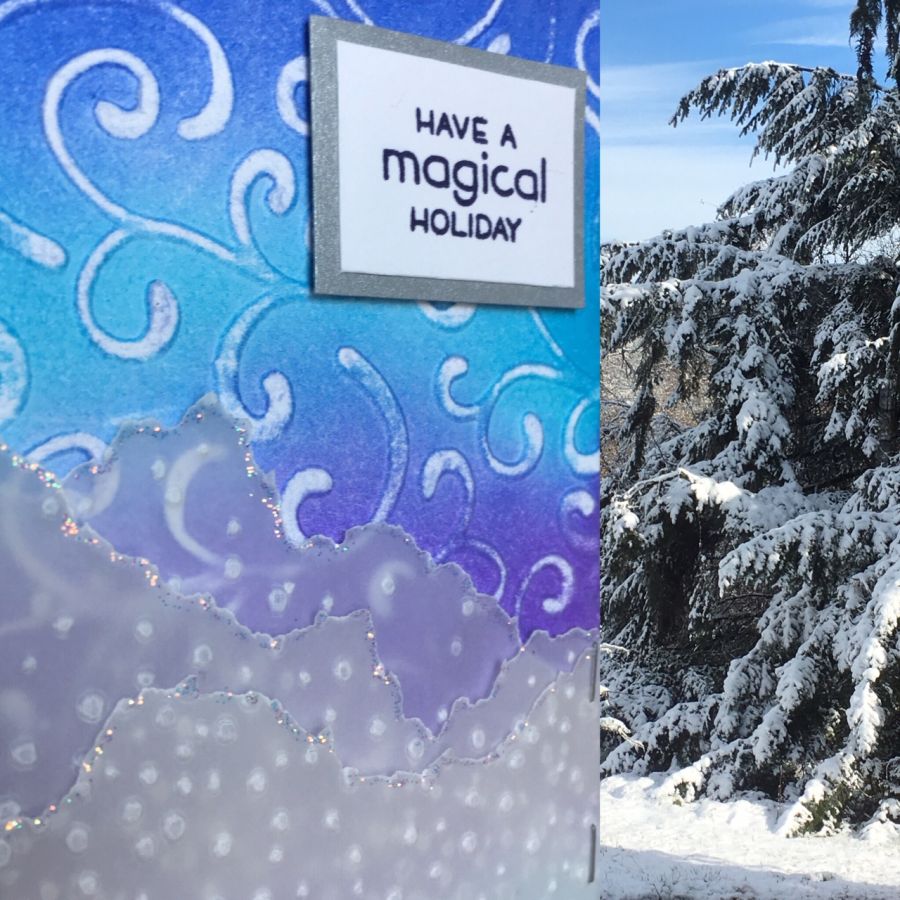
For the first card I used two different embossing folders. I first applied Distress Inks, blending four colors. I then dry-embossed it with the Swirls embossing folder and then sanded it to expose the swirls. For the snow drifts, I embossed the snow onto vellum with the Snowfall embossing folder. I then tore the vellum into pieces to resemble snowy drifts and layered them together. When I liked the composition, I stapled the vellum onto the background with the Tim Holtz Tiny Attacher and applied Stickles glitter glue to the edges of the vellum. I added a layered sentiment and a layer of silver cardstock and adhered it to a white card base. You can see the sparkle in the photo below.
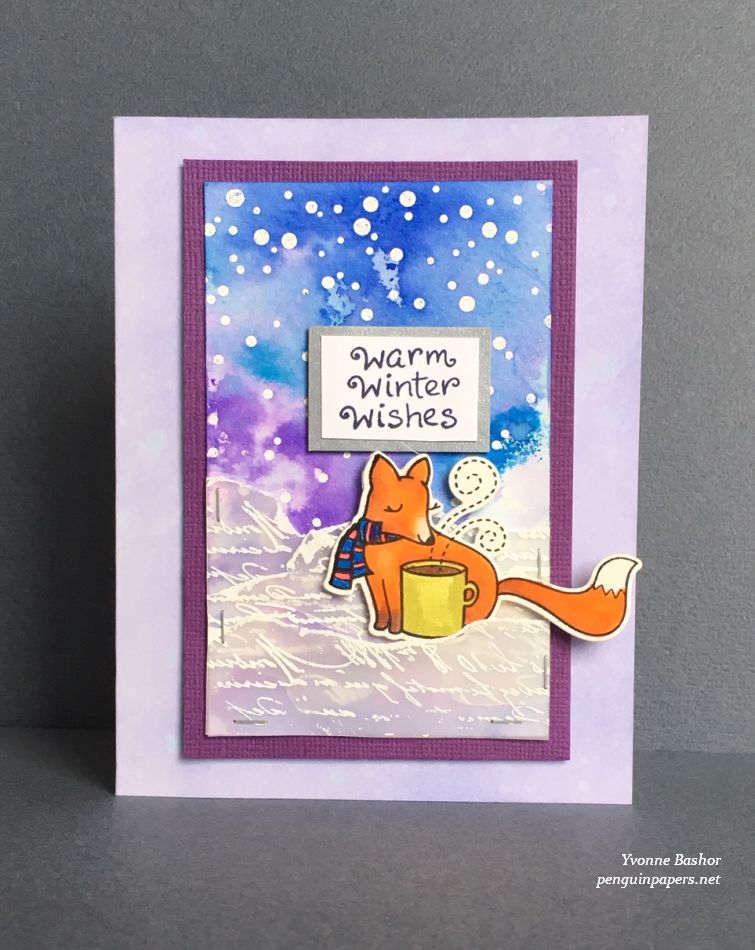
For the second card (below), I used the Distress Inks like watercolor. I heat-embossed the snow on watercolor paper using the Lawn Fawn Snow Cool stamp set and white embossing powder. Then I applied the Distress Inks to my craft sheet and spritzed the ink with water. By dragging the watercolor paper through the wet ink, drying, and reapplying, I created the colorful and snowy background. The embossing powder resists the “snow” that is heat embossed. I heat embossed the Tim Holtz script stamp on the vellum for this card and tore it to make the drifts again this time. I also applied embossing powder to the torn edges to give the appearance of snow. Again, I attached the vellum to the background with the Tim Holtz Tiny Attacher. To finish off this card, I stamped and colored the Lawn Fawn fox and popped it up onto the scene. I liked having his tail go off the background. I colored the card base by applying Milled Lavender and Shaded Lilac Distress Oxide inks to white cardstock. Finally I layered all of the pieces together and added the sentiment.
Thanks for visiting. I still have some catching up to do with posting here!
Stamps – Stampers Anonymous Tim Holtz Collection: Winter Watercolor and Festive Overlay
Patterned paper – Pebbles – Cozy & Bright Collection – Winter Green
Ranger Distress Ink – Evergreen Bough
Silver Mirror Cardstock – Paper Accents
Cardstock – Neenah
Ribbon
For this card, I started out with a Distress Ink background and then stamped the bird and sentiment on top. The detail of the chickadee stamp is really lovely and I didn’t want to detract from it with a lot of fussy stuff. I did add some glitz by layering the image with some patterned paper and then a layer of silver mirror cardstock. I added the silver ribbon for some visual interest and to repeat the silver again to tie it altogether while still keeping it clean and simple. I was inspired by the current sketch at CAS(E) this Sketch. Thanks for visiting.
Ephemera – Tim Holtz Idea-ology Ephemera Pack – Festive
Chipboard Quote Chip (Joy) – Tim Holtz Idea-ology – Christmas Words and Phrases
Candy Cane Chipboard – Echo Park Decorative Brads & Chipboard – Twas the Night Before Christmas
Mini Snowflake Ornament – Darice
Wooden Christmas Tree – Sierra Pacific Crafts
Ribbon and Ric-Rac
This is one of my favorite kinds of projects: creating a tag and combining a lot of different products from a lot of different companies! I created this tag for an exchange with my online cardmaking group. It also fit perfectly with a color challenge at The Paper Players. I started out by covering a plain manila tag with the patterned paper. I stamped out the snowman and colored the background on the image with some Evergreen Bough Distress Ink and used some of my Posca pens to color details on the snowman and to make the snow. I edged most of the elements with Medieval Blue Versafine Clair ink and then fit the die-cut snowflakes and all of the other little pieces together to form my composition. I edged the tag in blue ink as well and then tied the ribbon and ric-rac through the tag’s hole and attached the little snowflake ornament. This was really fun to make and I popped it in the mail to the recipient today. Thanks for visiting.
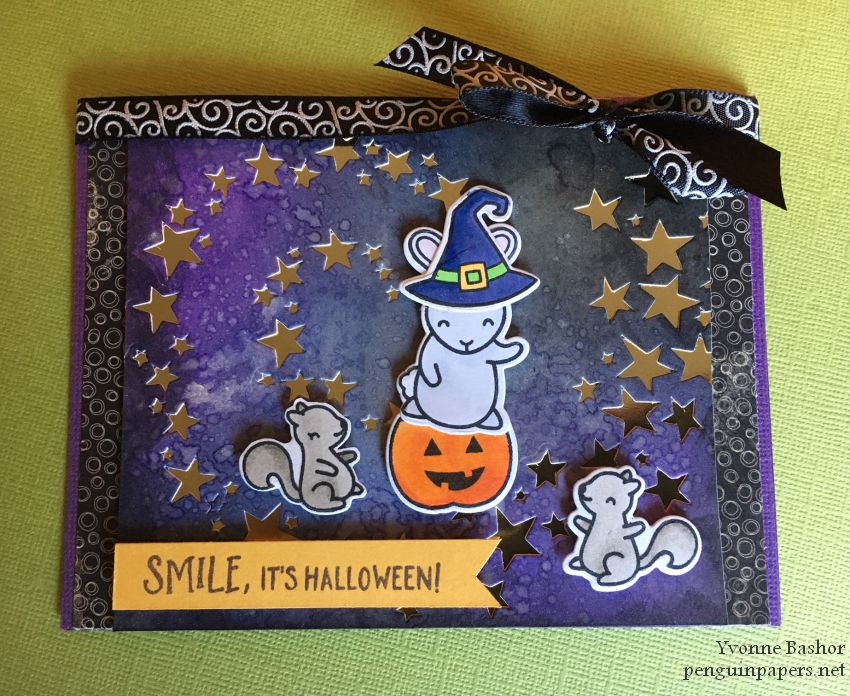
Today I’ve got a two-fer! I’ve made two Halloween cards with Lawn Fawn products featuring a number of cute creatures!
Stamps – Lawn Fawn – Spooktacular
Dies –
Lawn Fawn – Spooktacular, Stitched Windy Backdrop, Stitched Hillside Borders, Spooky Fence Border, and Trick or Treat Border
My Favorite Things – Inside & Out Stitched Rounded Square
Cardstock – Bazzill and Lawn Fawn Sparkle Cardstock (Autumn)
Sequins – Doodlebug Designs
I created a spooky scene with some cute stamped images and a lot of dies! I colored the creatures with Copic markers. I cut the spooky fence from Lawn Fawn sparkle cardstock (Autumn collection). It provided nice contrast among the matte black cardstock layers. The sequins provided a bit more sparkle to spice up the card.
Stamps – Lawn Fawn – Pick of the Patch, Spooktacular and Some Bunny
Dies –
Lawn Fawn – Pick of the Patch, Spooktacular and Some Bunny
Tim Holtz/Sizzix – Swirling Stars
Ranger Distress Oxide inks -Seedless Preserves, Black Soot and Peeled Paint
Patterned paper – Authentique Nightfall Five
Cardstock – Paper Arts gold metallic mirror paper and Bazzill
Ribbon – Offray
I began this card by making a Ranger Distress Oxide ink background and then die-cut it so that the shiny gold below peeks through the star openings. I colored the bunny, pumpkin and squirrels with Copic markers. I created this card with a bunny witch for a swap. The recipient is a fan of rabbits, so I wanted to be sure to incorporate one into the scene. It is always fun to combine several sets to build the perfect scene and I did that for both of these cards.
I created the background with several Distress Oxide inks and then stamped the Inkadinkado image in black onto it. I layered the patterned paper and the stamped image onto the card base. I cut the Trick or Treat sentiment from a piece of printed cardstock. I distressed the edges of the image and sentiment just by running scissors over the edge of the paper until it got a bit ragged. I adhered the stickers that really look like candy along the right hand side of the card (it must have flown out of the trick or treat bags!).
Metallic Sticker – Tim Holtz Idea-ology – Quotations – TH93559
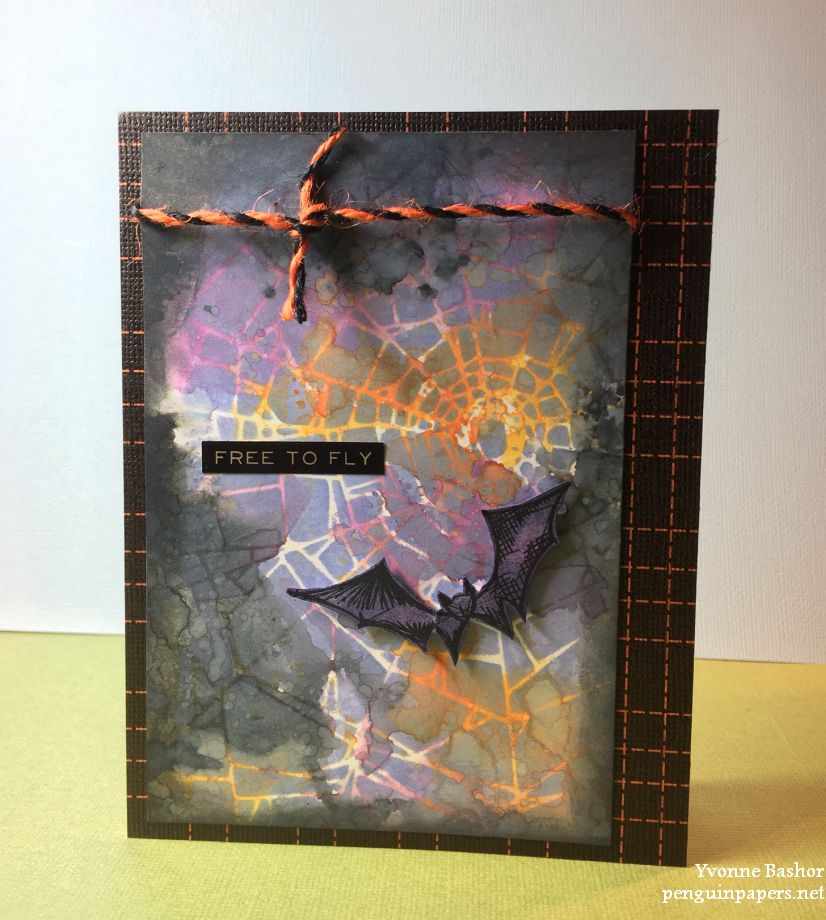
I started out creating backgrounds with no other plan but to make some Distress Oxide backgrounds using Halloween-y colors. The background for this card started out with Spiced Marmalade, Black Soot and Dusty Concord and lots of water and leaving some white space. I then applied Shaded Lilac Distress Oxide ink through the Shatter stencil. I edged it with Black Soot and added a little more water splatters to the blended inks.
Meanwhile, I stamped the bat in black Archival ink on white cardstock and trimmed away the labeling on the image. I colored it by blending Dusty Concord and Chipped Sapphire (regular) Distress ink to color the bat. I then adhered it to the background with dimensional adhesive. I added the “Free to Fly” sticker to the scene. I assembled the card by adhering the patterned paper to a card base, tying the twine around the top of the bat scene and adhering it all onto the card.
This was a fun one! Thanks for stopping by. For a closer look:
Prima Marketing silicone mould: Vintage Art Decor “Trifles”
Prima Marketing Paper Clay
Prima Art Alchemy Acrylic Paint: Mermaid Sparkle and Metallique Deep Waters
Stencils: Stampers Anonymous/Tim Holtz – “String” and “Houndstooth”
Texture Paste – Finnabair Art Basics Light Paste Opaque Matte
Ranger Distress Inks
Handmade (by me) collage tissue
Tissue wrap – Tim Holtz Ideaology “Postale”
Sequins
I created this pair of tags by layering papers, paint and ink and then topping them off with a painted piece that I molded from paper clay. I began by adhering some collage tissue and Tim Holtz patterned tissue wrap. I applied Distress Inks and then added some texture paste through a stencil. I painted the paper clay pieces with metallic paints and adhered them, along with the sequins. I inked the edges of the tags and tied some ribbon at the top of each.
For a closer look, here are some additional photos.