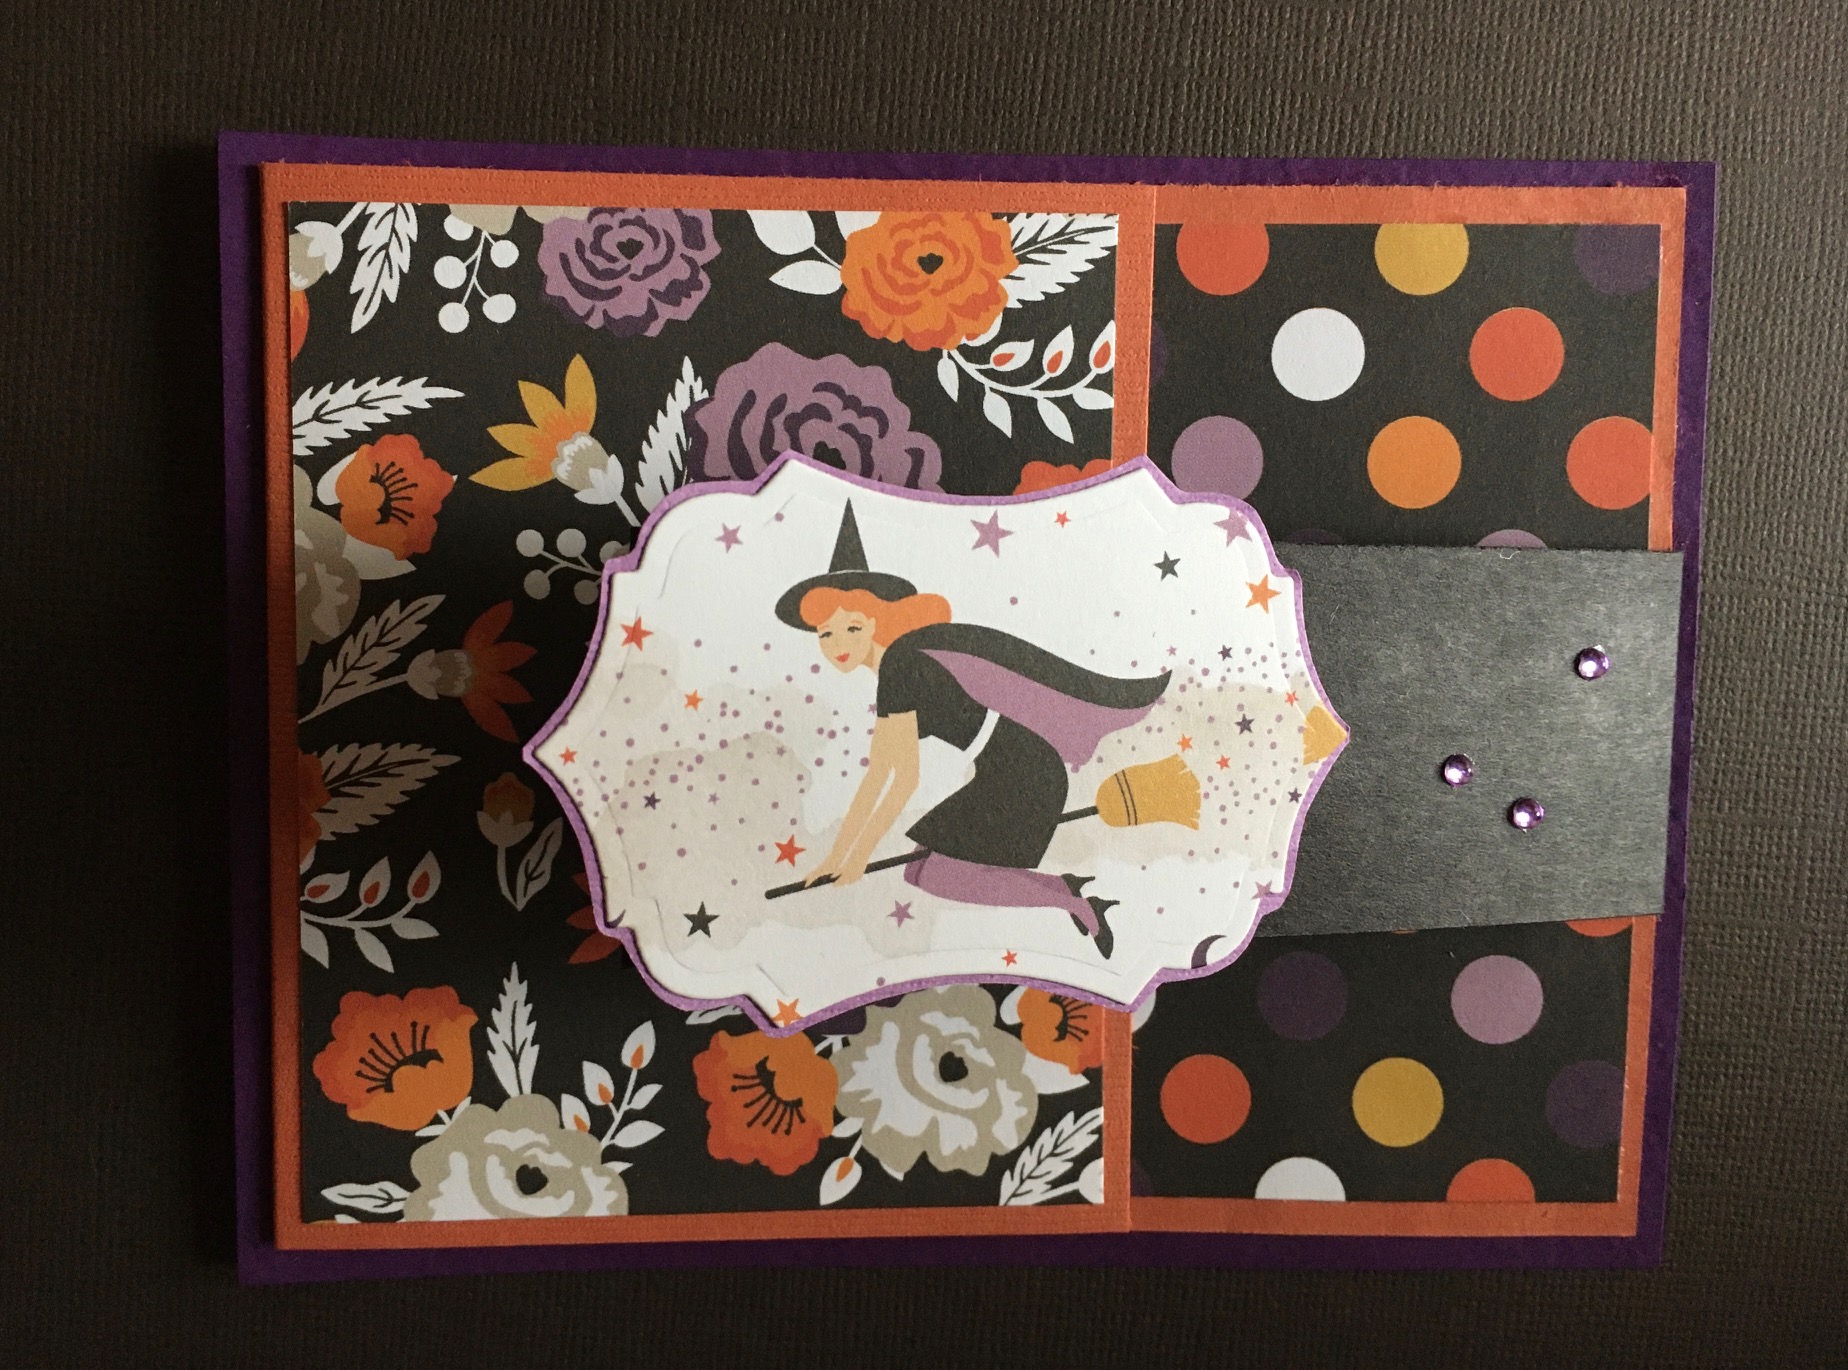
This is my most elaborate Halloween card this year. I’m not sure exactly what happened, but time got away from me and I just didn’t make many. I created this one for a swap that I participated in. We were to make a Halloween card that was a fun fold that the recipient could use for a decoration.
I had fun putting together several different Lawn Fawn stamp/die sets and patterned papers from different companies for a spooky night-time scene. I decided on a Z-fold card, and the beauty of this design is that it can stand up on its own but it folds up to easily fit into an envelope.
Supplies:
Lawn Fawn stamps and dies – Spooktacular, Hoppy Halloween, and Fox Costumes Before ‘n Afters and the Spooky Fence Border die
Papers – Authentique – Mysterious and Twilight collections, and Echo Park Bewitched collection (for the starry sky)
I colored the critters with Copic markers and backed the card with and cut the fence border from black cardstock.
This was very fun and quite easy to make. Have a Happy Halloween!
I created this Halloween card for an exchange. It is made predominately with Echo Park papers and it is a fun fold, so I am including several photos so that you might be able to see how it works.
Today I’ve got a two-fer! I’ve made two Halloween cards with Lawn Fawn products featuring a number of cute creatures!
Stamps – Lawn Fawn – Spooktacular
Dies –
Lawn Fawn – Spooktacular, Stitched Windy Backdrop, Stitched Hillside Borders, Spooky Fence Border, and Trick or Treat Border
My Favorite Things – Inside & Out Stitched Rounded Square
Cardstock – Bazzill and Lawn Fawn Sparkle Cardstock (Autumn)
Sequins – Doodlebug Designs
I created a spooky scene with some cute stamped images and a lot of dies! I colored the creatures with Copic markers. I cut the spooky fence from Lawn Fawn sparkle cardstock (Autumn collection). It provided nice contrast among the matte black cardstock layers. The sequins provided a bit more sparkle to spice up the card.
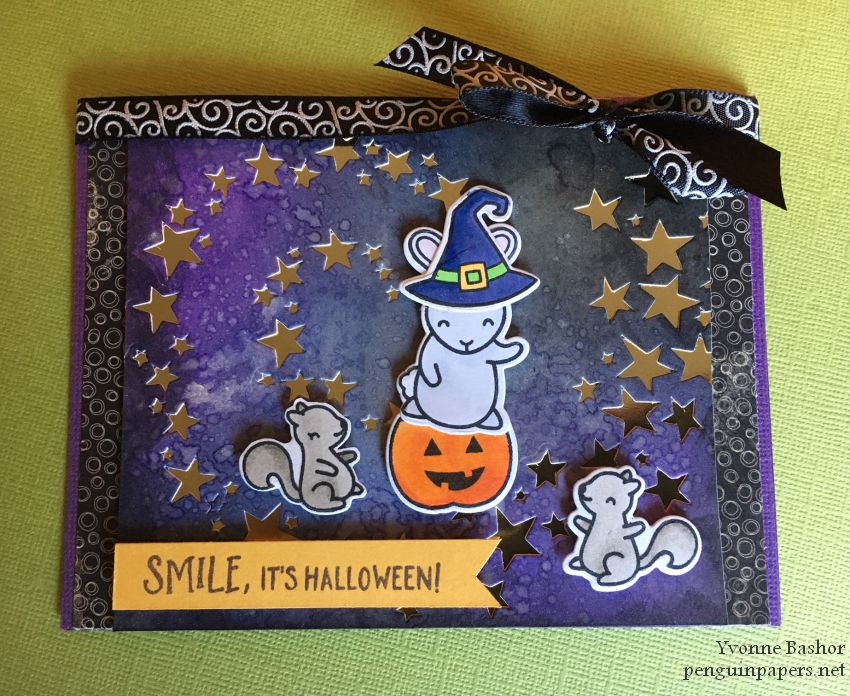
Stamps – Lawn Fawn – Pick of the Patch, Spooktacular and Some Bunny
Dies –
Lawn Fawn – Pick of the Patch, Spooktacular and Some Bunny
Tim Holtz/Sizzix – Swirling Stars
Ranger Distress Oxide inks -Seedless Preserves, Black Soot and Peeled Paint
Patterned paper – Authentique Nightfall Five
Cardstock – Paper Arts gold metallic mirror paper and Bazzill
Ribbon – Offray
I began this card by making a Ranger Distress Oxide ink background and then die-cut it so that the shiny gold below peeks through the star openings. I colored the bunny, pumpkin and squirrels with Copic markers. I created this card with a bunny witch for a swap. The recipient is a fan of rabbits, so I wanted to be sure to incorporate one into the scene. It is always fun to combine several sets to build the perfect scene and I did that for both of these cards.
I created the background with several Distress Oxide inks and then stamped the Inkadinkado image in black onto it. I layered the patterned paper and the stamped image onto the card base. I cut the Trick or Treat sentiment from a piece of printed cardstock. I distressed the edges of the image and sentiment just by running scissors over the edge of the paper until it got a bit ragged. I adhered the stickers that really look like candy along the right hand side of the card (it must have flown out of the trick or treat bags!).
Metallic Sticker – Tim Holtz Idea-ology – Quotations – TH93559
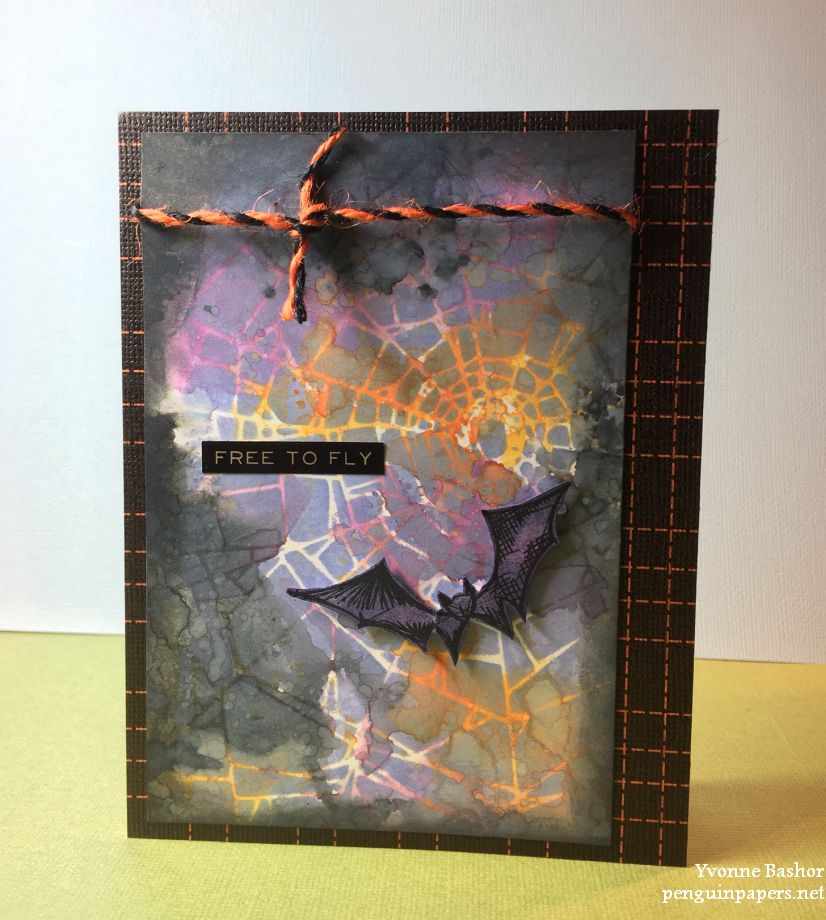
I started out creating backgrounds with no other plan but to make some Distress Oxide backgrounds using Halloween-y colors. The background for this card started out with Spiced Marmalade, Black Soot and Dusty Concord and lots of water and leaving some white space. I then applied Shaded Lilac Distress Oxide ink through the Shatter stencil. I edged it with Black Soot and added a little more water splatters to the blended inks.
Meanwhile, I stamped the bat in black Archival ink on white cardstock and trimmed away the labeling on the image. I colored it by blending Dusty Concord and Chipped Sapphire (regular) Distress ink to color the bat. I then adhered it to the background with dimensional adhesive. I added the “Free to Fly” sticker to the scene. I assembled the card by adhering the patterned paper to a card base, tying the twine around the top of the bat scene and adhering it all onto the card.
This was a fun one! Thanks for stopping by. For a closer look:
Ranger Distress inks: Carved Pumpkin, Peeled Paint and Hickory Smoke
This is a pretty adorable image of the kitties among the pumpkins by Newton’s Nook. Their animal designs are some of my favorites! I colored the image with Copic markers and trimmed it out so no white was showing. I inked the edges with a black Sharpie to cover any white paper edges. The sentiment is heat embossed, adding a little shine to the words. I trimmed the sentiment flag-style. Before I adhered the foreground, I applied some Distress inks to the patterned paper, beginning with Hickory Smoke and then adding Peeled Paint ink for a colorful shadow beneath the image. I popped up the image with dimensional adhesive and then edged the panel with Carved Pumpkin Distress Ink. Thanks for visiting today.
Paper – Authentique Mysterious collection: “Mysterious Six” (main image) and “Mysterious Five”
Pebbles Trick or Treat collection: “Candy Corn”
October Afternoon: Witch Hazel collection: “Whisker of Cat”
Web – American Crafts Details: Halloween – Spider web doilies
Bat brad – Hot off the Press
Ribbon – May Arts
Black crocheted lace
Black cardstock
I had fun creating this festive Halloween card featuring patterned papers. I love vintage Halloween images, so I chose this witch and cat for the focal point of this card. I pulled all kinds of things from my stash, some of which I’ve had for a number of years, to add to this card. I must admit, it took me a long time to come up with the completed design. I hope you like it! Thanks for stopping by.
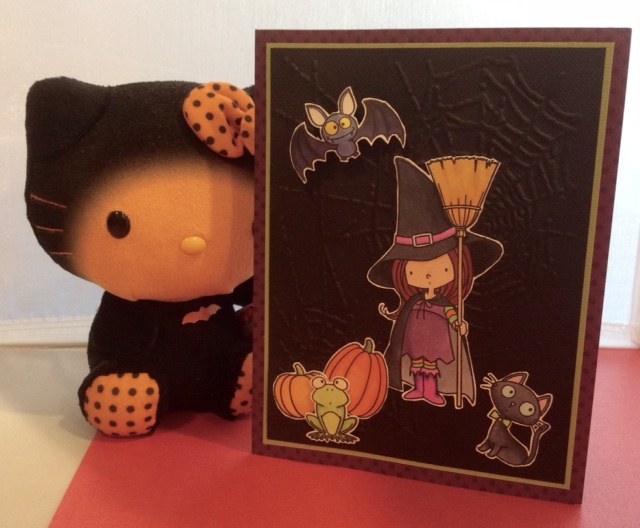
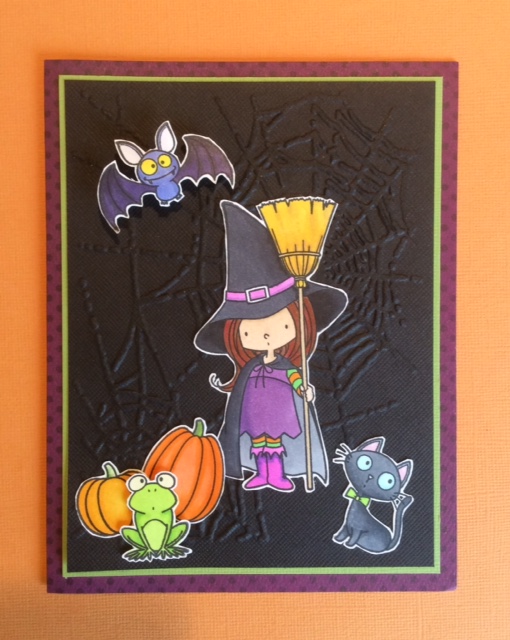
This card design was very simple because all of the cute creatures with a backdrop of an embossed spiderweb stole the show.
I colored and hand-cut all of the stamped images, because I had not purchased the matching dies. I’ve remedied this poor decision by recently acquiring the dies with a gift card that I won from My Favorite Things!
The coloring took the most time, blending Copics. Once I colored and cut all of the pieces, the next challenge was arranging them to my liking. I popped up the bat with dimensional adhesive so he is fairly flying.
Thanks for visiting and, even though it is nearly over, Happy Halloween!
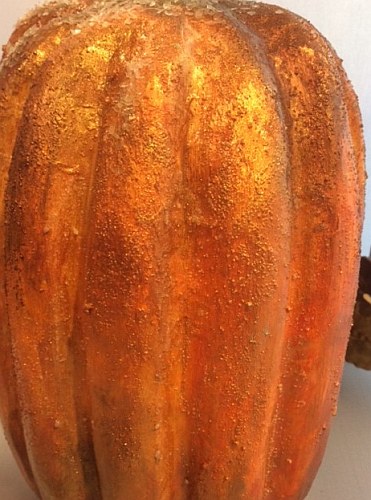
Dina Wakley Media acrylic paints – Cheddar, Ruby, Umber, Tangerine, and Evergreen
Prima Art Alchemy Acrylic Paint – Sparks Ginger Magic
Prima Art Alchemy Acrylic Paint – Opal Magic Violet Green
Finnabair Art Extravagance Texture Paste – White Sand
Prima Art Alchemy Metallique Wax – Rich Copper
Finnabair Art Basics 3D Matte Gel
Finnabair Art Ingredients Glass Glitter – Pearl
I bought this paper mache’ pumpkin for 70% off a couple of weeks ago and had no specific plan. I just thought it would be fun to paint it and use some of the many mediums I have collected! I also saw John Creighton Petersen’s magical pumpkin last week and was inspired.
So I started applying layers of paint and texture, beginning with gesso and then with a variety of Dina Wakley Media acrylic paints. Then I started adding some sparkle and shine with some Prima paints, followed by some White Sand Finnabair texture paste. That stuff really gave it the effect I was looking for. I added some more paint here and there and then applied the Prima Rich Copper Metallique Wax to add some shadows and color variation. Finally, I added 3D Matte Gel to the top of the pumpkin and partway down in spots and patted on (carefully!) the pearl glass glitter. It made it look like there is frost on my pumpkin! Great fun!
Die-cuts – K & Company “Rob and Bob Halloween Words & Icons”
Patterned paper – Doodlebug Design, Inc. “BooVille”
Sequins – Doodlebug Design, Inc.
Cardstock – Paper Arts
I created this simple gatefold card using items I’ve had in my crafty stash for a while. Cardstock die-cuts featuring goofy, yet spooky characters and festive patterned paper made the card-front bright. Sequins give the card a little sparkle and they bring out the bright colors in the paper used.
On the right, you can see inside the card, where there is another die-cut. Thanks for visiting!


 I colored and hand-cut all of the stamped images, because I had not purchased the matching dies. I’ve remedied this poor decision by recently acquiring the dies with a gift card that I won from My Favorite Things!
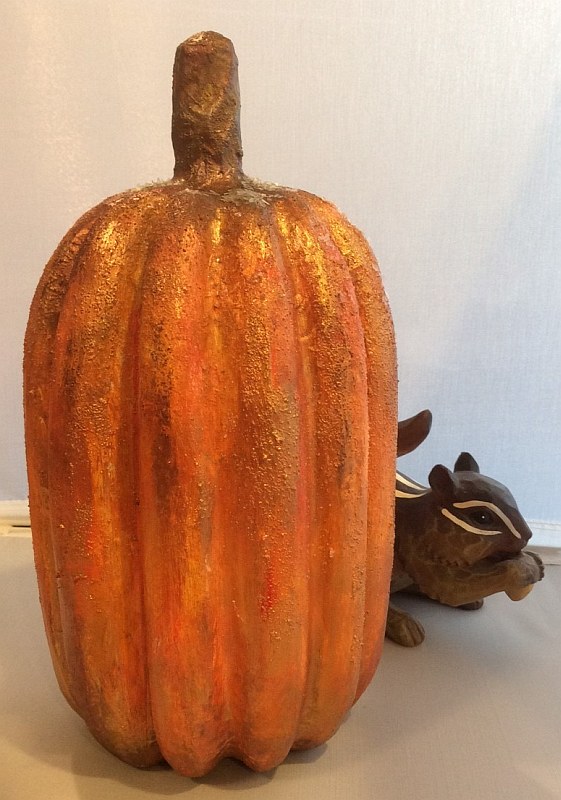
 thought it would be fun to paint it and use some of the many mediums I have collected! I also saw


