I usually procrastinate in making Christmas cards in a timely manner, but my friend Barb challenged an online group of us to make a card with a poinsettia and I thought I should join in! I was sort of surprised that with all of the stamps I own, this set is the only one I found that had poinsettias, and it had two different ones.
Supplies used:
~ Stamps: Stampers Anonymous Tim Holtz Collection – Yuletide Gatherings CMS390 (poinsettia) and Modern Christmas CMS388 (sentiment)
~ Authentique Magical Collection – Magical Five
~ Karin Brushmarker Pro markers
~ Metallic gold watercolor and gold twine
I have been wanting to test out the Karin Brushmarkers direct to the rubber stamp and this one was a great candidate. These markers are great for watercolor and have a brush tip, so they are perfect for applying color to a rubber stamp. For this one, I didn’t spritz the stamp with water before or after, and the image came out very nice and crisp. I was able to get three more impressions after this by adding water to the stamp. Here is how they looked:
So depending on the look you’d like to achieve, you can get a lot of impressions from one ink application, which is potentially a big time saver. As a result of this experiment, I have several images to work with for more cards. Always a plus!
Alphabet stamps – Hero Arts “ALPHABET: Letters and Numbers” and “alphabet”
Acrylic paints – Dina Wakley Media: Magenta and Tangerine
Scribble Sticks – Dina Wakley Media: Lapis, Cheddar, Tangerine
Collage tissue colored with Aladine Izink Pigment: Cactus and Topaz
Washi tape – Tim Holtz Ideaology
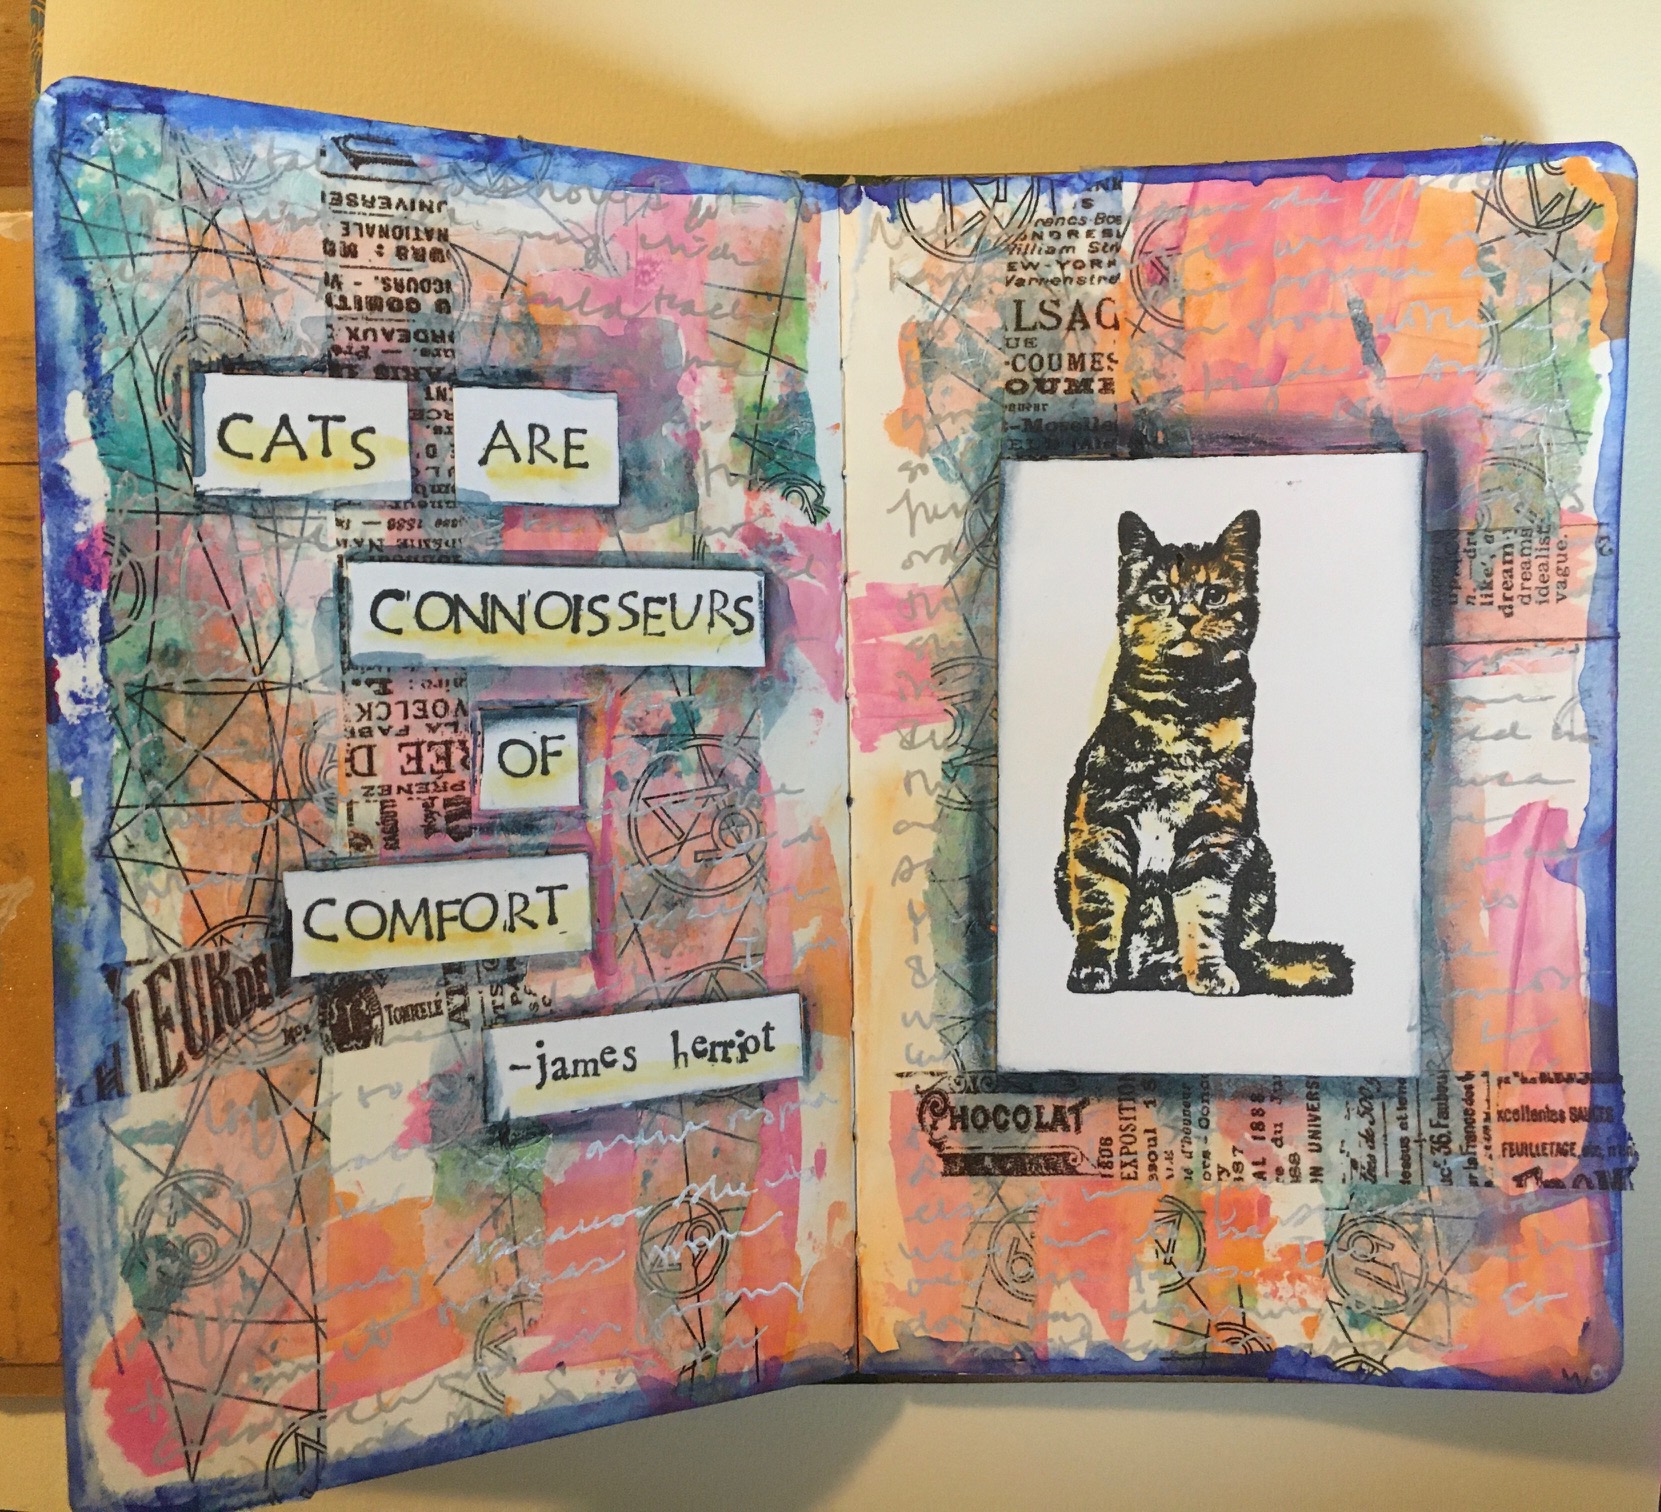
I created this art journal spread in my small Dylusions journal recently, inspired by Rachel Greig on Creative Jumpstart 2020. This is the third year I’ve done Nathalie Kalbach’s Creative Jumpstart and I would highly recommend it to anyone who wants exposure to many mixed media styles without a huge time or financial investment.
I started by applying some strokes of acrylic paint to the pages. I layered the tissue paper (that had been in a shoe box!) that I’d colored with the Aladine Izink metallic inks over the top and then added a couple of strips of washi tape to the background. Once it dried, I journaled over the entire two-page spread with a silver Signo pen and then added the cat stamp and quote, which I’d stamped onto white cardstock. I stamped the Herriot quote with Hero Arts alphabet set that I’ve had for years. (The copyright on them is 2002!) I added touches of Cheddar and Tangerine Scribble Sticks and water on both and outlined around the stamped pieces and the perimeter of the pages with a Lapis Scribble Stick and water. A very fun spread to make!
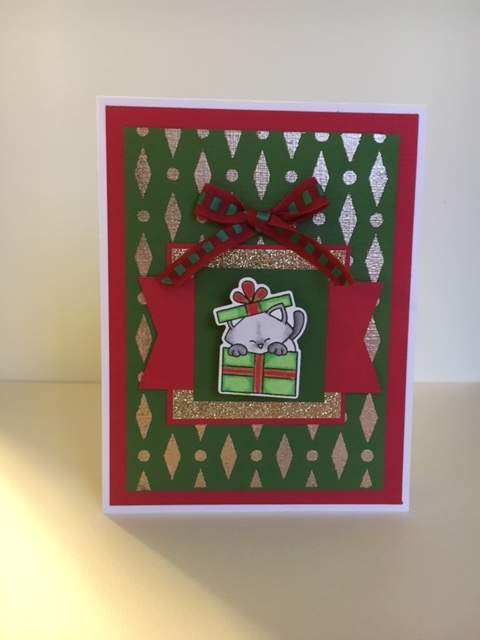
I created this following the sketch for this month’s Inky Paws Challenge 111 on the Newton’s Nook blog. I really liked the layout of this sketch so when I saw it I knew I had to make a card! I colored the kitty with Copic markers and heat embossed some green cardstock with gold embossing powder for some elegant pattern. The really fun thing about this is that I attached an Action Wobble to the cat–so he wiggles! See below for a wiggly video! The small things in life make me happy!
I’ll be teaching how to make this card in early December at Runaway Art and Craft Studio, along with two other Christmas cards. Have a great day and thanks for stopping by!
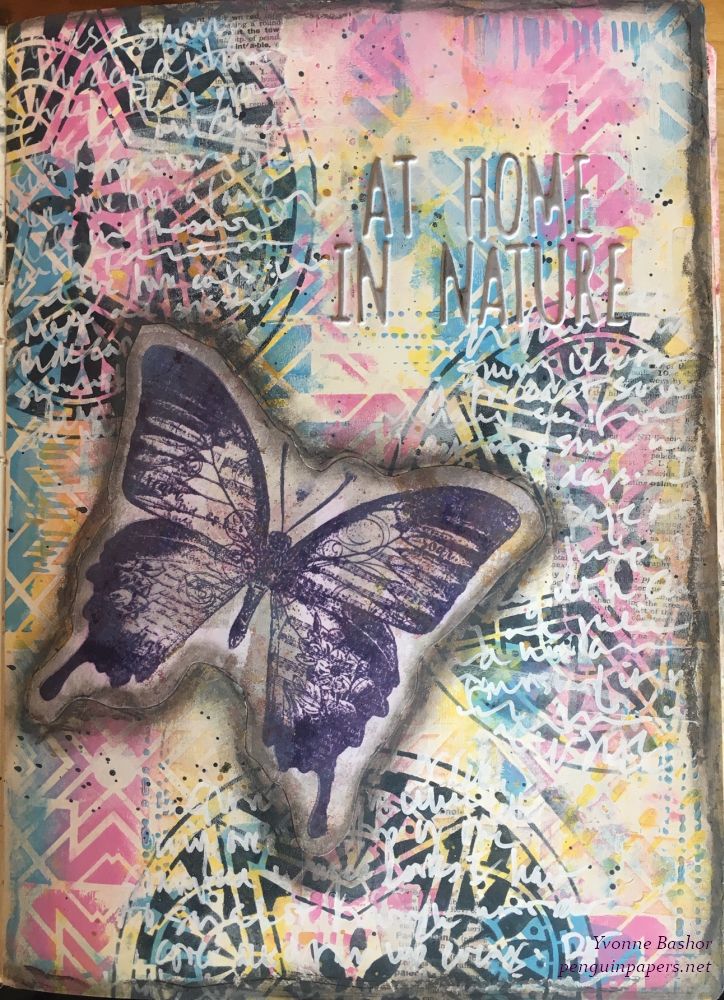
Impression Obsession – Dina Kowal design – Big Butterfly
Stencil – Stencil Girl S610 – Gwen LaFleur design – Boho Star Circle
Posca pen – White
Ranger/Tim Holtz Distress Crayon – Hickory Smoke
Paper Artsy Fresco paints – Bubble Gum, Chalk, Smurf, Zesty Zing, Pea Coat
Ranger Archival Ink / Dina Wakley Media – Night
White foam stickers – American Craft Thickers – Memento White
I created this art journal page as part of Creative Jumpstart 2019. This particular lesson was presented by Tania Ahmed, which I used as a jumping off point. I really enjoyed her approach and highly recommend that anyone interested in mixed media jump into Creative Jumpstart!
My main focal image was a gel print from my stash that I stamped over with the IO butterfly stamp. I so enjoyed Tania’s lesson and all of the layering involved. Thanks for visiting today!
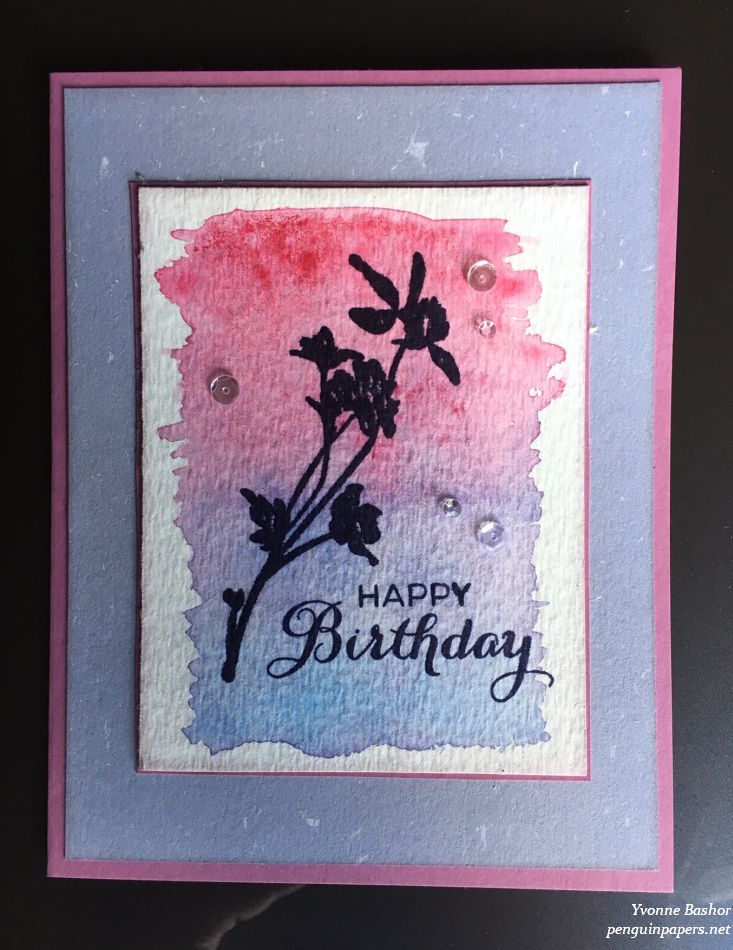
Stampers Anonymous Tim Holtz Collection – Wildflowers
Technique Tuesday – Ranunculus
Watercolors – Sakura Koi
Cardstock
Sequins
This is a clean and simple card with a bright palette–a fresh look after holiday cards! I created the background using watercolors and blending them vertically. Once it was dry, I stamped the floral silhouette and sentiment onto the watercolored panel and added sequins for some visual interest. I layered the panel onto the subtle patterned paper and a matching card base. Very simple! Thanks for visiting.
Patterned paper – Echo Park Celebrate Winter Collection
Glitter cardstock – Paper Accents
Chipboard Quote Chip (Happy Holidays) – Tim Holtz Idea-ology – Christmas Words and Phrases
Red “pearls” – Mark Richards Ltd.
Cardstock – Bazzill
Wishing you a very Merry Christmas!
This was a fun card using the cute stamp and die sets from Memory Box. I like the color combination of red, white and blue with snowflakes–it is really eye-catching. Have a wonderful day with your family and friends and thanks for stopping by.
Stamps – Stampers Anonymous Tim Holtz Collection: Winter Watercolor and Festive Overlay
Patterned paper – Pebbles – Cozy & Bright Collection – Winter Green
Ranger Distress Ink – Evergreen Bough
Silver Mirror Cardstock – Paper Accents
Cardstock – Neenah
Ribbon
For this card, I started out with a Distress Ink background and then stamped the bird and sentiment on top. The detail of the chickadee stamp is really lovely and I didn’t want to detract from it with a lot of fussy stuff. I did add some glitz by layering the image with some patterned paper and then a layer of silver mirror cardstock. I added the silver ribbon for some visual interest and to repeat the silver again to tie it altogether while still keeping it clean and simple. I was inspired by the current sketch at CAS(E) this Sketch. Thanks for visiting.
Stamps – Stampers Anonymous Tim Holtz Collection: Winter Watercolor and Festive Overlay
Marvy LePlume II markers
Patterned papers –
Graphic 45 – Floral Shoppe Collection: Golden Serenity
Pebbles – Cozy & Bright Collection – Winter Green
Cardstock – Bazzill
Red “pearls”
Ribbon
Black embossing powder
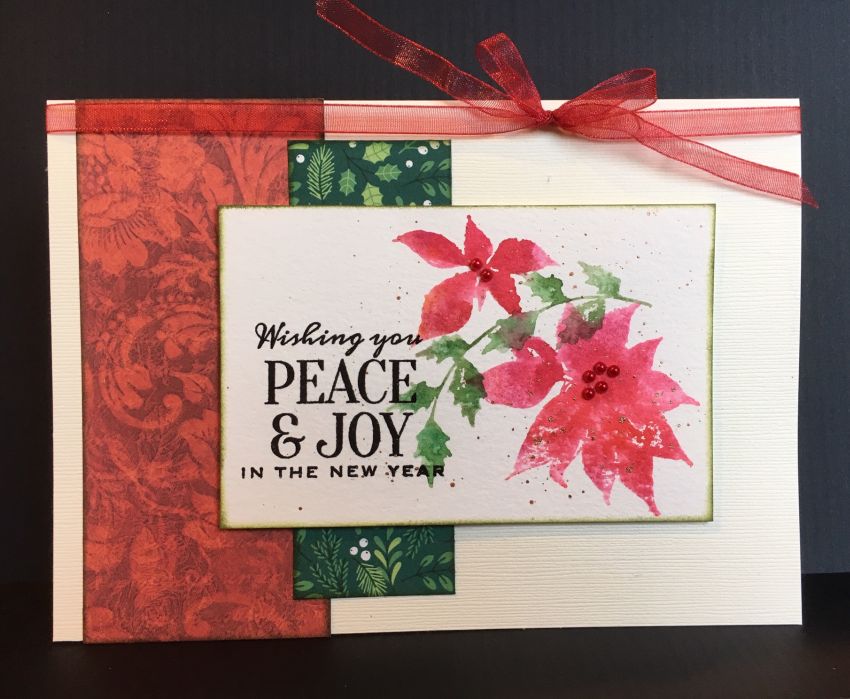
This is another card that I made for the watercolor class I taught at Runaway Art and Craft Studio in Salem. I used the Marvy markers direct to rubber on the poinsettia and holly stamps, then spritzed the stamps with water before stamping for a nice watercolor effect. I heat embossed the sentiment with black embossing powder and spattered the image with some gold metallic paint after adding the red “pearls” to the flower centers. The image is layered on top of some patterned paper strips and all is edged with green ink. Thanks for stopping by.
Ephemera – Tim Holtz Idea-ology Ephemera Pack – Festive
Chipboard Quote Chip (Joy) – Tim Holtz Idea-ology – Christmas Words and Phrases
Candy Cane Chipboard – Echo Park Decorative Brads & Chipboard – Twas the Night Before Christmas
Mini Snowflake Ornament – Darice
Wooden Christmas Tree – Sierra Pacific Crafts
Ribbon and Ric-Rac
This is one of my favorite kinds of projects: creating a tag and combining a lot of different products from a lot of different companies! I created this tag for an exchange with my online cardmaking group. It also fit perfectly with a color challenge at The Paper Players. I started out by covering a plain manila tag with the patterned paper. I stamped out the snowman and colored the background on the image with some Evergreen Bough Distress Ink and used some of my Posca pens to color details on the snowman and to make the snow. I edged most of the elements with Medieval Blue Versafine Clair ink and then fit the die-cut snowflakes and all of the other little pieces together to form my composition. I edged the tag in blue ink as well and then tied the ribbon and ric-rac through the tag’s hole and attached the little snowflake ornament. This was really fun to make and I popped it in the mail to the recipient today. Thanks for visiting.
Stamps – Stampers Anonymous Tim Holtz Collection: Winter Watercolor and Festive Overlay
Patterned paper – BoBunny – Once Upon A Lifetime collection
Paper Accents Mirror Paper – green
Marvy LePlume II markers
Cardstock – Bazzill
Nuvo Crystal Drops – silver
Red “pearls”
Embossing powder – silver
Ribbon
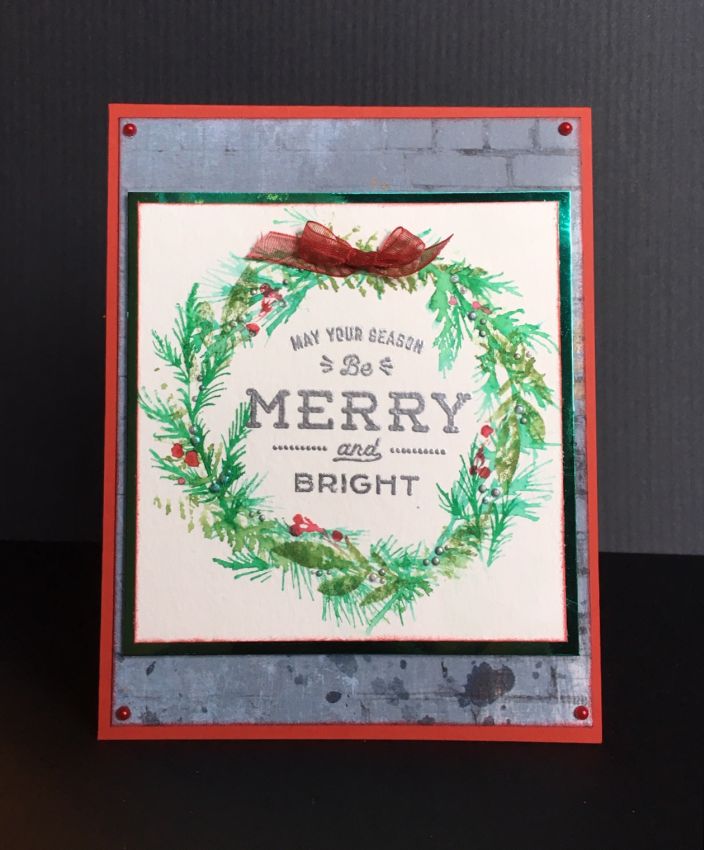
I just finished teaching a class featuring this and two more cards using these stamp sets and a watercolor technique. The watercolor is done using Marvy LePlume II markers direct to rubber and then spritzed with water. Wreath-building is very popular among stampers currently. For this card, I simply penciled in a circle and stamped the greens around it using different marker colors and stamps. It feels just like the process one undertakes when actually creating a wreath for the front door–only quicker! Once the stamping was all complete, I added a few silver Nuvo Crystal Drops for a little shine in a view areas on the wreath. Finally I added a sentiment in the center of the wreath and gave it some more shine with silver heat embossing, plus a bow on top. I should probably put a real wreath up now! Thanks for stopping by.