Category Archives: Online Card Classes

- Die – Sizzix/Tim Holtz – Flurry #2
- Stamp – Lawn Fawn – Simply Winter Sentiments
- Watercolors – Windsor & Newton
- Silver mirror cardstock – Paper Accents
- Cardstock – Bazzill
I created this card based on inspiration from Day 2 of Online Card Classes Clean & Simply Holiday class. You need to take the class to get all of the steps, but it was fun to get back with my watercolors again and a technique I learned long ago in college. I layered the watercolored panel onto a shiny piece of silver cardstock and heat embossed the sentiment for a bit of gloss and sheen. Thanks for stopping by.
3 Comments | tags: cardmaking, die cuts, embossing, lawn fawn, online_card_classes, sizzix, stamping, tim holtz, watercolor | posted in Christmas, Clean & Simple, Online Card Classes, Winter

- Stamp – Technique Tuesday “Greenhouse Society – Pansy” August 2015
- Tim Holtz Distress watercolor cardstock – Ranger Ink
- Embossing powder – Detail Silver
- Tim Holtz Distress Markers – Ranger Ink – Dusty Concord, Wild Honey, Mustard Seed, Peeled Paint, Twisted Citron, and Broken China
I’m taking the Online Card Classes Watercolor for Cardmakers: Exploring Mediums class right now. This was an image I painted as a result of Day One’s lessons using watercolor-based markers. First I heat embossed the image from Technique Tuesday with silver embossing powder. I then used Ranger Distress Ink markers as my watercolor medium. I haven’t quite pulled a card together with this yet. Thanks for visiting today.
2 Comments | tags: distress techniques, embossing, stamping, technique tuesday, tim holtz, watercolor | posted in Distress Techniques, Online Card Classes
 Hero Arts Stamps:
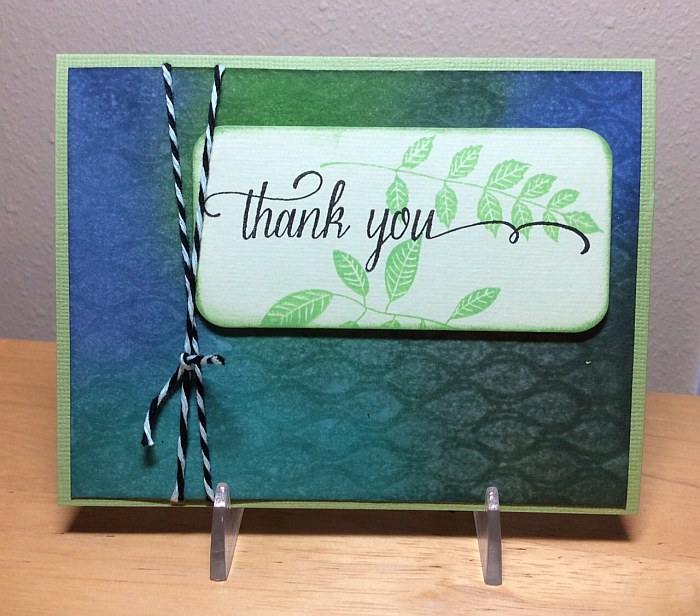
CL738 – Messages with Flourish
CL834 – Stamp Your Own Plant
CG613 – Simple Leaf Background
Hero Arts Frame Cuts:
D1004 – Rectangle Frame
Twine – My Mind’s Eye “Chalk Studio”
Cardstock – Bazzill and Worldwin
Ranger Distress Inks
I created this card as part of a personal challenge on the Hero Arts Flickr group, where we challenged ourselves to create a card with at least one Hero Arts product within a 90 minute timeframe. I made it (barely!) within that amount of time. I’m very slow and methodical, so any timed challenge is really tough for me! The background was something I made after taking the first day of Online Card Classes “Background Check” class. I used Distress inks and water, plus a lovely Hero Arts background stamp to make the background. A very fun technique! Thanks for visiting today.
2 Comments | tags: cardmaking, die cuts, distress techniques, flora, Hero Arts, leaves, my mind's eye, stamping | posted in Challenges, Distress Techniques, Online Card Classes, Thank You, Uncategorized

- Dies – Memory Box – “Sofia Heart” and “Mini Heart Collection”
- Simon Says Stamp – “Large Hearts Set” and “Stitched Rectangles”
- Penny Black – “Love & Joy”
- Cardstock – Bazzill Bling and Neenah Solar White
- Sequins – Doodlebug
- Vellum
I am in the midst of the Online Card Classes Clean & Simple 4 class. During the lessons on Day 4, I was inspired by Yana Smakula and her Faux Embossing technique. I used a number of different heart dies I have in my stash to create a fun, white-on-white background. I then attached the Love die cut on a small piece of vellum cut with the stitched rectangle die. You can still see the texture of the heart background through the vellum. I added some pearly and shiny white sequins to the background to accent the bling seen in the sentiment for a subtile and classy look. Thanks for visiting.
1 Comment | tags: cardmaking, clean and simple stamping, die cuts, memory box, penny black, Simon Says Stamp | posted in Love, Online Card Classes

- Dies –
- Penny Black – “Love & Joy”
- Memory Box – “Mini Heart Collection”
- Memory Box – “Floral Vine”
- Memory Box – “Sofia Heart”
- Memory Box – “Pierson Corner”
- Poppy Stamps – “Ivy Tendrils”
- Poppy Stamps – “Lovely Tendril”
- Cardstock – Bazzill and BoBunny
I am taking the Online Card Classes Clean & Simple 4 class right now. I’m trying to keep up in the evenings after work, although today I did fall behind. However, I did finish a card! I was inspired by Debby Hughes lesson on the faux paper cutting technique. I used a lot of dies in my collection to create this heart. It took a very long time and I learned a lot (mainly about what I’d do better next time!). It was a fun card to complete. Thanks for visiting.
Leave a comment | tags: die cuts, memory box, penny black, poppy stamps | posted in Love, Online Card Classes, Valentine
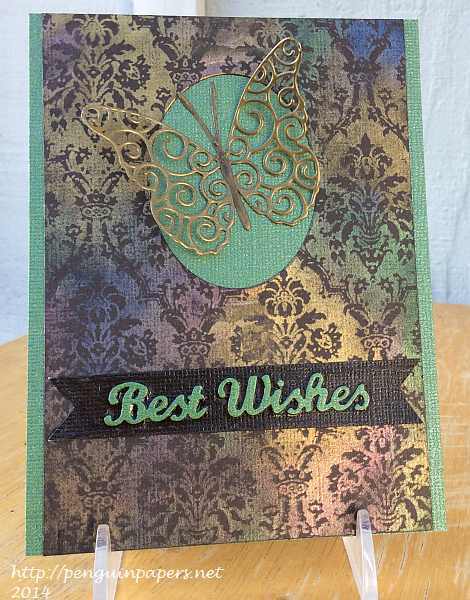
- Stamp – Tim Holtz/Stampers Anonymous “Reverse Damask”
- Dies – Memory Box “Swirl Butterfly”, Elizabeth Craft Designs “Best Wishes” and Spellbinders Nestabilities “Standard Circles Large”
- Ranger Perfect Pearls – Plum, Perfect Gold, Kiwi, and Rust
- Embossing Powder – Stampendous – Opaque Gold
- Cardstock – Bazzill
- Ranger Glossy Accents
I was inspired by a lesson in the Online Card Classes Stretch Your Stamps 2 class to play with a background stamp and Perfect Pearls. I stamped the lovely background image with Perfect Medium and then applied Perfect Pearls to make an elegant sheen on the dark brown cardstock. I covered the die cut butterfly with gold embossing powder and heat set it. I wanted to repeat a little of the gold used in the background to tie the butterfly focal point to the background. For the sentiment, I used the die cut words, adhered them to a fishtail-cut flag, and covered it all with Glossy Accents to bring on a little more shine. Thanks for visiting.
Leave a comment | tags: butterflies, cardmaking, die cuts, embossing, memory box, Ranger, spellbinders, Stamper's Anonymous, tim holtz | posted in General Cards, Online Card Classes

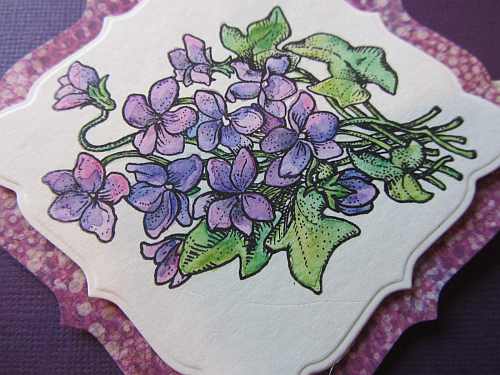
- Stamp – Flourishes “Botanical Bookplates Volume 1”
- Patterned paper – K & Company “Jubilee Purple Burst”
- Die – Spellbinders Nestabilities “Labels Fifteen”
- Ribbon – May Arts
- Cardstock – Bazzill
This is a birthday card I made this past weekend. It is for my mom. Happy Birthday, Mom!
I love a good botanical stamp! This Flourishes stamp is really lovely. I’ve been taking and really enoying the Watercolor for Cardmakers class at Online Card Classes and this was inspired by some of the lessons there. I used watercolor pencils and a water brush to color the image. If you’d like to see a close-up of the violets, see the photo below. Thanks for stopping by.

Leave a comment | tags: cardmaking, die cuts, flora, Flourishes, spellbinders, stamping, watercolor | posted in Birthday, Online Card Classes
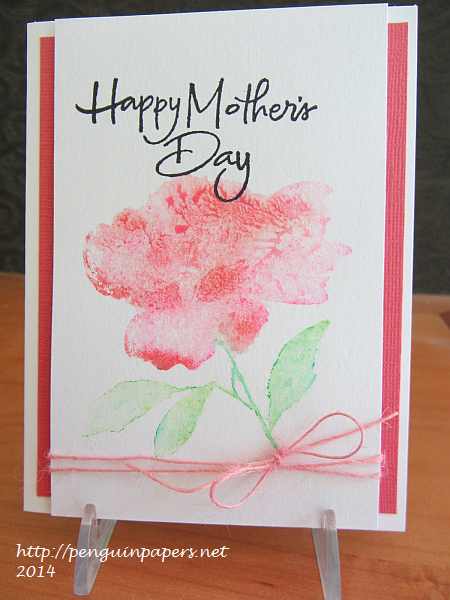
- Floral Stamp – Hero Arts “Painted Flower”
- Sentiment Stamp – Wordsworth “Happy Mother’s Day”
- Twine – American Crafts
- Cardstock – Bazzill
For this card, I was inspired by Shari Carroll at Online Card Classes “Watercolor for Cardmakers” class. I used Gelatos to color the flower direct to rubber and applied water to create this great watercolor effect. The design of the card is very simple to show off the pretty flower. To see a little bit more, check out the detail below and have a great day. Happy Mother’s Day, Mom!

3 Comments | tags: cardmaking, flora, Gelatos, Hero Arts, watercolor | posted in Online Card Classes
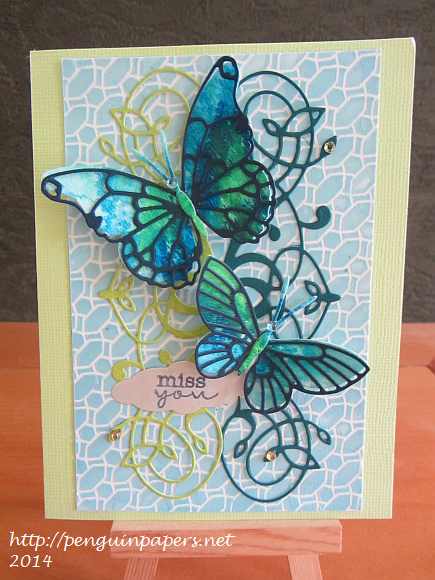
- Stencil – Memory Box “Cressida”
- Die Cuts – made from Memory Box dies: Darla Butterfly, Vivienne Butterfly, Moonlight Butterfly, Kaleidoscope Butterfly, Valerian Flourish
- Bling – KaiserCraft and Mark Richards
- Sentiment – Stamp by My Favorite Things “Pretty Poppies” set and die cut from Spellbinders Nestabilities from the Blossom Tag and Accents set
- Golden Modeling Paste
- Ranger Alcohol Ink – Sail Boat Blue
- Faber Castell Gelatos
- Cardstock – Bazzill
This was a fun card with lots of different media at work. I started out making the background with inspiration from the latest Online Card Classes class: Stenciled. I mixed a few drops of alcohol ink with some modeling paste to make a nice light blue. I then smeared it through my new (gorgeous) stencil from Memory Box. For the butterflies, I scribbled some Gelatos in blue and green on some watercolor paper and spritzed the color with some water to blend the colors together. Once the Gelatos had dried, I die cut the butterflies and the accompanying detailed butterflies from solid cardstock and glued them together. I added the flourish die cuts to the background and then placed the butterflies and the sentiment on top and applied rhinestones to the flourishes and heads of the butterflies. Lots of texture on this card! Thanks for visiting.
1 Comment | tags: alcohol inks, butterflies, die cuts, memory box, Ranger, stamping, stencils | posted in Miss You, Online Card Classes

- Stencil – The Crafter’s Workshop “Mini Ferns”
- Stamp – Simon Says Stamp “Square Sayings”
- Patterned paper – Echo Park “For the Record 2”
- Ranger Dylusions Ink Sprays – Fresh Lime, Vibrant Turquoise and London Blue
- Golden Molding Paste
- Cardstock – Bazzill
I made this card based on a lesson from the Online Card Classes Stenciled class. I tried my hand at using molding paste with a stencil. My variation was to mist the cardstock with ink sprays prior to adding the molding paste and it actually incorporated some of the color into the stenciled image. Kind of a happy accident! I’ve included a close-up here to try to show it in a little more detail.
 My color scheme reflects the colors of the Seattle Seahawks, who will soon be playing in the Super Bowl. The Operation Write Home Stars and Stamps CardBowl is this weekend, and one of the challenges is to use something that reflects one of the teams playing in your card design. Living in the northwest, it seemed only appropriate to select the Seattle team, so I picked the team colors! Thanks for stopping by today.
1 Comment | tags: cardmaking, crafter's workshop, echo park, Ranger, Simon Says Stamp, stencils | posted in Challenges, Online Card Classes, OWH