Stencil – The Crafter’s Workshop TCW2300 Slimline Gentle Leaves
Stamp – Miss Ink Stamps – Everyday Sentiments
Posca pen – white
Acrylic paints, gel plate, archival ink
Sequins – Buttons Galore
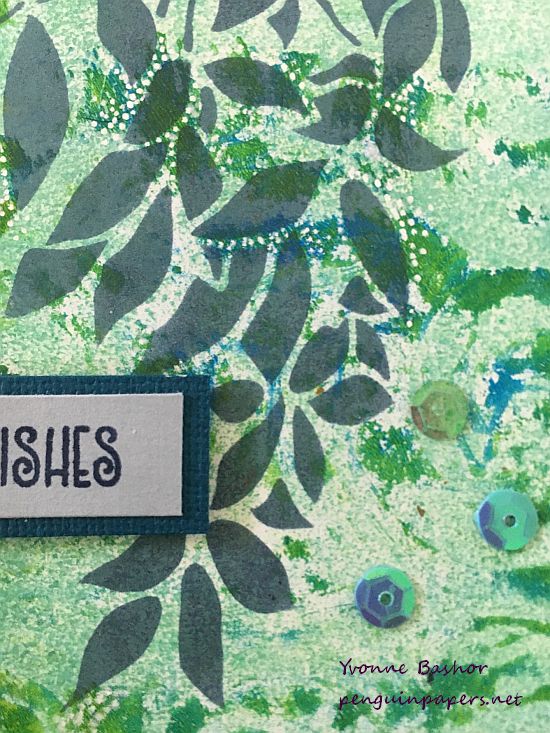
I make lots and lots of gel prints! I like to participate in printing challenges, I teach gel printing classes and make many samples for classes, and I just love to grab a gel plate or two and experiment with inks, paint and textures. So each time I set out to make a few prints, it can end up to be many that I don’t have time to use at that very moment. So needless to say, I have a lot of potential card backgrounds available in my stash.
For this mixed media card, I grabbed a print that was already card base sized. It had interesting texture, but needed a focal point. I had this new stencil by The Crafter’s Workshop that I hadn’t used yet, so I didn’t hesitate to use it with some archival ink to add a design that worked very well with my gel print. I am always a fan of botanical designs. I wanted to make sure the stenciled design was clear on the print, so I added a bunch of dots with a white Posca paint pen. This added even more texture but added enough contrast that the leaves were better defined. Adding a stamped sentiment and some sequins made it an easy to complete the card.
I created this following the sketch for this month’s Inky Paws Challenge 111 on the Newton’s Nook blog. I really liked the layout of this sketch so when I saw it I knew I had to make a card! I colored the kitty with Copic markers and heat embossed some green cardstock with gold embossing powder for some elegant pattern. The really fun thing about this is that I attached an Action Wobble to the cat–so he wiggles! See below for a wiggly video! The small things in life make me happy!
I’ll be teaching how to make this card in early December at Runaway Art and Craft Studio, along with two other Christmas cards. Have a great day and thanks for stopping by!
Die and stamp set – Spellbinders – Hello Expressions
Stencil – The Crafter’s Workshop – TCW829 Heartful Flower by Julie Fei-Fan Balzer
Ink – StazOn Pigment – Snowflake
Posca paint markers
Cardstock – black and turquoise
Surprise! I’m finally posting!
I created this card as a sample for a demo I’m doing. I will be creating cards from stenciled backgrounds at Runaway Art and Craft Studio during a demonstration at First Wednesday on May 1st. First Wednesday, sponsored by Salem Main Street Association, is a monthly celebration in downtown Salem during which businesses open their doors to celebrate with the community. While I am stenciling and making cards, Christy is art journaling and Robin will be sharing her illustrated coloring posters.
I began this card by applying white ink through a stencil onto black cardstock to create the base design. I then added color by drawing dots around the stenciled design with Posca acrylic paint markers. I layered the die-cuts and popped it up with dimensional adhesive above the stamped sentiment and then adhered the whole card front onto a turquoise card base.
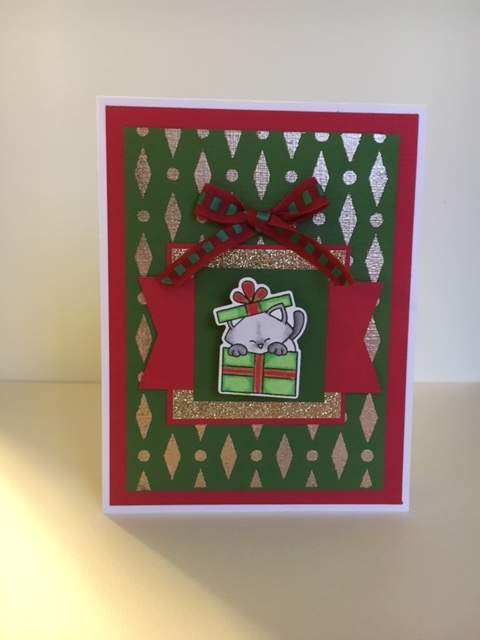
This was a fun card to make, partly because of the subject matter (more cute animals!) and also because I pulled out supplies from multiple companies. It is fun to mix it up sometimes. It was way too difficult to resist making a raccoon Valentine for my mom. Many people don’t know this, but she has several friends who are raccoons.
I started by coloring the raccoon image with Copic markers and fussy cutting it. I made the tree stump (slice?) by applying Distress Ink through a stencil and cutting it out, then using it for a backdrop. I assembled the various elements, finishing with the sentiment and tying a ribbon at the top. Thanks for stopping by.
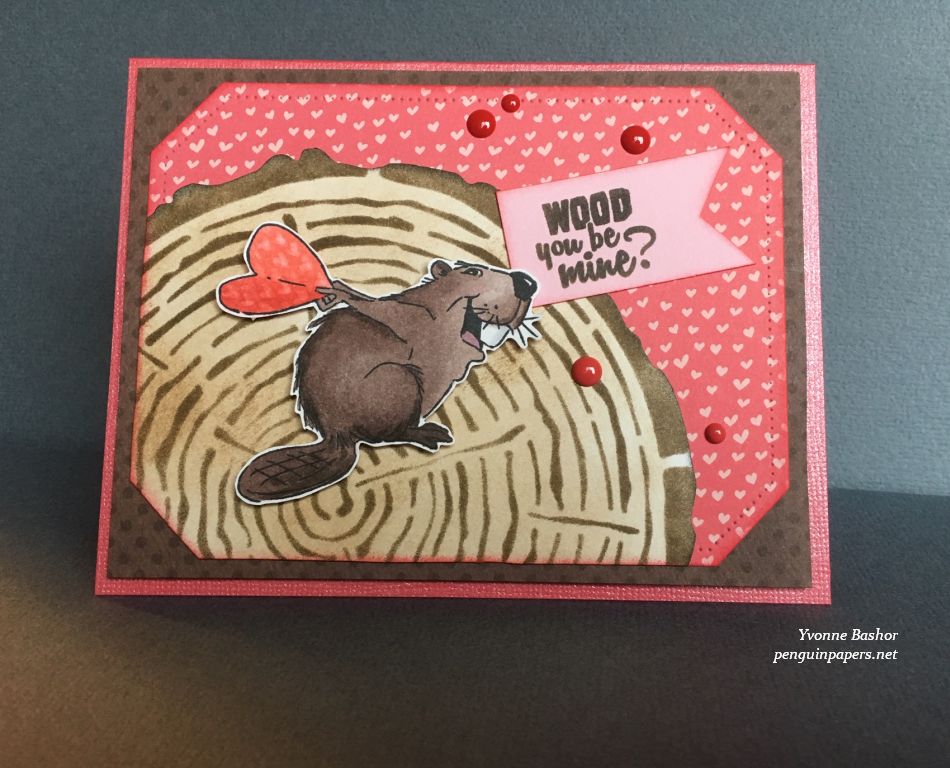
I made this Valentine for my son, who is an Oregon State University student (and they’re the Beavers–Go Beavs!). He is a fan of cute animals, so this is right up his alley–and mine! I colored the beaver image with Copic markers and emulated the heart motif in the patterned paper in the heart he is clutching. The tree stump is created by applying Distress ink through a stencil. This was a fun card to piece together! Thanks for stopping by.
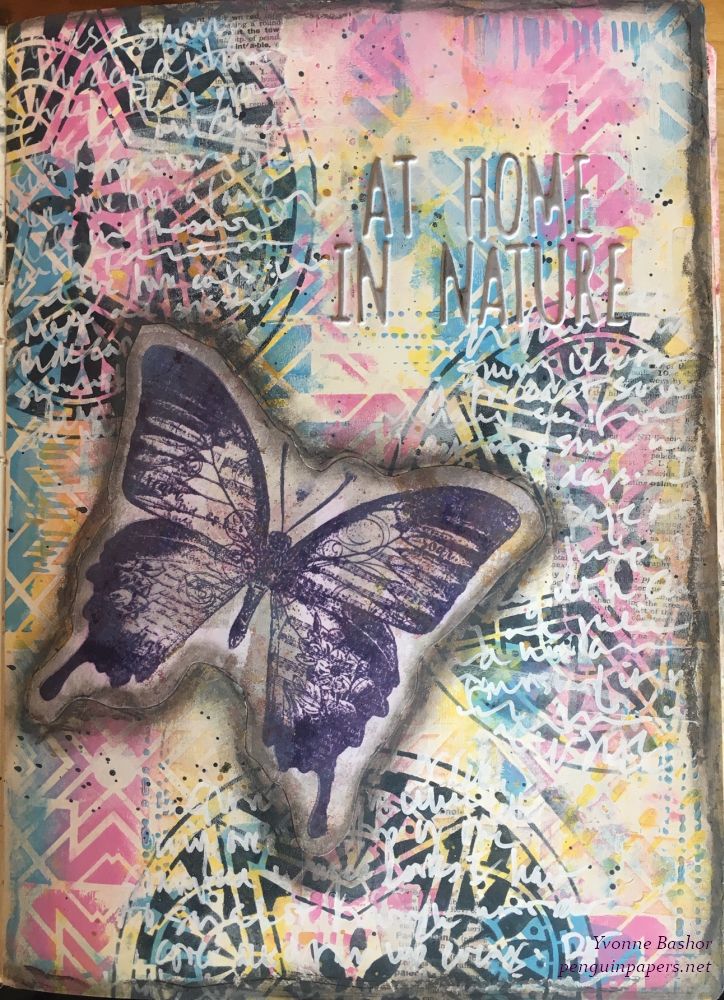
Impression Obsession – Dina Kowal design – Big Butterfly
Stencil – Stencil Girl S610 – Gwen LaFleur design – Boho Star Circle
Posca pen – White
Ranger/Tim Holtz Distress Crayon – Hickory Smoke
Paper Artsy Fresco paints – Bubble Gum, Chalk, Smurf, Zesty Zing, Pea Coat
Ranger Archival Ink / Dina Wakley Media – Night
White foam stickers – American Craft Thickers – Memento White
I created this art journal page as part of Creative Jumpstart 2019. This particular lesson was presented by Tania Ahmed, which I used as a jumping off point. I really enjoyed her approach and highly recommend that anyone interested in mixed media jump into Creative Jumpstart!
My main focal image was a gel print from my stash that I stamped over with the IO butterfly stamp. I so enjoyed Tania’s lesson and all of the layering involved. Thanks for visiting today!
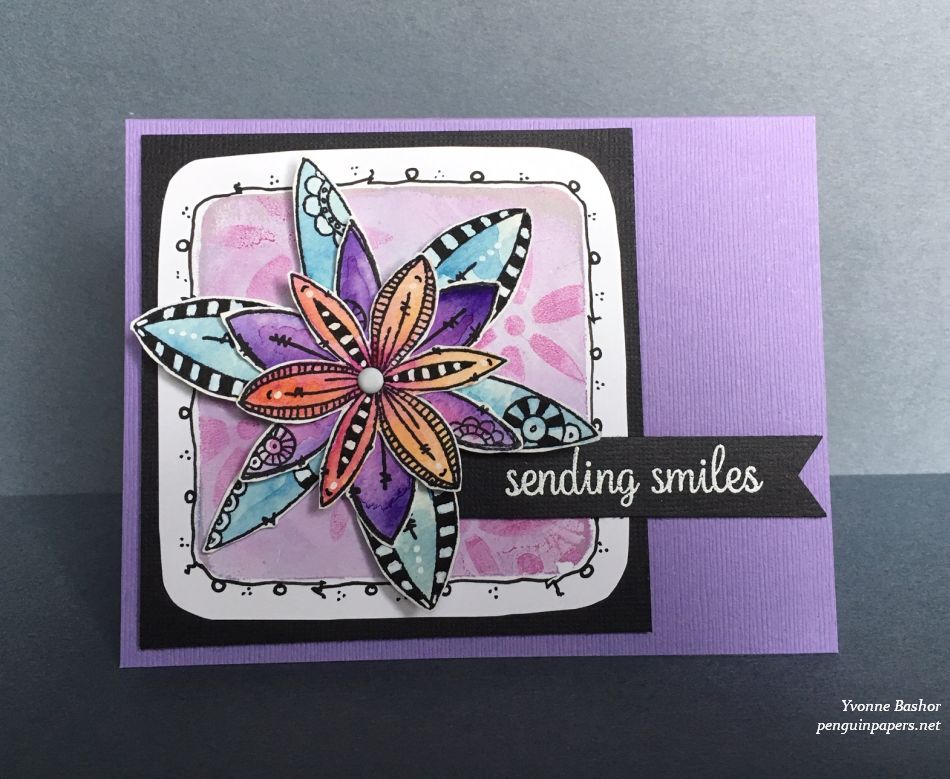
I created this mixed media card in phases. First I stamped out the flower stamps onto watercolor paper with Archival ink and added color with some watercolors. Once dry, I colored in areas with black and white Posca pens and added a few doodles of my own. After fussy-cutting the flowers out, I began working on the background. I made a number of gel plate prints using PaperArtsy Fresco paints and the JOFY stencil that matched the flower stamps. I selected one that I made with a small plate that framed the flowers nicely, then doodled around the perimeter and trimmed it out. I layered the flowers together and attached them in the center with a brad. I finished the card by adhering the flower to the background and adding a sentiment that I heat embossed. Thanks for stopping by.
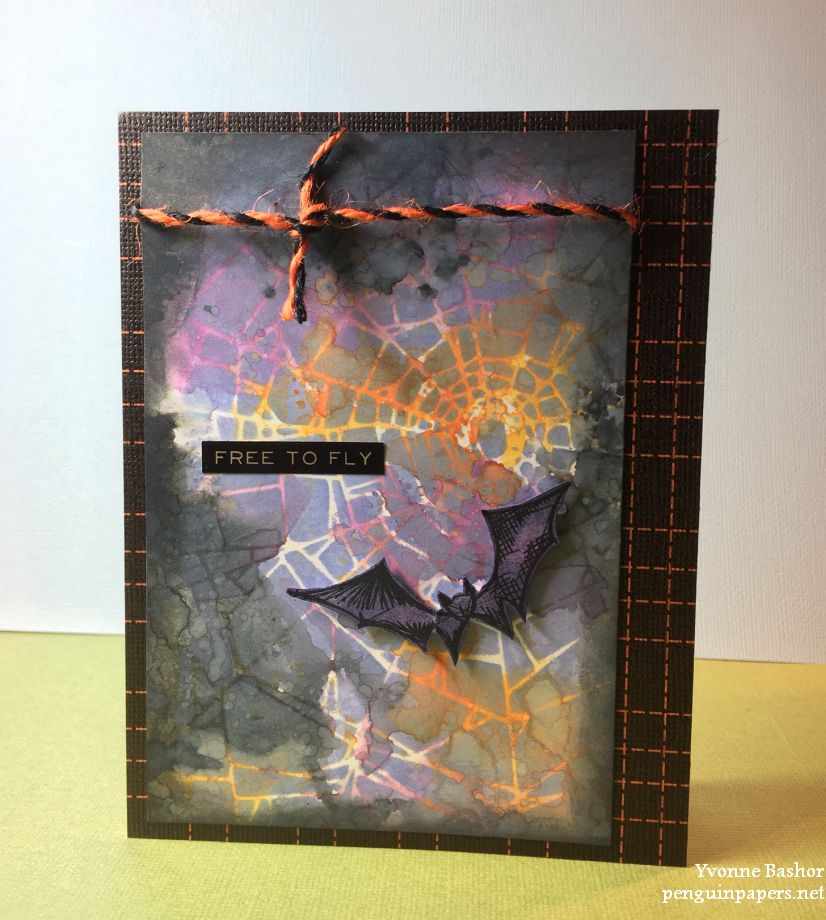
Metallic Sticker – Tim Holtz Idea-ology – Quotations – TH93559
I started out creating backgrounds with no other plan but to make some Distress Oxide backgrounds using Halloween-y colors. The background for this card started out with Spiced Marmalade, Black Soot and Dusty Concord and lots of water and leaving some white space. I then applied Shaded Lilac Distress Oxide ink through the Shatter stencil. I edged it with Black Soot and added a little more water splatters to the blended inks.
Meanwhile, I stamped the bat in black Archival ink on white cardstock and trimmed away the labeling on the image. I colored it by blending Dusty Concord and Chipped Sapphire (regular) Distress ink to color the bat. I then adhered it to the background with dimensional adhesive. I added the “Free to Fly” sticker to the scene. I assembled the card by adhering the patterned paper to a card base, tying the twine around the top of the bat scene and adhering it all onto the card.
This was a fun one! Thanks for stopping by. For a closer look:
Gel prints from my stash (using acrylic paint, stencils, found objects)
Stamp – Altenew “Fresh Freesia”
Cardstock – Bazzill
Ink – VersaFine Clair “Medieval Blue”
Sheer Shimmer Spritz – Gold – Imagine Crafts
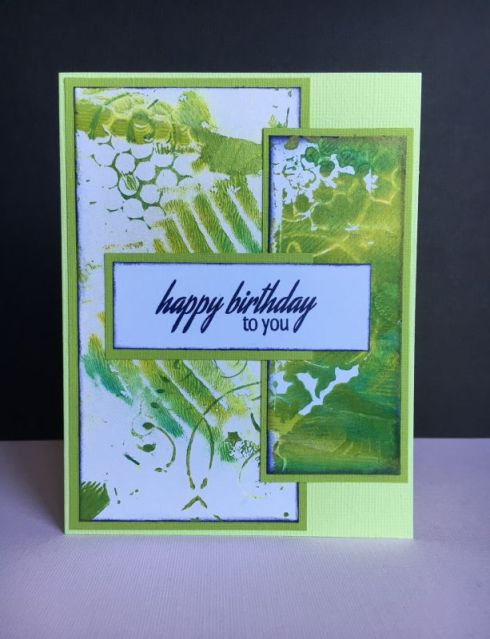
I created these cards using scraps of gel prints that I printed long ago. I used stencils when I made the prints used in the first card, one is from The Crafter’s Workshop called “Aboriginal” (the smaller panel) and the other is a stencil I borrowed and I can’t determine the company who produced it. I also spritzed the final card with some sheer gold spray for a little shimmer. The second card featured green gold acrylic paint, so it already had a pretty gold metallic look. I have many, many prints in my stash because I’ve taught classes in printing and done it on my own so I have lots to play with as a result. Some I use in my art journals, but I have been enjoying using them in cards lately. For both cards, after I cut them into panels I edged them in a darker ink to “finish” them nicely. I also matted the pieces with cardstock and added the birthday sentiment. Thanks for visiting today.
Paper beverage napkin – Lady Jayne “Celebrate Floral Heart”
Stencils –
Stampers Anonymous – Tim Holtz Collection “Flames”
Ranger Ink – Dina Wakley Media “Viney”
Prima-Finnabair Art Basics 3-D Gloss Gel
Stamps – Ranger Ink – Dina Wakley Media “Scribbly Flowers”
Deli paper
Dina Wakley Media acrylic paint – magenta, lemon, lime and white
Tim Holtz Idea-ology tissue tape – “Laboratorie”
Sequins – Doodlebug Designs
OHTO Fude Ballpoint Pen – black
Krylon gold metallic pen
Black Cardstock – Bazzill
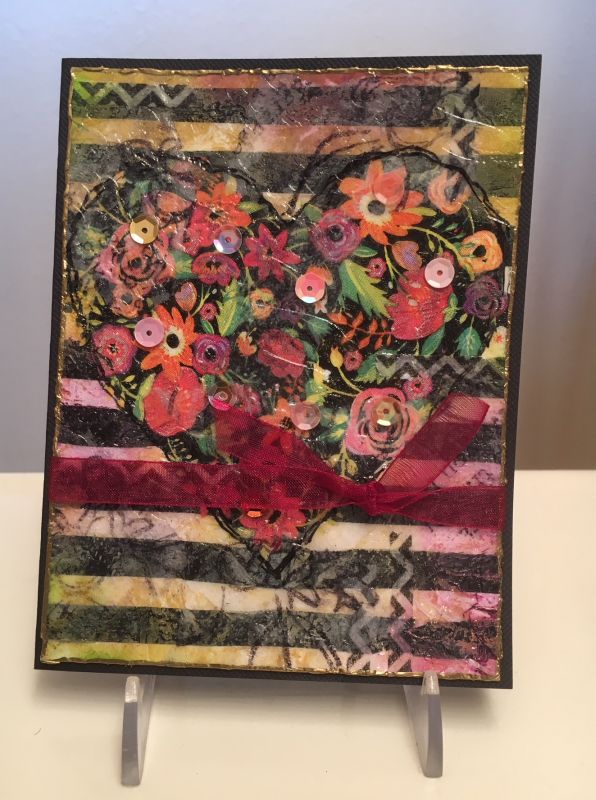
I created this mixed media card beginning with a beverage napkin that I adhered to a piece of Bristol paper with gel medium. I stamped and lightly painted some deli paper and added tissue tape to the piece. Then I applied the 3-D gloss gel through a couple of different stencils and allowed that to dry into a nice textured coating.
I have included a detailed photo so you can see the texture of the stenciled 3-D gel medium. It is pretty cool!
I loosely outlined the heart with the Fude Ball pen and then ran my metallic gold pen around the entire card, topping it off with a piece of ribbon and some sequins. I mounted the piece onto a black card base. It is amazing what you can do with a paper napkin! Thanks for visiting.


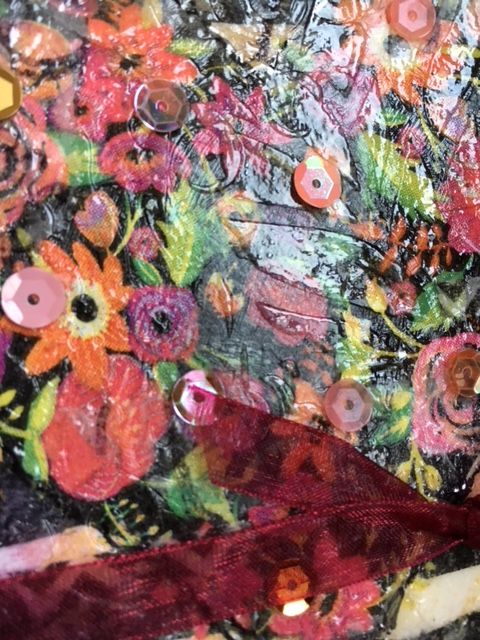 I have included a detailed photo so you can see the texture of the stenciled 3-D gel medium. It is pretty cool!

