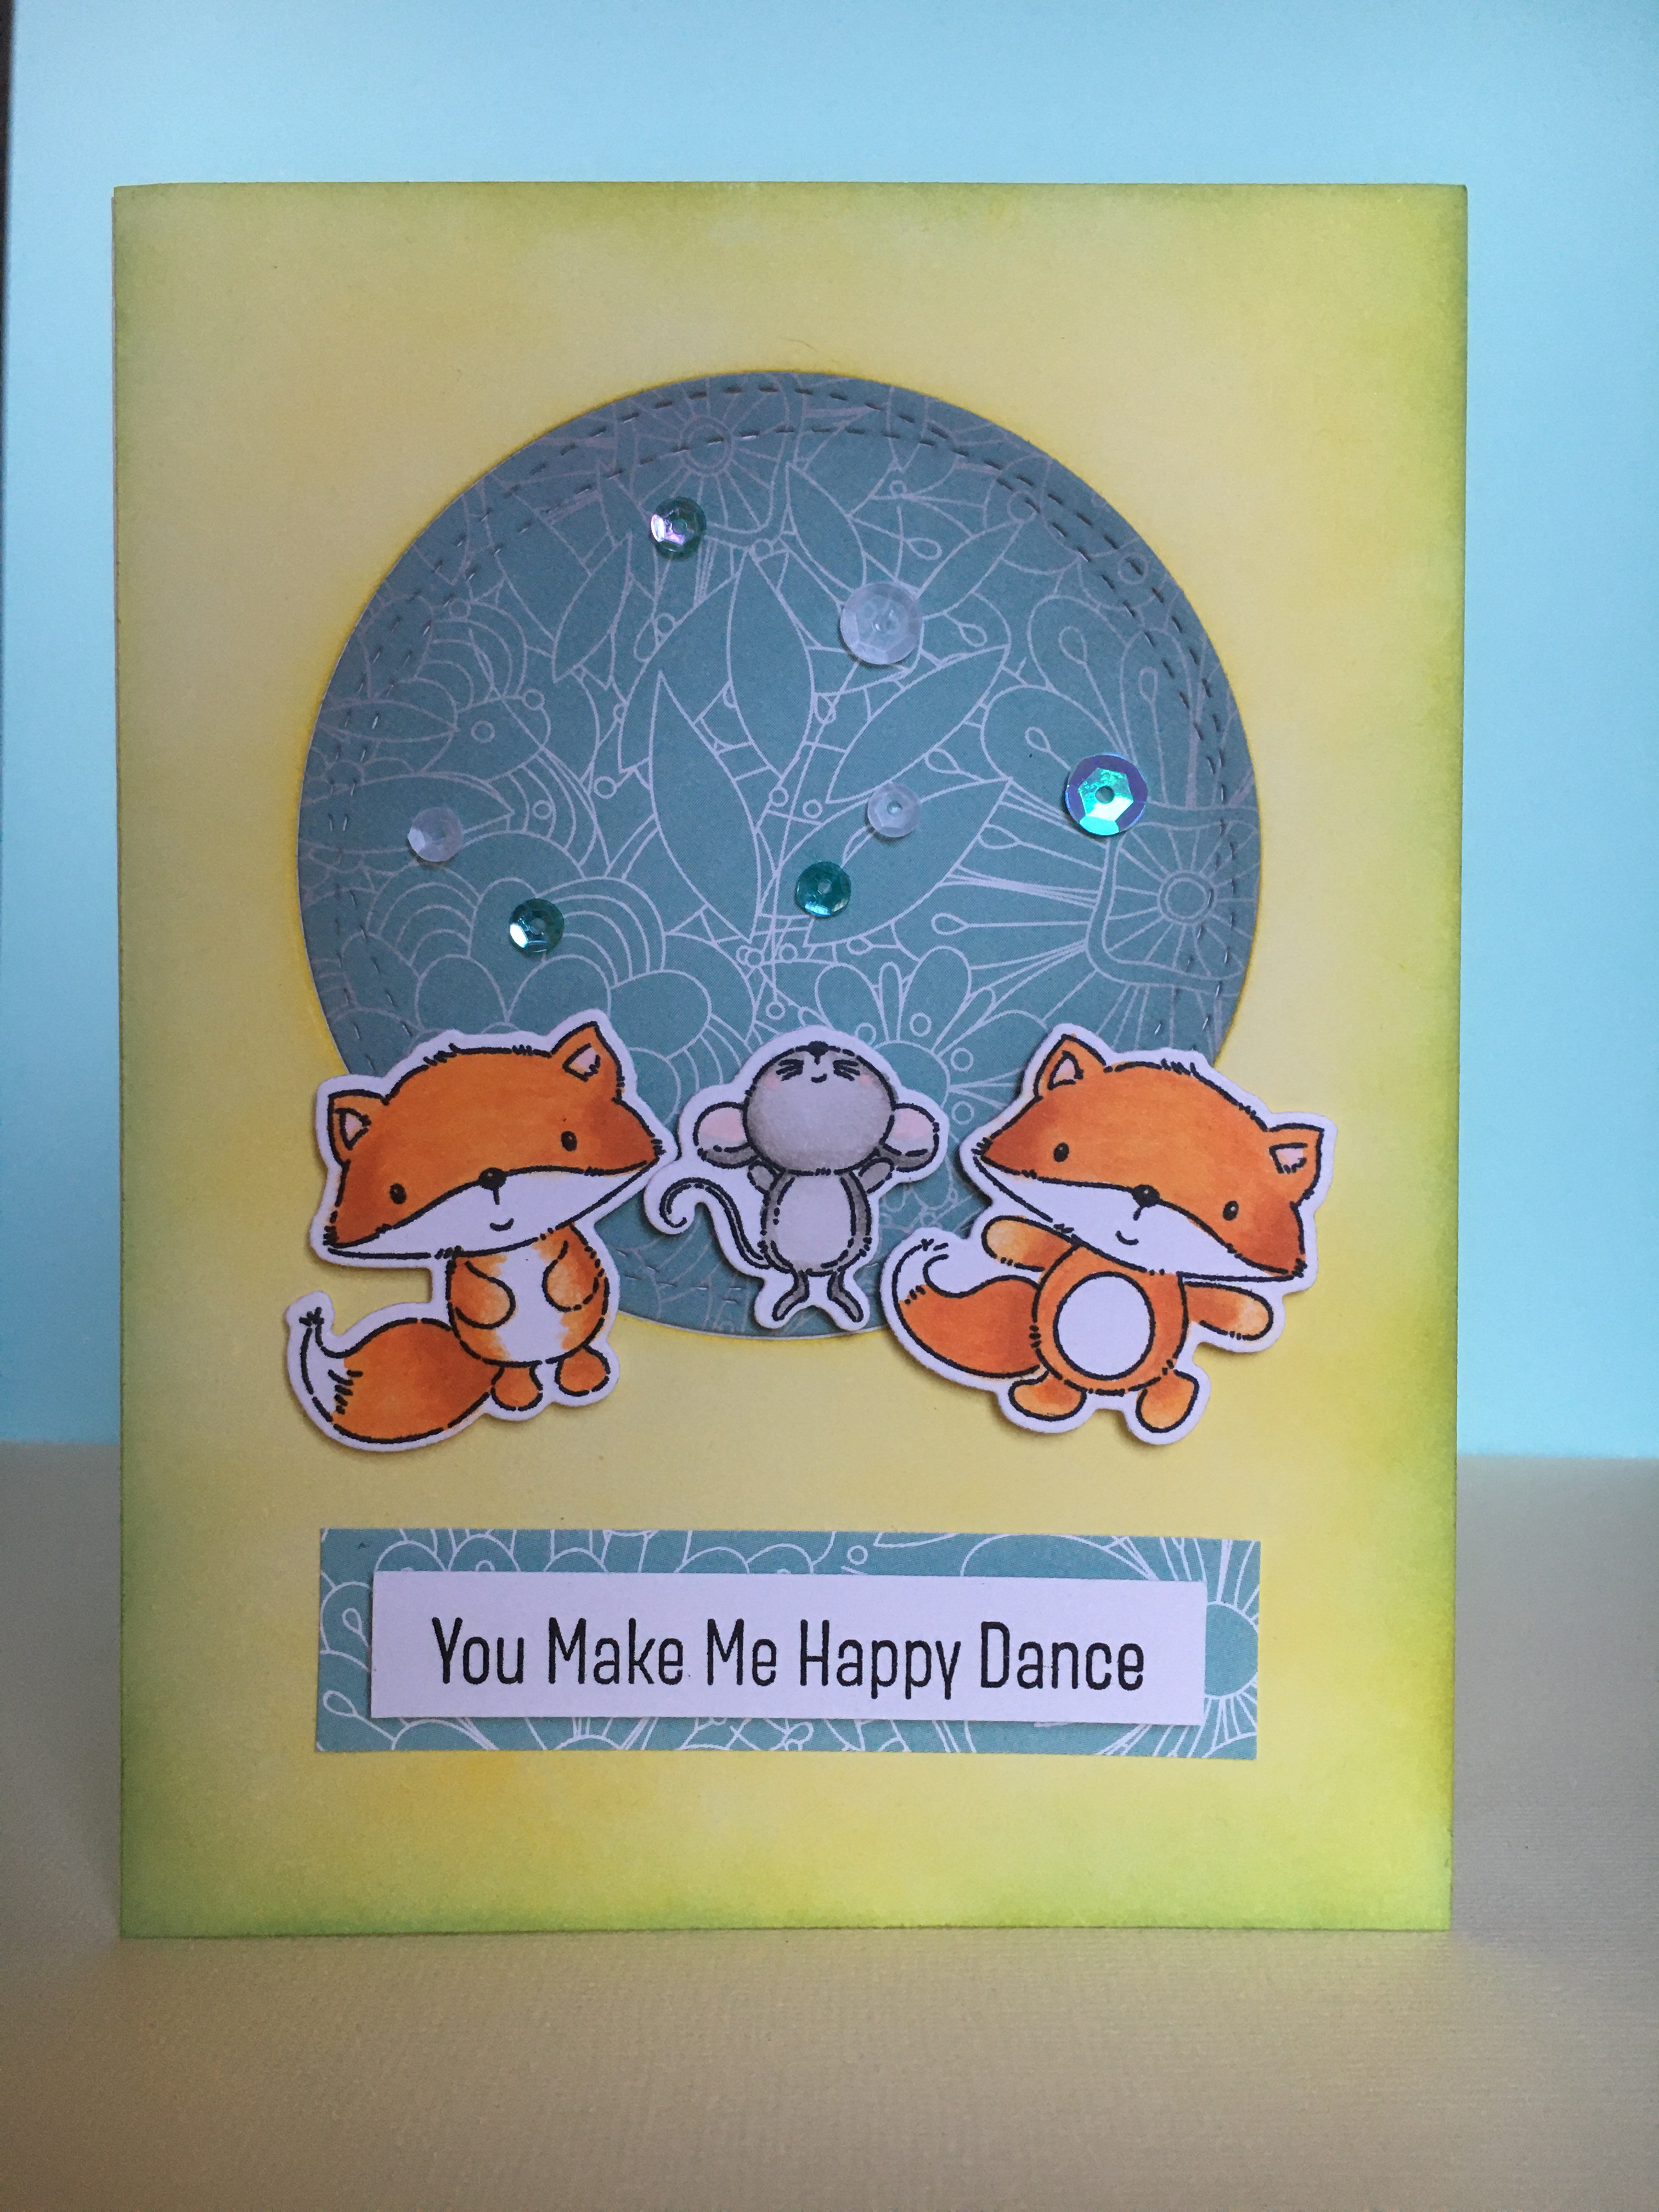
I have a simple card to share today, using the latest sketch at the My Favorite Things blog. This was a fun card that I made using some supplies that I’ve had for awhile, but never used.
For this card, I did a simple ink blended background using Mustard Seed and Tumbled Glass Distress inks. I cut out the round window from the panel and adhered it to a card base. Then I added a Wonky Stitched Circle die-cut from the patterned paper that I edged with Hickory Smoke Distress Oxide ink. I then colored the critters with Copic markers and popped them up near the bottom of the floral circle. To add a little more interest, I scattered a few sequins at the top of the circle. To finish the card off, I stamped the sentiment on white and layered it onto a strip of the same patterned paper used in the circle. Clean and simple and done!
I love creating monotype prints with leaves on my gel plate! The leaves in all shapes and sizes are calling me during these Autumn months. These are vine maple leaves that are turning at this time of year. I was able to capture some lovely color on a recent trip and immediately printed with some of the leaves..
I used some Distress Oxide inks and acrylic paints to make some leaf prints right after I collected these maple leaves. We traveled to central Oregon recently, which is a fall tradition for us, and it is fun to print botanical immediately after I gather them! It was a little cool, so I didn’t set up my gel plate outside like I do sometimes, but it was still very pleasant. I decided to quickly make a card with one of the prints.
Often when I make cards from gel prints, it is hard for me to cover up the print with a lot of stuff. With this, the leaves (the right-hand leaf) are really the focal point and a simple die-cut sentiment really keeps the card simple and elegant. I added a little ribbon across the top to visually balance out the sentiment, repeated the black with a mat around the print and adhered it all to a navy card base. I added a smattering of epoxy dots I had in my stash and called it done!
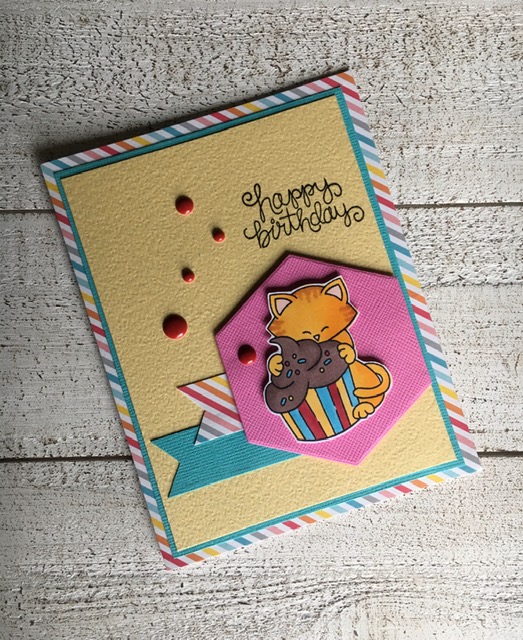
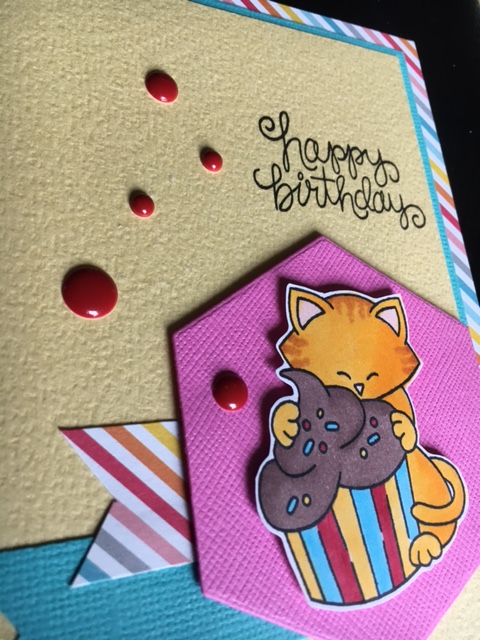
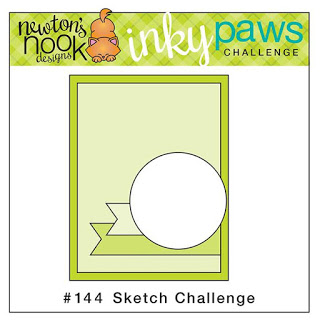
I participated in the *virtual* Crop on the Cape, hosted by Jenn Shurkus, last weekend. I always enjoy Jenn’s “Creative Chick” online classes and am always happy to support creative small businesses who have certainly been impacted during the last year. I highly recommend her classes. There were lots of demos and challenges during the three days which made it lots of fun. I created this card for one of the challenges that was based on a color scheme and group of photos for inspiration. I had this Newton’s Nook stamp set in my stash and decided to use the current sketch provided for the Inky Paws Challenge on the Newton’s Nook blog to make some birthday happiness.
I colored the kitty and cupcake with Copic markers. The Happy Birthday sentiment is part of the same stamp set, along with some other cute images and sentiments. I kept the card simple with just a little dimension added to the hexagon and some epoxy stickers (I love that shiny texture on a card!) to finish it off. Thanks for visiting.
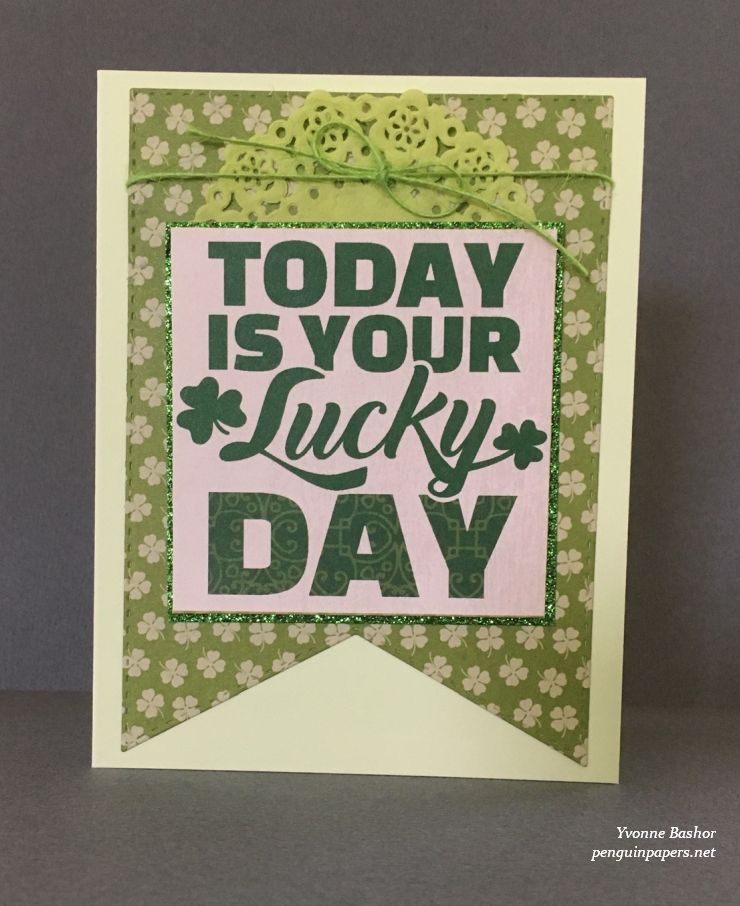
Authentique Clover Collection – Clover Five (focal image)
Die – Art Impressions – Banner Double Stitched Dies
Doily – Doodlebug Designs
Twine – May Arts
Cardsotck –
Bazzill
Paper Accents Glitter Cardstock – Green
I really like the color green, so when I had a chance to use these Authentique papers to create a card for Runaway Art and Craft Studio, I was excited. This is a very simple card with small touches that make it special: glitter paper matting around the focal image, lovely patterned paper from Authentique, the doily and twine at the top, and that eye-catching banner die-cut I made with the new Art Impressions die. And everything is green! Thanks for visiting today.
Stamp – Art Gone Wild / Catherine Scanlon Designs – Say It
Washi tape -Queen & Company
Patterned cardstock – BoBunny
Cardstock – Bazzill
Embossing powder – Stampendous – Detail White
I really like the strong lines in this card design and really had fun interpreting the sketch. The sketch is the current sketch at the Case This Sketch site. I created the bold lines with washi tape using the dotted cardstock as a base. I then heat embossed the sentiment so that it would match the black and white of many of the elements. Very simple, but I was pleased with the outcome. Thanks for visiting today.
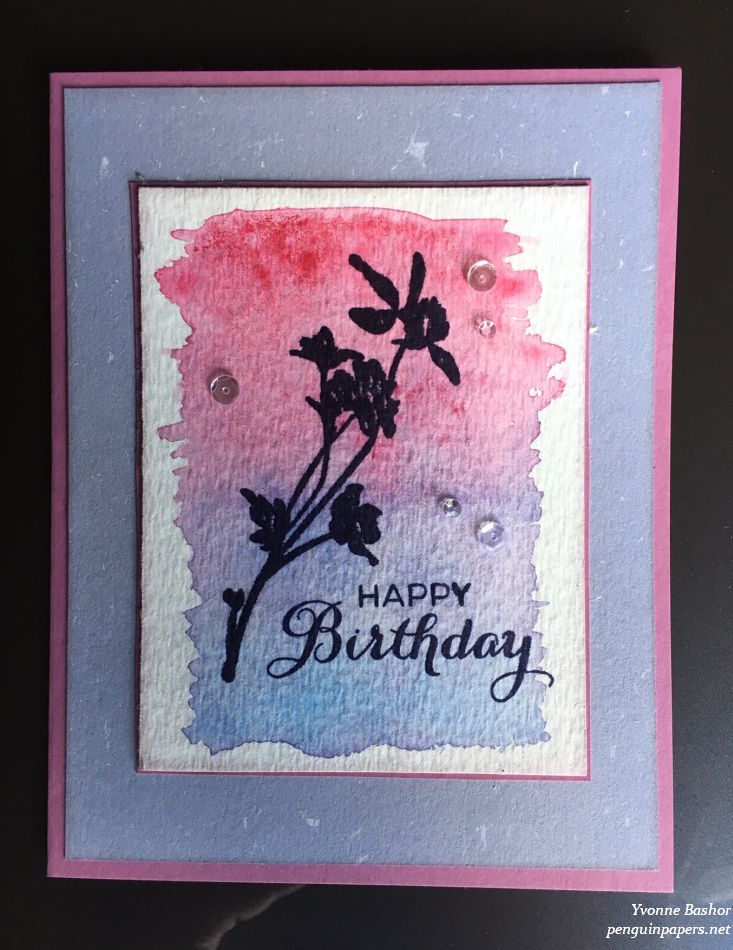
Stampers Anonymous Tim Holtz Collection – Wildflowers
Technique Tuesday – Ranunculus
Watercolors – Sakura Koi
Cardstock
Sequins
This is a clean and simple card with a bright palette–a fresh look after holiday cards! I created the background using watercolors and blending them vertically. Once it was dry, I stamped the floral silhouette and sentiment onto the watercolored panel and added sequins for some visual interest. I layered the panel onto the subtle patterned paper and a matching card base. Very simple! Thanks for visiting.
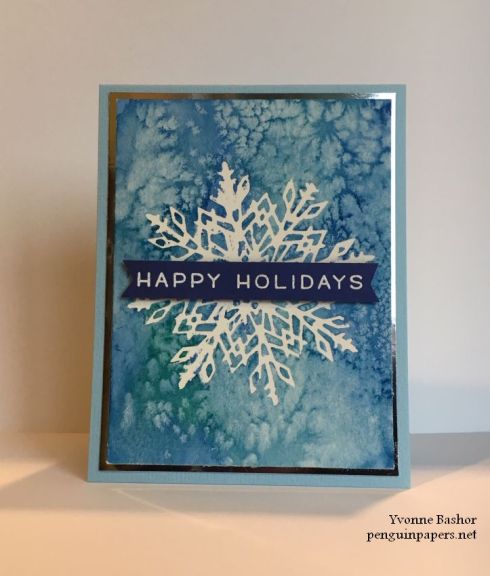
Stamps – Stampers Anonymous Tim Holtz Collection: Winter Watercolor and Festive Overlay
Patterned paper – Pebbles – Cozy & Bright Collection – Winter Green
Ranger Distress Ink – Evergreen Bough
Silver Mirror Cardstock – Paper Accents
Cardstock – Neenah
Ribbon
For this card, I started out with a Distress Ink background and then stamped the bird and sentiment on top. The detail of the chickadee stamp is really lovely and I didn’t want to detract from it with a lot of fussy stuff. I did add some glitz by layering the image with some patterned paper and then a layer of silver mirror cardstock. I added the silver ribbon for some visual interest and to repeat the silver again to tie it altogether while still keeping it clean and simple. I was inspired by the current sketch at CAS(E) this Sketch. Thanks for visiting.
I created this card based on inspiration from Day 2 of Online Card Classes Clean & Simply Holiday class. You need to take the class to get all of the steps, but it was fun to get back with my watercolors again and a technique I learned long ago in college. I layered the watercolored panel onto a shiny piece of silver cardstock and heat embossed the sentiment for a bit of gloss and sheen. Thanks for stopping by.
Cardstock – Neenah Solar White and BoBunny Back-To-Back Dots
I created this card as a one-layer card with the exception of the sentiment. I stamped the flower stamp, masking it so I could overlap flowers. I added the more solid “background” on the left-hand side by applying ink to my Gelli Plate. I cut around some of the flowers on the right side for some visual initerest. For the flower centers, I added glitter with Stickles, and then scattered a few sequins around the flowers for a little more shine. Finally I added the birthday sentiment. Thanks for stopping by.
This was a fun card to make. I started by heat embossing the butterfly stamp with white embossing powder onto Kraft cardstock. Then I colored it with metallic gel pens for a nice shine. Once completed, I fussy cut the butterfly out and popped it up on the embossed kraft panel with dimensional adhesive. I heat embossed the sentiment with white powder onto black. I matted the kraft panel and the sentiment onto shiny blue panels and then mounted the whole thing onto a white card base. Thanks for visiting today.