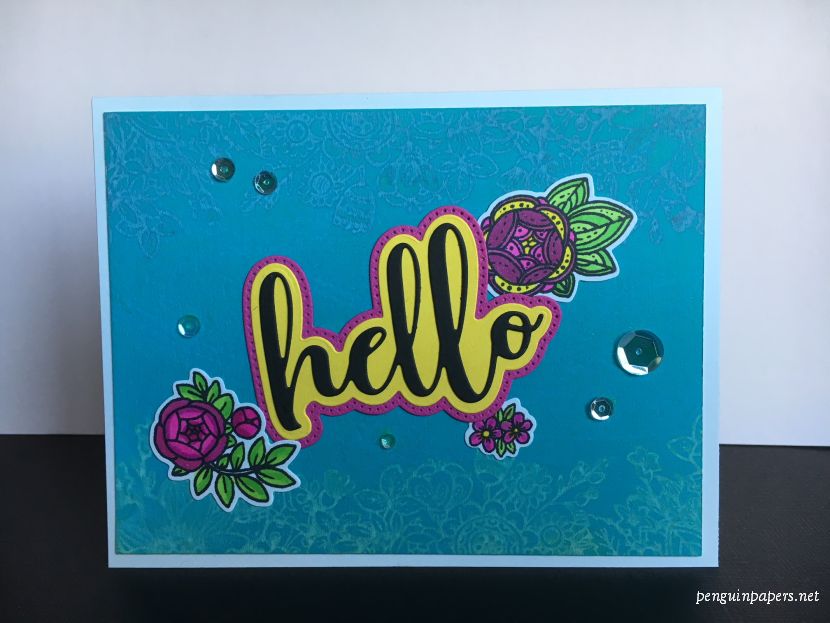
Stencil – The Crafter’s Workshop TCW2300 Slimline Gentle Leaves
Stamp – Miss Ink Stamps – Everyday Sentiments
Posca pen – white
Acrylic paints, gel plate, archival ink
Sequins – Buttons Galore
I make lots and lots of gel prints! I like to participate in printing challenges, I teach gel printing classes and make many samples for classes, and I just love to grab a gel plate or two and experiment with inks, paint and textures. So each time I set out to make a few prints, it can end up to be many that I don’t have time to use at that very moment. So needless to say, I have a lot of potential card backgrounds available in my stash.
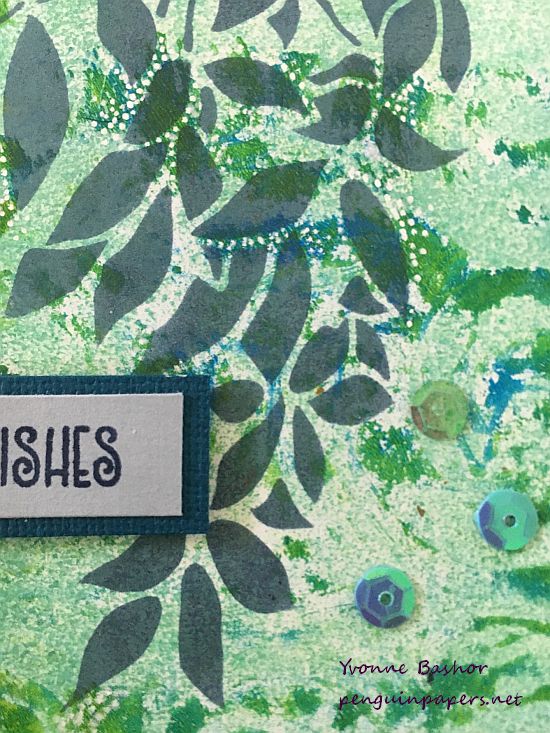
For this mixed media card, I grabbed a print that was already card base sized. It had interesting texture, but needed a focal point. I had this new stencil by The Crafter’s Workshop that I hadn’t used yet, so I didn’t hesitate to use it with some archival ink to add a design that worked very well with my gel print. I am always a fan of botanical designs. I wanted to make sure the stenciled design was clear on the print, so I added a bunch of dots with a white Posca paint pen. This added even more texture but added enough contrast that the leaves were better defined. Adding a stamped sentiment and some sequins made it an easy to complete the card.
Spellbinders “Wishing Expressions” stamp and die set
Die – Spellbinders “Wishing Expressions” stamp and die set
Tim Holtz Ideaology Collage Paper – Floral
My handmade collage paper
Perfect Pearls Mists “Bronze”
Tattered Angels Glimmer Mist “Creme de Chocolat”
Cardstock
This is one of my favorite kinds of cards to make: mixed media. I layered my handmade collage tissue paper and some Tim Holtz collage paper onto cardstock with matte gel medium. I stamped the butterfly on a piece of tissue and adhered it with gel medium as well. After the piece dried, I sprayed it with the metallic inks and also inked the edges with black ink. I then added the die cut word and stamped sentiment and put the card together. Thanks for visiting.
For this card, I used this floral stamp set in two different was. First I created the background, beginning with covering a piece of watercolor paper with Peacock Feathers Distress Oxide ink, direct to paper. This ink covers the paper so smoothly and thoroughly with just a few swipes! I then stamped the border stamp from the Zen Floral set with another color of the oxide inks with a spritz of water, which activates the ink. I used Worn Lipstick ink for the top border and Squeezed Lemonade on the bottom. I then cut the “Hello” die-cuts and stamped and colored more flowers using Copic markers, picking up the colors in the borders. I arranged the flowers and sequins around the greeting. Ta da! Thanks for stopping by.
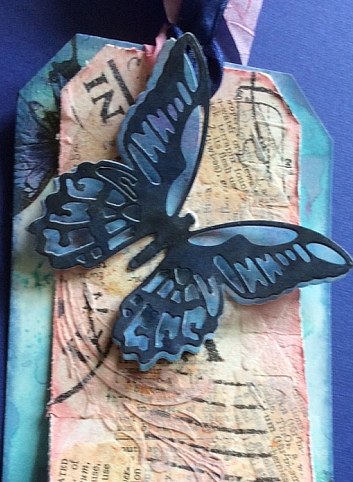
Stampers Anonymous Tim Holtz Idea-ology Tissue Wrap – Postale
Ranger Texture Paste
Dictionary paper
Napkin – Michel Design Works “Wisteria” cocktail napkin
Ornate metal corners
Distress Oxide inks – Broken China, Cracked Pistachio, Faded Jeans, Worn Lipstick, and Black Soot
Ranger Perfect Pearls mist – Bronze
Ribbon
I worked on these tags over quite an extensive period of time: layering, drying, analyzing… They were a lot of fun to make though. I cut the tags from a Tim Holtz die set that I’ve had for years and comes in handy because I can make lots of different sizes with it. I made backgrounds on the larger two tags using Distress Oxide inks in blues. Then I added torn butterflies from the napkin applying them with gel medium.
Because I was layering the tag pairs, I added more details on the smaller ones as they would be most visible. I started by collaging torn dictionary paper and Tim Holtz tissue wrap with gel medium onto the gessoed tag surface. I then applied texture paste through stencils. Once that was dry, I layered Distress Oxide ink (Worn Lipstick) over the top and distressed the edges of the small tags with the Tonic Studios paper distressing tool. I added some spritzes of Perfect Pearls mist to add some sheen.
I used more Distress Inks for the butterfly layers, the base layer in blues and Worn Lipstick and the top layer with Black Soot. I then die-cut the black layer and placed it over the base layer so just the center of the body was attached and the wings stick up. I colored the white ribbon with distress ink for a perfect match and tied the two tags together.
Thanks for visiting. It was fun investing time and experimentation into these tags!
Stampers Anonymous Tim Holtz Collection, “Falling Leaves”
Hero Arts “Branch Background”
Hero Arts/Basic Grey “Dotted Grid”
Embossing powders – Ranger Ink Wendy Vecchi – Red Geranium, Sunflower, and Forget-Me-Not; Ranger – Lime Green and White
Cheesecloth
Tea bag paper
Sticker – Tim Holtz Idea-ology “Small Talk”
Ticket – Tim Holtz Idea-ology “Expedition” Ephemera pack
Inks – Tsukineko VersaMark watermark ink and Ranger Distress and Archival inks
Sequins – Neat & Tangled “Festive Fall Sequin Mix”
Flower – Prima
Twine – from the kitchen drawer
I’m kind of thinking I should rename my blog “Lots o’ Layers,” based on some of my projects! I certainly get caught up in enjoying the process and never am very sure of the outcome! For this piece I was inspired by a technique demonstrated in the November issue of Craft Stamper Magazine. The unique step that I took away was using white embossing powder almost as a paint rather than embossing from a stamped image.
I die cut a number of different circles and used one large circle for the base. I stamped the two larger circles with VersaMark and then also applied a bit more VersaMark ink with my finger before adding the embossing powder and heating. After stamping the leaves with Distress inks and moving the colors a bit with a waterbrush, I applied VersaMark ink with my finger, then white embossing powder and heat-set the powder. The bright colors of the ink and some of the embossing powders, along with the white embossing powder, made this a visually interesting collage. I added cheese cloth, paper from a tea bag cut into a circle, sequins and ephemera, layer by layer and topped it off with the little sticker sentiment: Finders Keepers. Thanks for visiting today.
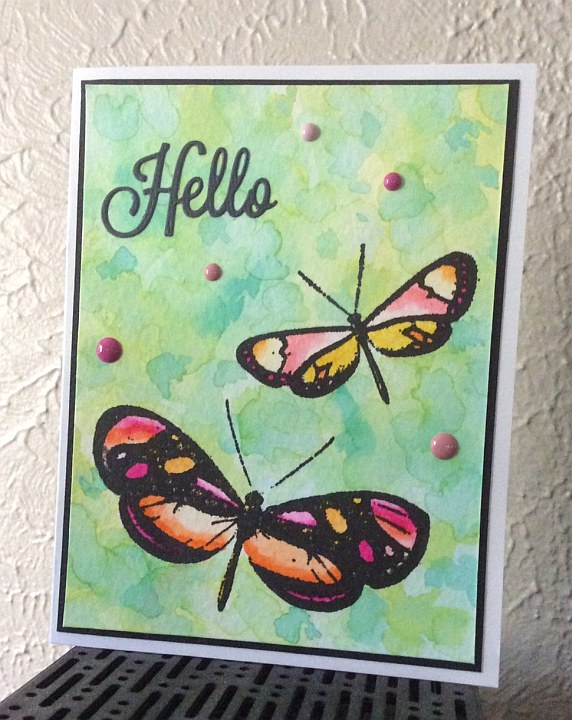
After stamping the butterflies onto watercolor paper, I began watercoloring the background for this card using ink from the Zig Clean Color markers and a waterbrush. I added layers of color until I was happy with the look. Then I colored the butterflies with the markers and waterbrush as well, and added the die-cut and dots. Thanks for visiting.
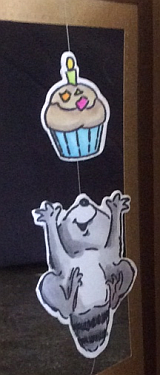
Stamps/Dies – Art Impressions “Mini Raccoon Spinner Set”
Rectangle dies – Simon Says Stamp “Stitched Rectangles”
Patterned paper – BoBunny “Enchanted Harvest Collection” 6 X 6″ paper pad
Cardstock – Paper Accents
Copic markers
Fishing line
This raccoon is is running up the tree and really trying to take that cake! I stamped the raccoon and cupcake, then colored them with Copic markers. Once that was complete, I die cut them and attached them to the fishing line (these images are two-sided).
Detail of view of raccoon from the inside.
I put a panel of the bark patterned paper on the inside of the card base and die cut the outside opening and the other stitched frames. I attached the raccoon and cupcake suspended by fishing line on the back side of the card front, concealing the fishing line with another stitched frame.
This was a fun card to make and I know a certain raccoon lover who will really like it! Thanks for visiting.
My Favorite Things Die-namics #466 – “Sun, Moon & Stars”
Little B “Circles”
Spellbinders Edgeabilities “Classic Ric Rac”
Patterned papers
Echo Park “A Perfect Summer: Chevrons”
KaiserCraft Ubud Dreams (from 6-1/2″ paper pad)
Sequins – Doodlebug Designs
Cardstock – Paper Accents
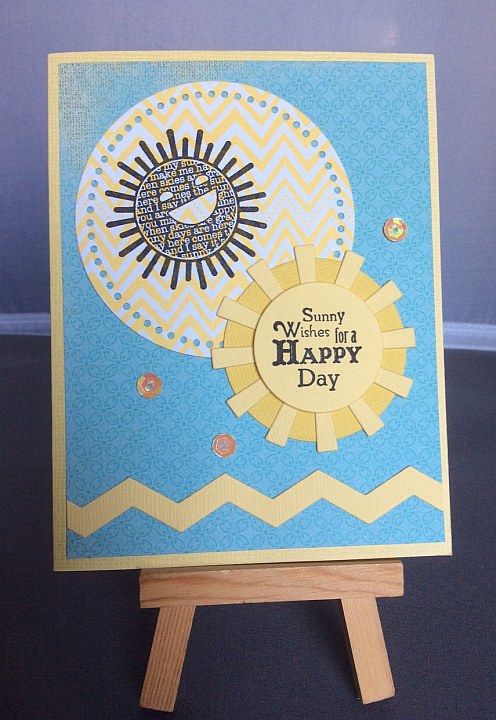
In honor of the solar eclipse we experienced here in the path of totality, I made a card featuring the sun! I used a stamp set I’ve had for a number of years by Darcie’s. It was fun to repeat the sun’s rays with the die-cut from My Favorite Things and repeat the chevron from the paper with the die-cut made with the Spellbinder’s Ric Rac die. The sequins are an iridescent yellow, but they look pretty orange in the photo. Thanks for stopping by.
Patterned paper – BoBunny “Secret Garden – Lovely”
Cardstock – Bazzill
Zig Clean Color markers/waterbrush
For this simple card, the main attraction is the orchid. This is such a beautiful stamp set from Flourishes! I stamped it and then went in with Zig Clean Color markers and a waterbrush to color the image. I added the sentiment, still keeping it simple and elegant. I layered the main image with a subtle patterned paper and a simple embossed white layer, then adhered the whole shebang onto pink cardstock. I made this card for a close friend who recently lost her husband. Thanks for visiting.


 Because I was layering the tag pairs, I added more details on the smaller ones as they would be most visible. I started by collaging torn dictionary paper and Tim Holtz tissue wrap with gel medium onto the gessoed tag surface. I then applied texture paste through stencils. Once that was dry, I layered Distress Oxide ink (Worn Lipstick) over the top and distressed the edges of the small tags with the Tonic Studios paper distressing tool. I added some spritzes of Perfect Pearls mist to add some sheen.