Tag Archives: crafter’s workshop

- Die and stamp set – Spellbinders – Hello Expressions
- Stencil – The Crafter’s Workshop – TCW829 Heartful Flower by Julie Fei-Fan Balzer
- Ink – StazOn Pigment – Snowflake
- Posca paint markers
- Cardstock – black and turquoise
Surprise! I’m finally posting!
I created this card as a sample for a demo I’m doing. I will be creating cards from stenciled backgrounds at Runaway Art and Craft Studio during a demonstration at First Wednesday on May 1st. First Wednesday, sponsored by Salem Main Street Association, is a monthly celebration in downtown Salem during which businesses open their doors to celebrate with the community. While I am stenciling and making cards, Christy is art journaling and Robin will be sharing her illustrated coloring posters.
I began this card by applying white ink through a stencil onto black cardstock to create the base design. I then added color by drawing dots around the stenciled design with Posca acrylic paint markers. I layered the die-cuts and popped it up with dimensional adhesive above the stamped sentiment and then adhered the whole card front onto a turquoise card base.
Thanks for stopping by.
Leave a comment | tags: cardmaking, crafter's workshop, die cuts, flora, spellbinders, stencils | posted in General Cards

- Stamps – Lawn Fawn “Hang in There”
- Dies – Lawn Fawn “Hang in There”
- Stencil – The Crafter’s Workshop Rebekah Meier Designs “Connected Dots”
- Ranger Distress Oxide inks: Fired Brick and Antique Linen
- Zig Clean Color markers/waterbrush
- Gold Mosaic Stickers – Mark Richards, Ltd.
- Patterned papers – My Mind’s Eye “Come Away with Me”
- Tim Holtz Idea-ology Small Talk Stickers – “Snarky”
I made this card for a young friend who turned 21. I knew I had to take advantage of our mutual sense of humor, so I used the “Snarky” sticker from Tim Holtz! I created the background with Distress Oxide inks and a stencil. I colored the sloth and branch with Zig Clean Color markers and watercolored the ink with a waterbrush. Once the images were dry, I die-cut them and placed them onto the background, stamped the birthday sentiment and added the sticker. I edged the watercolor paper with Distress ink then layered it onto the patterned papers. The gold stone mosaic stickers gave the card a little pizzazz. Thanks for visiting.
Challenges:
My Creative Scoop – Color Inspiration Monthly Link Up 33
2 Crafty Critter Crazies – Challenge #13
2 Comments | tags: cardmaking, clean and simple stamping, crafter's workshop, distress techniques, fauna, lawn fawn, my mind's eye, stamping, tim holtz, watercolor | posted in Birthday, Challenges, Distress Techniques

- Stamp – Holly Berry House Originals – Cameroon Scarab
- Stencil – The Crafter’s Workshop (TCW) Balzer Designs – “Mini Spikey Wheels”
- Die – Spellbinders Nestabilities “Fleur de Lis Squares”
- Crystal stickers – white – Mark Richards Ltd.
- Faber Castell Gelatos
I am part of a group of cardmakers who challenge each other to create with different techniques and themes. Currently, we have an insect challenge. I have a number of stamps that have insect images, partly because of my interest in becoming a bugologist at a young age. My parents did try to correct me and tell me that it is ENTOmologist, but it was always going to be BUGologist to me! And I guess I didn’t end up becoming one either. 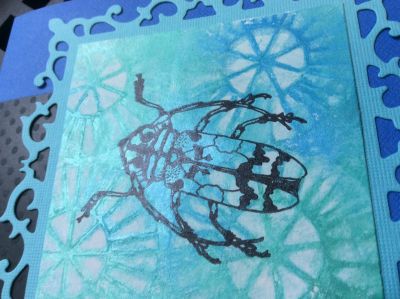
For this card I first created the background by covering a piece of multi-media paper with Gelatos in a few colors. I then took a stencil and a baby wipe and removed some of the color through the stencil, leaving the pattern. I then blended it together a little more. I then stamped the scarab onto the background with black Staz-on ink. If you look closely at the detail photo to the right, you can get a little bit of an idea of the texture and sheen created with the Gelatos on the background.
Thanks for visiting today.
Leave a comment | tags: crafter's workshop, die cuts, fauna, holly berry house, spellbinders, stamping | posted in Backgrounds, General Cards, Uncategorized

- Dies – Sizzix Thinlets – Tim Holtz “Detailed Butterflies”
- Stamp – Simon Says Stamp “Square Sayings”
- Patterned paper – Basic Grey Lemonade Collection: “Pretty Petals”
- Ranger – Dina Wakley Clear Gesso
- Ranger – Tim Holtz Distress Crayons
- Ranger Texture Paste
- Stencil – The Crafter’s Workshop “Tiny Circles” 6 X 6″ stencil
- Sequins – Simon Says Stamp – Assorted Moonshine
- Inks Sprays – Dylusions White Linen, Tattered Angels Glimmer Mist assorted colors
- Cardstock – Bazzill
This was such a fun project! I made it over a period of time, since I created the background while playing with patterned papers, texture paste and stencils, and ink sprays with some friends. I made a lot of different backgrounds with many layers of ink and texture. Then I got my hands on the Distress Crayons and butterfly dies and put together some different butterflies to use on something someday, coloring the butterfly base with the crayons and cutting the details from a contrasting cardstock. I stared at my backgrounds and the butterflies and finally put the pieces together in this birthday card! The final card fits perfectly for the current challenge at Simon Says Stamp for the Monday Challenge Blog Butterfly Beauty Challenge. Thanks for stopping by!
2 Comments | tags: butterflies, cardmaking, crafter's workshop, die cuts, distress techniques, mixed media, Simon Says Stamp, stencils, tim holtz | posted in Backgrounds, Birthday, Challenges, Distress Techniques, Simon Says Stamp

- Stencil – The Crafter’s Workshop – TCW631s – “Mini Doodle Bloom”
- Stamp – Hero Arts – CL738 “Messages with Flourish”
- Patterned paper – Sizzix – “Fox Tales” Paper Pad
- Ink – Ranger Distress Inks – Abandoned Coral, Spun Sugar and Squeezed Lemonade
- Cardstock – Neenah Solar White
I used the Crafter’s Workshop stencil and applied Distress Ink through a portion of it to create the image for this card. The sketch is from Freshly Made Sketches Challenge #228. I mounted the white panel onto a piece of subtly patterned paper from Sizzix. It picked up my ink colors perfectly. I think I succeeded at clean and simple on this card! Hope to see you soon.
1 Comment | tags: clean and simple stamping, crafter's workshop, distress techniques, Hero Arts, sizzix, stamping, stencils | posted in Challenges, Clean & Simple, Freshly Made, Thank You

- Ranger – Dina Wakley Media Clear Gesso and Dina Wakley Media White Gesso
- Ranger – Texture Paste – Transparent Matte
- Dreamweaver – Wendy Vecchi Embossing Paste
- Patterned papers – 7 Gypsies, Basic Grey, Fiskars/Heidi Grace
- Tattered Angels Glimmer Mists
- Ranger Dylusions Ink Sprays
- Stencils – Ranger/Tim Holtz, Ranger/Dina Wakley, The Crafter’s Workshop, Stencil Girl
I was inspired by an technique in the February Craft Stamper magazine, pages 23-25. Mine is a (minimalist!) variation on what Mona Pendleton did to create some lovely vintage Valentines. Do check out what Mona did because her work is absolutely beautiful! There was quite a process involved in creating these backgrounds with some drying time between layers. You can go on forever layering! I started with a piece of patterned paper. This is difficult, because you will be covering up much of the design of the paper, but if you are like me, you’ve got an abundance to work with! The pattern will peek through when you are finished.
Add a layer of clear gesso to the patterned paper and allow it to dry–this is pretty quick. Then I applied the texture/embossing paste through a stencil. I tried both types that I had (listed above). You will want to experiment with the finish you prefer–some dry matte and others are glossy. These pastes are translucent (you can choose something opaque for a different look), adding a subtle layer I really liked. The pastes take a while to dry, so this is when you need to be a little bit patient and set this aside so they are completely dry before the next step.
Next I applied ink sprays and spritzed with some water so they ran and mixed together. This is the messy part, but it is really fun to see what you can do! I did really like the look of adding more white Gesso and spritzing it with water, as I added some of spray inks in different areas of the paper. I also liked using the Dylusions White Linen ink spray for a similar white, opaque layer. Using ink sprays containing mica, like the Glimmer Mists, really gave a nice sparkly effect without being overly glitzy. The spray inks really bring out the texture of the stenciled designs done earlier with the paste. You can use baby wipes to take away areas you think are too dark or to expose more of the original background if you like.
Thanks for stopping by. I’ll post a card soon, showing an example of how these backgrounds can be used.
3 Comments | tags: crafter's workshop, mixed media, Ranger, stencils | posted in Backgrounds, Craft Stamper

- Vintage photo
- Stamp – My Favorite Things “All Star”
- Stencil – The Crafter’s Workshop Template 6 x 6″ “Quatrefoil”
- Modeling Paste – Viva Modellier Creme – Mother of Pearl
- Die – Lawn Fawn “Scripty Thanks”
- Washi tape – Studio G
- Cardstock – Bazzill
At the end of the season, it is tradition for parents of the South Salem High School tennis team to thank the coaches for all of their work and many volunteer hours they’ve contributed. The team just had their end-of-year tournament and awards ceremony this past weekend. The team captains presented each of the three coaches a gift and one of these cards, signed by all of the players. Since the school colors are light blue, red and white, I used them as my palette for the card. I added some extra texture and sheen on one of the panels by applying pearl modeling paste through a stencil. These were fun cards to make! Thanks for stopping by. Go Saxons!
Leave a comment | tags: cardmaking, crafter's workshop, die cuts, lawn fawn, mixed media, my favorite things, stencils | posted in Thank You, Uncategorized
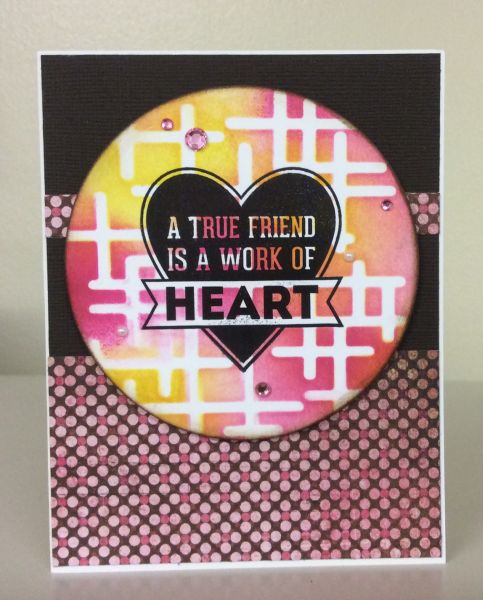
- Stamp – My Favorite Things – “My Favorite Sentiments” set
- Stencil – The Crafter’s Workshop “Crosshatched Frags”
- Patterned paper – Basic Grey “Kissing Booth: Cupid”
- Die – Spellbinder’s Nestabilities “Standard Circles Large”
- Ranger Distress Inks – Mustard Seed, Picked Raspberry and Spiced Marmalade
- Bling – Rhinestones – Queen & Co. and Mark Richards; Pearls – Memory Box
- Cardstock – Bazzill
This month’s Our Daily Bread Designs Challenge at Operation Write Home Stars and Stamps was to make your own background to be used on a card. I’ve been really into the backgrounds thing lately with my mixed media explorations. I thought I’d do something a little more mainstream for an OWH card, so I used Distress Inks through a stencil. This is a favorite technique of mine. I just take several colors of Distress Ink and apply it with a sponge applicator through a stencil, blending the colors. Then I stamped on top and die cut it and it looks like a piece of patterned paper. Thanks for visiting today.
1 Comment | tags: cardmaking, crafter's workshop, distress techniques, my favorite things, Ranger, stamping, stencils | posted in Backgrounds, Challenges, Distress Techniques, General Cards, OWH

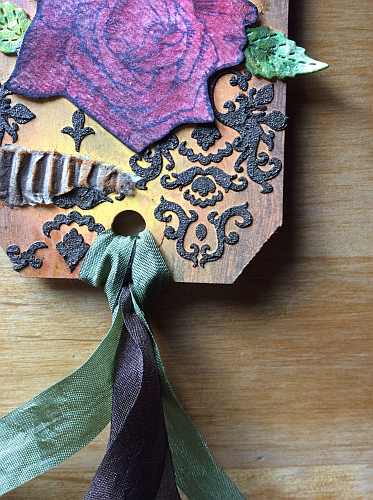
- Tag – Ranger #5 Manila
- Stamp – Visible Images “Roses”
- Stencil – The Crafter’s Workshop “Mini Damask”
- Die – Lawn Fawn “Stitched Leaves” set
- Ferro – Viva Decor “Gold iron” (modeling paste)
- Tim Holtz Distress Paints – Spiced Marmalade, Mustard Seed and Tarnished Brass
- Faber Castell Gelatos – Red Cherry, Raspberry and Watermelon
- Tim Holtz Distress Ink – Walnut Stain and Spiced Marmalade
- Ribbon – May Arts “Solid Wrinkled” in Olive and Brown
- Corrugated cardboard
I sure used a lot of supplies for such a small tag! I really enjoy it when I can use a lot of different stuff from a lot of different companies to complete my final project. Makes me feel like I’ve made good use of my stash!
I started out with a plain, manila tag and brushed it with Distress Paints. I then applied Ferro through the stencil for the damask layer. Ferro is thick and has some metallic properties. Its consistency really stands up to a detailed stencil, which you might not expect. I then tore strips from the corrugated cardboard, which had come from the sleeve on my coffee cup! I distressed it with ink before adhering with gel medium. I then added the rose that I had colored on watercolor paper and smoothed out with a baby wipe. I cut the leaves from a scrap from a Gelli Plate print. I distressed the remainder of the elements with walnut stain ink and tied up the tag with the ribbon. I created this for the August Tag Challenge at Mixed Media Mojo.
For a closer look, here’s a detail shot:

Thanks for stopping by.
1 Comment | tags: crafter's workshop, die cuts, distress techniques, flora, Gelatos, lawn fawn, mixed media, Ranger, stencils, viva decor | posted in Challenges, Mixed Media Mojo, Tags
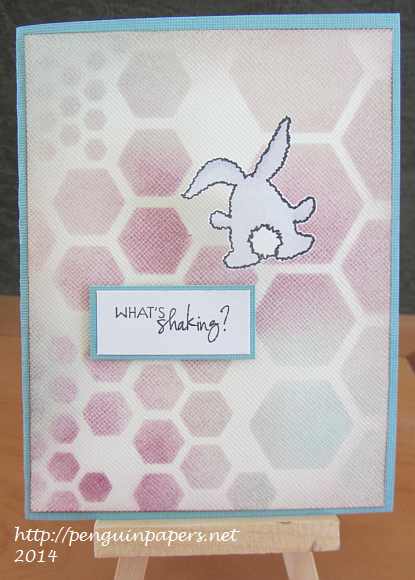
Stamps – Verve Stamps “Bunny Shake”
Stencil – The Crafter’s Workshop “Hexagons”
Distress Inks – Ranger: Tumbled Glass, Milled Lavendar, Seedless Preserves
Copic Markers
Cardstock – Paper Accents
Today I’m using hexagons for the Operation Write Home Stars and Stamps Midweek Throwdown Challenge to use hexagons on a card. Hexagons have gotten to be a pretty popular shape for stamps, stencils, die cuts, etc. I applied Distress Inks with a sponge applicator using a stencil with various sizes of hexagons for the background. I’ve had this bunny stamp for a long time, but I haven’t ever used him. I colored him very simply with Copic markers. Since I wanted to make him shake (had to do it!), I popped him up with a skinny paper accordian. Now he shakes! The sentiment was part of this stamp set. Thanks for visiting today.
1 Comment | tags: cardmaking, crafter's workshop, distress techniques, stencils, Verve Stamps | posted in Challenges, General Cards, OWH