Tag Archives: Ranger

- Dies:
- Spellbinders “Foxy” and Labels One”
- Simon Says Stamp “Thanks”
- Metallic Gold cardstock
- Ranger Distress Inks – Mermaid Lagoon, Cracked Pistachio, Squeezed Lemonade, Spiced Marmalade, and Picked Raspberry
- Doodlebug sequins
- Cardstock – Bazzill
First, I created the multi-colored background by painting with Distress Inks and water, and then spritzed it with a little more water to get some nice spots! Then I die-cut it and the fox and sentiment and put them altogether. I unified it with more metallic gold by adding the sequins. I mounted the pieces on black to make the colors pop. The Shopping our Stash Challenge #228 is Thanks, which appropriate since Thanksgiving is just a couple of days away. Thanks for stopping by and have a Happy Thanksgiving!
2 Comments | tags: cardmaking, die cuts, distress techniques, Ranger, Simon Says Stamp, spellbinders, watercolor | posted in Challenges, Distress Techniques, Shopping Our Stash, Thank You

- Stamps –
- Ranger/Dina Wakley Media “Scribbly Birds”
- Printworks “Thank You”
- Patterned papers – KaiserCraft “Outdoor Trail” 6-1/2″ paper pad
- Ranger Distress inks – Squeezed Lemonade, Bundled Sage and Dried Marigold
- Wood button – Prima Marketing
- Enamel dots – Teresa Collins – Orange
- Twine – Little B – Naturals
- Cardstock – Bazzill
- Kraft paper
I created this card with one of the cute bird images by Dina Wakley. First I applied Ranger Distress inks to the paper, blending the three colors in a somewhat random manner. Then I stamped the image onto the inked cardstock and cut it out. This background paper is spot varnished, so it has a real sheen to it (I think you can see it in the photo). I used the current challenge sketch at Retro Sketches (#179) and also will enter this in the Shopping Our Stash #217: Put a Bird on it! Using inspiration from the sketch to put this card together was pretty fun. Thanks for visiting today.
2 Comments | tags: cardmaking, Dina Wakley, distress techniques, KaiserCraft, Ranger, stamping | posted in Challenges, Distress Techniques, Retro Sketches, Shopping Our Stash, Thank You

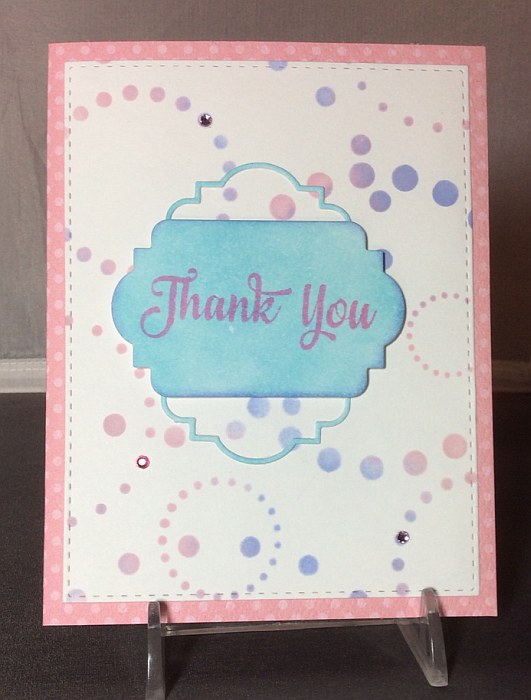
- Dies – Simon Says Stamp – “Stitched Rectangles” and “Frames” (two die cuts from this set)
- Stencil – Simon Says Stamp – “Circle Dots”
- Stamp – Simon Says Stamp (designed by Hero Arts) – “Brave (OWH)”
- Cardstock – Bazzill (white) and BoBunny “Passion Fruit Dot”
- Inks – Ranger Distress Inks – Tumbled Glass, Spun Sugar, and Shaded Lilac; Hero Arts Ombre pad – Pink to Red (used on sentiment)
- Bling – Hero Arts and Mark Richards
I created this card for two Simon Says Stamp (SSS) challenges. The Simon Says Stamp Flickr Challenge #26 is to create a card using pastel colors. The Simon Says Stamp Monday Challenge this week is to create a project featuring three colors. So I made a card that has three pastel colors and lots of polka dots. I created the background by applying Spun Sugar and Shaded Lilac Distress inks through the SSS stencil. I then blended Tumbled Glass ink onto cardstock and die cut it for the sentiment. Three gemstones were attached to three of the background dots for just a little sparkle. I layered all of the elements onto polka dot-covered cardstock to tie it all together. Thanks for stopping by.
1 Comment | tags: cardmaking, die cuts, distress techniques, Hero Arts, Ranger, Simon Says Stamp, stamping, stencils, tim holtz | posted in Challenges, Distress Techniques, Simon Says Stamp, Thank You

- Stamps –
- Stampers Anonymous Studio 490 Wendy Vecchi “Hydrangea”
- Simon Says Stamp “OWH – Brave” set
- Stencil – Stampers Anonymous Studio 490 Wendy Vecchi “Hydrangea”
- Ranger Distress Inks: Shaded Lilac, Victorian Velvet, Spun Sugar, Antique Linen, Mowed Lawn
- Cardstock – Ninah Solar White 80#
- Uni-Ball Signo Pen – white
This clean and simple (CAS) card features the hydrangea from a recent Stampers Anonymous stamp and stencil set. The Addicted to CAS Challenge #58 is to be inspired by the code word: Distress. I used Ranger Distress inks through the stencil after I stamped the hydrangea image. I also spattered dilluted Distress ink to tie the elements of the card together and still keep it one layer. I added some stippling with my white Signo pen to provide some texture and pattern to the image. This also fits the bill for the Simon Says Stamp Flickr Group Challenge #14, which is to create a one layer Clean and Simple Card. It is pretty challenging to create a single layer card! This will be a perfect card to send in my Operation Write Home box. Thanks for stopping by.
3 Comments | tags: cardmaking, clean and simple stamping, distress techniques, Ranger, Stamper's Anonymous, stamping, stencils, tim holtz | posted in Addicted to CAS, Challenges, Clean & Simple, Miss You, Simon Says Stamp

- Stamp – Stampington “Scripted Butterfly”
- Mask – Ranger – Dina Wakley Media “Insects”
- Acrylic Paints – Ranger Dina Wakley Acrylic Paints
- Stencils – Memory Box “Flourish” and Ranger Dylusions “Dotted Flowers”
- Pan Pastels
I made this page following a class with Dina Wakley, who is such an inspiration! Layers were made with acrylic paints, Pan Pastels, ink and Gesso. It fits the February challenge at Mixed Media Mojo, where the challenge is to use the theme: Red and a twist: Wings.
3 Comments | tags: butterflies, Dina Wakley, mixed media, Ranger, stencils | posted in Art Journal Page, Mixed Media Mojo

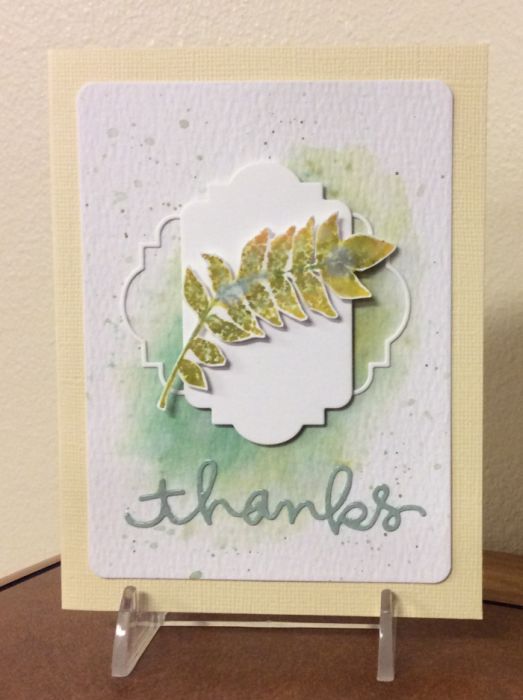
- Stamp – from Simon Says Stamp “Leaves and Scribbles” set
- Dies – Simon Says Stamp “Frames” and “Thanks”
- Ranger Distress Inks: Forest Moss, Mustard Seed, Crushed Olive, Dried Marigold, and Evergreen Bough
- Cardstock – Neenah and Paper Accents
- Ranger Distress watercolor cardstock
- Ranger Glossy Accents
For today’s card, I created a watercolor background and image with Ranger Distress Inks. I did a wash with ink and lots of water for the background and then added some spatters of color. Next, I cut the decorative frame from 110 lb. Neenah white cardstock, which is very hefty. I adhered the thin outer frame horizontally and then added the center vertically in the middle with dimensional adhesive. I applied Distress inks directly to the stamp and then spritzed it with water. Once it was dry, I cut out the leaves and mounted it on top of the frames with a bit more dimensional adhesive. The word “thanks” is a die-cut that I cut out of some cardstock that I found in my stash that matched some of my ink, and then added Glossy Accents on top for some shine to set the sentiment off a little bit.
I’m submitting this card in two challenges: this week’s Simon Says Stamp Flickr Challenge #4 is watercoloring and the Craft Stamper October Take It Make It Challenge which is multi-colored stamping.
5 Comments | tags: craft stamper magazine, die cuts, distress techniques, Ranger, Simon Says Stamp, stamping, watercolor | posted in Craft Stamper, Distress Techniques, Simon Says Stamp, Thank You
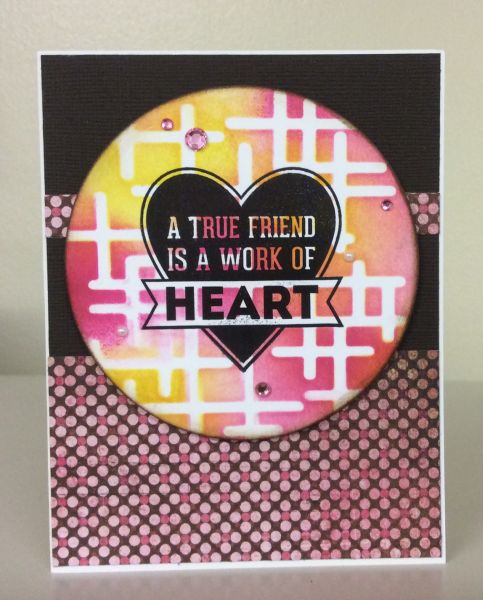
- Stamp – My Favorite Things – “My Favorite Sentiments” set
- Stencil – The Crafter’s Workshop “Crosshatched Frags”
- Patterned paper – Basic Grey “Kissing Booth: Cupid”
- Die – Spellbinder’s Nestabilities “Standard Circles Large”
- Ranger Distress Inks – Mustard Seed, Picked Raspberry and Spiced Marmalade
- Bling – Rhinestones – Queen & Co. and Mark Richards; Pearls – Memory Box
- Cardstock – Bazzill
This month’s Our Daily Bread Designs Challenge at Operation Write Home Stars and Stamps was to make your own background to be used on a card. I’ve been really into the backgrounds thing lately with my mixed media explorations. I thought I’d do something a little more mainstream for an OWH card, so I used Distress Inks through a stencil. This is a favorite technique of mine. I just take several colors of Distress Ink and apply it with a sponge applicator through a stencil, blending the colors. Then I stamped on top and die cut it and it looks like a piece of patterned paper. Thanks for visiting today.
1 Comment | tags: cardmaking, crafter's workshop, distress techniques, my favorite things, Ranger, stamping, stencils | posted in Backgrounds, Challenges, Distress Techniques, General Cards, OWH

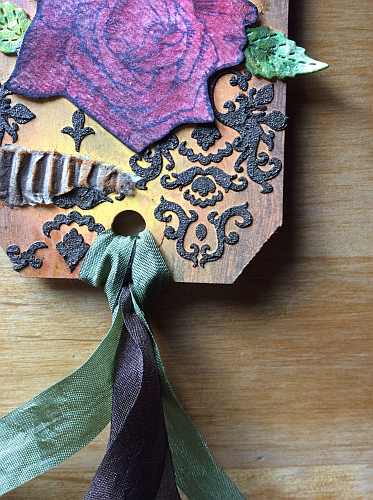
- Tag – Ranger #5 Manila
- Stamp – Visible Images “Roses”
- Stencil – The Crafter’s Workshop “Mini Damask”
- Die – Lawn Fawn “Stitched Leaves” set
- Ferro – Viva Decor “Gold iron” (modeling paste)
- Tim Holtz Distress Paints – Spiced Marmalade, Mustard Seed and Tarnished Brass
- Faber Castell Gelatos – Red Cherry, Raspberry and Watermelon
- Tim Holtz Distress Ink – Walnut Stain and Spiced Marmalade
- Ribbon – May Arts “Solid Wrinkled” in Olive and Brown
- Corrugated cardboard
I sure used a lot of supplies for such a small tag! I really enjoy it when I can use a lot of different stuff from a lot of different companies to complete my final project. Makes me feel like I’ve made good use of my stash!
I started out with a plain, manila tag and brushed it with Distress Paints. I then applied Ferro through the stencil for the damask layer. Ferro is thick and has some metallic properties. Its consistency really stands up to a detailed stencil, which you might not expect. I then tore strips from the corrugated cardboard, which had come from the sleeve on my coffee cup! I distressed it with ink before adhering with gel medium. I then added the rose that I had colored on watercolor paper and smoothed out with a baby wipe. I cut the leaves from a scrap from a Gelli Plate print. I distressed the remainder of the elements with walnut stain ink and tied up the tag with the ribbon. I created this for the August Tag Challenge at Mixed Media Mojo.
For a closer look, here’s a detail shot:

Thanks for stopping by.
1 Comment | tags: crafter's workshop, die cuts, distress techniques, flora, Gelatos, lawn fawn, mixed media, Ranger, stencils, viva decor | posted in Challenges, Tags, Mixed Media Mojo

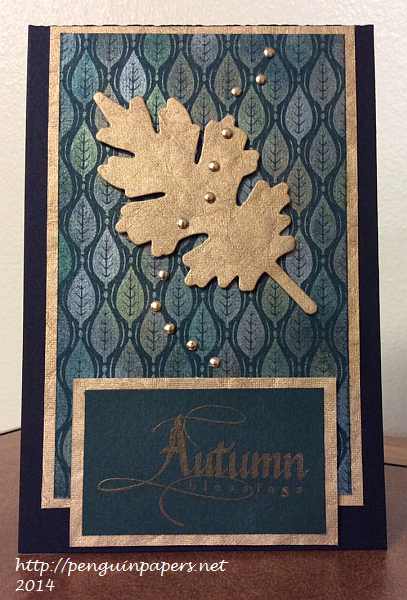
- Stamps – Hero Arts “Simple Leaf Background” and Rubbermoon “Autumn Blessings”
- Die – Memory Box “Oak Leaf”
- Ranger Perfect Pearls – Forever Green, Turquoise, Rust, Perfect Gold
- Embossing Powder – Stampendous – Ultra Detail Gold
- Gold specialty paper – ANW Crestwood “India Gold”
- Gold embellishments – Mark Richards Enterprises – metal dots
- Cardstock – Bazzill
Another fun and shiny card that I made with a background stamp and Perfect Pearls! The focal point is the die cut leaf and gold accents tie it all together with the gold heat embossed sentiment and gold metal dots running through the leaf. Thanks for visiting.
1 Comment | tags: cardmaking, Hero Arts, memory box, Ranger, stamping | posted in Autumn
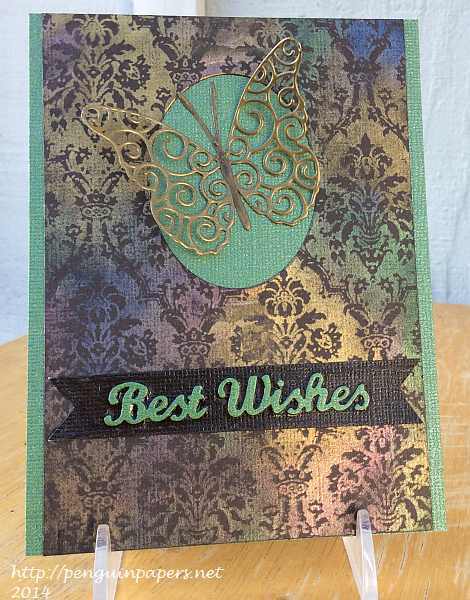
- Stamp – Tim Holtz/Stampers Anonymous “Reverse Damask”
- Dies – Memory Box “Swirl Butterfly”, Elizabeth Craft Designs “Best Wishes” and Spellbinders Nestabilities “Standard Circles Large”
- Ranger Perfect Pearls – Plum, Perfect Gold, Kiwi, and Rust
- Embossing Powder – Stampendous – Opaque Gold
- Cardstock – Bazzill
- Ranger Glossy Accents
I was inspired by a lesson in the Online Card Classes Stretch Your Stamps 2 class to play with a background stamp and Perfect Pearls. I stamped the lovely background image with Perfect Medium and then applied Perfect Pearls to make an elegant sheen on the dark brown cardstock. I covered the die cut butterfly with gold embossing powder and heat set it. I wanted to repeat a little of the gold used in the background to tie the butterfly focal point to the background. For the sentiment, I used the die cut words, adhered them to a fishtail-cut flag, and covered it all with Glossy Accents to bring on a little more shine. Thanks for visiting.
Leave a comment | tags: butterflies, cardmaking, die cuts, embossing, memory box, Ranger, spellbinders, Stamper's Anonymous, tim holtz | posted in General Cards, Online Card Classes