Tag Archives: stamping

- Stamps – Hero Arts – CL947 “Color Layering Large Orchid”
- Ranger – Distress Crayons
- Ranger – Distress Inks
- Distress Watercolor cardstock
- Bazzill cardstock – Bouquet
- Neenah Solar White cardstock
I created this card for a 90-minute scramble #138 on the Hero Arts Flickr site. Our challenge was to use solid stamps and outline stamps together. I used Distress Crayons directly on the outline stamp and spritzed it with water. I did a similar watercolor technique for the solid stamps and stems, only using Distress Inks. I added some water splatters and the sentiment to finish off the image. I then adhered it with a strip of purple cardstock and popped the whole thing up with dimensional adhesive. Thanks for stopping by.
5 Comments | tags: distress techniques, flora, Hero Arts, stamping, tim holtz, watercolor | posted in Challenges, Distress Techniques, General Cards

Stamps – Poppystamps “Ooh La La”
Dies – Spellbinders –
Floral Doily Motifs
Standard Circles Large
Patterned papers – Authentique “Everlasting” Collection: Promise and Timeless
Cardstock – Bazzill
I created this card with the current sketch at Mojo Monday: #461. A cardmaking group I belong to has a challenge to create a black and white card, so I set out to use this penguin set. It is very simple, using several patterned papers layered together with the image. Thanks for visiting.
1 Comment | tags: cardmaking, die cuts, poppystamps, spellbinders, stamping | posted in Challenges, General Cards, Mojo Monday

- Stamp and stencil set – Stampers Anonymous Wendy Vecchi Studio 490 “Hydrangea”
- Die (Tag) – Simon Says Stamp “Medium Tags”
- Stamp (Sentiment) – Simon Says Stamp “Happy & Smile” set
- Patterned paper – BoBunny “Enchanted Garden”
- Ranger Distress inks – Shaded Lilac, Victorian Velvet, Seedless Preserves, Peeled Paint, and Crushed Olive
- Embossing paste – translucent – Wendy Vecchi Studio 490
- Sequins – Simon Says Stamp – Assorted Moonshine
- Cardstock – Paper Accents “Lavender Twilight”
I created this card for my sister’s birthday. I had created a number of images with the hydrangea stamp and stencil set when I was demonstrating with them at Runaway Art and Craft Studio in Salem, Oregon. After I stamped and colored this image with Distress inks, I added some translucent embossing paste over the flowers to add some texture. I put the image together with a birthday tag colored with matching Distress ink and added some sequin sparkle. This Anything Goes card fits the Simon Says Stamp Blog Wednesday Challenge this week and the Simon Says Stamp Flickr Challenge, too. Thanks for visiting.
1 Comment | tags: bobunny, cardmaking, distress techniques, flora, Ranger, Simon Says Stamp, Stamper's Anonymous, stamping, stencils | posted in Birthday, Challenges, Simon Says Stamp

- Stamps – My Favorite Things “Strike up the Band” set
- Die – My Favorite Things “Strike up the Band”
- Patterned papers – BoBunny “Enchanted Garden” 6″ X 6″ paper pad
- Simon Says Stamp Cardstock – Fog
- Copic markers
- Stampendous embossing powder – Detail White
- Hero Arts spray ink – Unicorn
There are so many cute bunnies in this stamp set from My Favorite Things! I’ve had these stamps and dies for a while, but hadn’t gotten a chance to use them on a card until now. I’m also entering this card in two challenges on the My Favorite Things blog: The Sketch #291 challenge and MFT Color Challenge #50. After I stamped and die cut the bunny, I colored it with Copics to match the MFT color challenge. I popped it up with dimensional adhesive on the patterned paper background that I spattered with white spray ink. I heat embossed the sentiment in white and added the musical notes from the stamp set. Thanks for visiting.
2 Comments | tags: bobunny, cardmaking, die cuts, embossing, my favorite things, stamping | posted in Birthday, Challenges, My Favorite Things Challenge

- Stamps – WPlus9 – “Spring Blooms”
- Dies –
- Spellbinders Nestabilities “Vintage Labels Three”
- Memory Box “Locina Buckle”
- Memory Box “Amira Flourish”
- Ken Oliver Crafts – Liquid Metals “Metallic Amethyst”
- Pearls – KaiserCraft
- Cardstock – Paper Accents
- Textured paper – unknown origin
- Vellum
I created this card for a challenge with a group of friends to make a purple-themed card, as a tribute to a group member who recently passed away. I colored the image background with Ken Oliver Liquid Metals in a nice, metallic amethyst wash. I stamped over it with black ink. I used some lacy die-cuts for visual interest. Thanks for visiting.
1 Comment | tags: cardmaking, clean and simple stamping, die cuts, memory box, spellbinders, stamping, watercolor | posted in Challenges, General Cards

- Stamps –
- Shell and Starfish – Stampington & Company – Christine Adolph Series, “Shore Cliff Elements”
- Sentiment – Darcie’s – “Beach Bums”
- Heavy body Gesso – Ranger Dina Wakley
- Gelatos
- Sequins – Simon Says Stamp “Moonshine”
- Ink spray – Hero Arts “Unicorn” and Tattered Angels “Rich Mocha”
- Gelliplate
- Stencil – Dyan Reaveley’s Dylusions “Triangles”
- Tissue Paper
- Round paper punches
As with most mixed-media pages, this little piece was made with a number of supplies over several days. The Mixed Media Mojo July Challenge is to create something with a Summertime theme and a “seashell twist.” The Simon Says Stamp Monday Challenge is Nautical/By the Sea. So I set to work on this page with these challenges in mnd. The circles were from Gelliplate prints. I pulled out two stamp sets that I’ve had for years for a beachy feel. I’ve also been watching Marta’s art journal and mixed media videos at Maremi SmallArt, which have been very inspirational. I built layers with gesso, tissue paper, Gelatos, ink sprays and stamping. Thanks for visiting today.
5 Comments | tags: art journal, mixed media, stamping, stampington & company, stencils | posted in Art Journal Page, Challenges, Mixed Media Mojo

- Stamp – Simon Says Stamp “Square Sayings”
- Die – Spellbinders Nestabilities “Labels Twenty Two”
- Origami paper – Yasutomo Metallic Colors
- Gears – Tim Holtz Ideaology “Mini Gears”
- Patterned paper – KI Memories/Hampton Art “Metro Garden” 6X6″ paper pad
- Cardstock – Bazzill
I wanted to create another iris fold card. For this one I cut a “window” from one of my dies. I used a square Iris Fold pattern from Judy Headrick at Cards and Crafts to fill in the frame with multiple metallic colors. I made this card for an older gentleman and added the gears for a masculine touch. Thanks for visiting today.
2 Comments | tags: cardmaking, die cuts, fancy folds, Simon Says Stamp, spellbinders, stamping, tim holtz | posted in General Cards

- Patterned Papers – Hot off the Press Cardmaker’s Creative Pack Earth Tones
- Squirrel pattern – Circle of Crafters
- Stamp – Clearly Besotted “Nuts for You”
- Die – Clearly Besotted “Nuts for You”
- Cardstock – Bazzill
- Kraft paper card base
It has been a long time since I’ve created an iris fold card! I volunteered to participate in an iris or tea bag fold card swap, so I jumped in. Now I want to make some more! The pattern is from Circle of Crafters, where you can find many different free designs to work with. I decided to accent the card with acorns from the Clearly Besotted stamp and die sets I’ve had for quite a while. Thanks for visiting today.
2 Comments | tags: cardmaking, clearly besotted stamps, die cuts, fancy folds, fauna, stamping | posted in Autumn

- Stamps –
- Stampers Anonymous U4-960 (bugs)
- Hero Arts “Thanking of You”
- Dimensional stickers – EK Success
- Zig Clean Color markers
- Neenah Solar White cardstock
I created another card a buggy image for the insect challenge our card group is hosting. It also seemed to be a good fit for Challenge #91: Fly at Addicted to CAS. I created the background to have a scribbly, watercolored effect by using my Zig markers and a waterbrush. I stamped only the partial image from a long Stampers Anonymous woodmount stamp I’ve had in my collection for years. A very simple card. Thanks for visiting.
3 Comments | tags: butterflies, cardmaking, clean and simple stamping, ek success, Hero Arts, Stamper's Anonymous, stamping, watercolor | posted in Addicted to CAS, Challenges, General Cards, Summer

- Stamp – Holly Berry House Originals – Cameroon Scarab
- Stencil – The Crafter’s Workshop (TCW) Balzer Designs – “Mini Spikey Wheels”
- Die – Spellbinders Nestabilities “Fleur de Lis Squares”
- Crystal stickers – white – Mark Richards Ltd.
- Faber Castell Gelatos
I am part of a group of cardmakers who challenge each other to create with different techniques and themes. Currently, we have an insect challenge. I have a number of stamps that have insect images, partly because of my interest in becoming a bugologist at a young age. My parents did try to correct me and tell me that it is ENTOmologist, but it was always going to be BUGologist to me! And I guess I didn’t end up becoming one either. 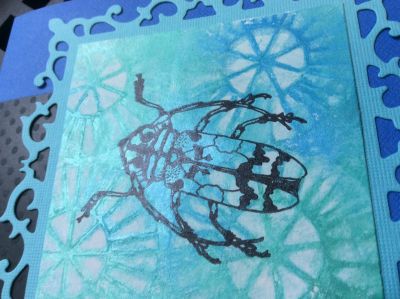
For this card I first created the background by covering a piece of multi-media paper with Gelatos in a few colors. I then took a stencil and a baby wipe and removed some of the color through the stencil, leaving the pattern. I then blended it together a little more. I then stamped the scarab onto the background with black Staz-on ink. If you look closely at the detail photo to the right, you can get a little bit of an idea of the texture and sheen created with the Gelatos on the background.
Thanks for visiting today.
Leave a comment | tags: crafter's workshop, die cuts, fauna, holly berry house, spellbinders, stamping | posted in Backgrounds, General Cards, Uncategorized


