Tag Archives: distress techniques

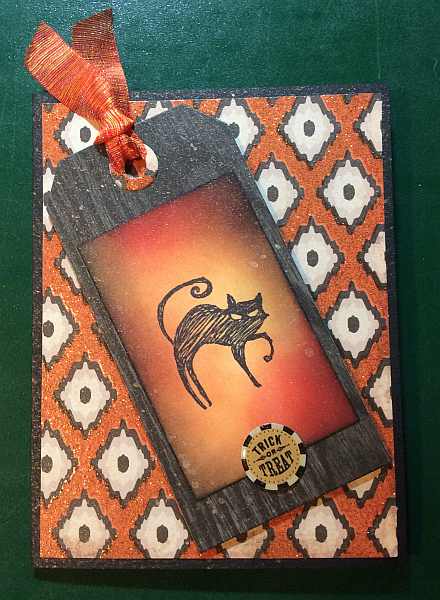
- Stamp – Inkadinkado “Black Cat”
- Dies – Sizzix Tim Holtz Alterations “Tag Collection”
- Patterned papers – My Mind’s Eye “Frightful Collection: Spooky” (both sides)
- Epoxy Sticker – K&Company – Brenda Walton “Haunted Clearlly Yours”
- Ranger Distress Inks: Spiced Marmalade, Fired Brick, Black Soot
- Cardstock – Bazzill
- Ribbon – May Arts
- Perfect Pearls Mist – Biscotti
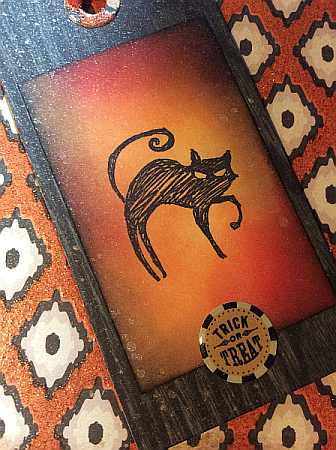
Today I present you with a spooky Halloween cat with some sparkles for good measure. I created this for the challenge at Friday Mashup (Friday Mashup 181) which was to create a card with a tag, or one with bling, or one that featured both. Well, this fit the requirements for both. The patterned paper had lots of sparkle (not sure how clear that is to see in the photo) and I created a cat tag, distressing the background with Ranger Distress Inks. I also spritzed the whole card with Perfect Pearls Mist for some additional bling. The whole card is quite spooky in my opinion!
Here’s a closer look:
Thanks for stopping by today.
3 Comments | tags: cardmaking, die cuts, distress techniques, inkadinkado, my mind's eye, stamping | posted in Friday Mashup, Halloween, Tags

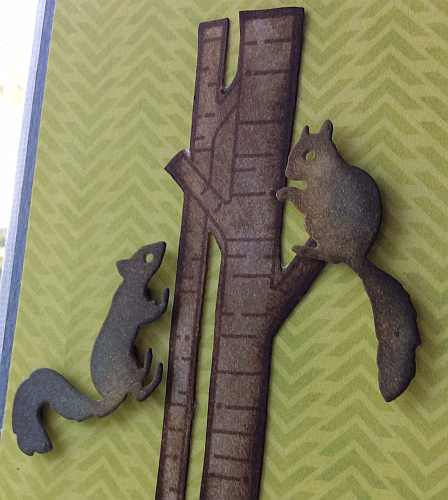
- Dies – Impression Obsession “Squirrel Set”
- Stamps – Lawn Fawn “Joy to the Woods” (tree) and Impression Obsession “Vertical Greetings”
- Patterned paper – Echo Park “Here and Now”
- Distress Inks – Ranger – Walnut Stain, Weathered Wood, and Black Soot
- Cardstock – Bazzill
When I first laid eyes on these squirrels, I could hardly stand it! I decided I wanted to color the squirrel die cuts and the stamped tree myself, rather than using colored paper. I cut the squirrels out of white cardstock and applied Distress Inks to get the desired colors. Then I stamped the tree trunks with brown ink, fussy cut them and then also applied Distress Inks to them. I popped up the squirrels with dimensional adhesive so they look like they are perched and climbing as squirrels would–very 3-D. It is tradition for me to make a squirrel birthday card for a friend, so this is what I came up with. Thanks for visiting today.
For a closer look:
Leave a comment | tags: cardmaking, clean and simple stamping, die cuts, distress techniques, echo park, fauna, Impression Obsession, lawn fawn | posted in Birthday, Distress Techniques
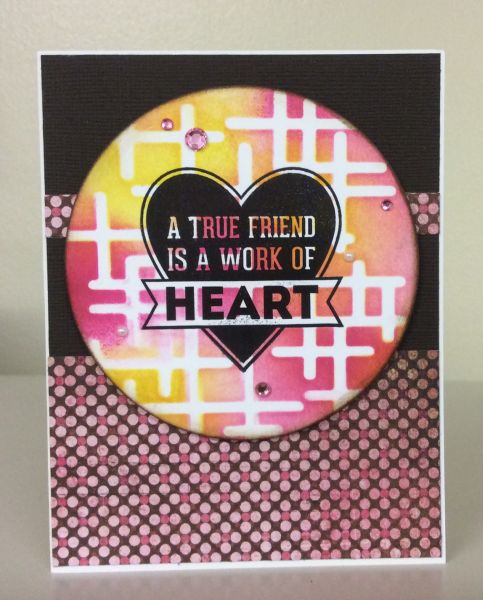
- Stamp – My Favorite Things – “My Favorite Sentiments” set
- Stencil – The Crafter’s Workshop “Crosshatched Frags”
- Patterned paper – Basic Grey “Kissing Booth: Cupid”
- Die – Spellbinder’s Nestabilities “Standard Circles Large”
- Ranger Distress Inks – Mustard Seed, Picked Raspberry and Spiced Marmalade
- Bling – Rhinestones – Queen & Co. and Mark Richards; Pearls – Memory Box
- Cardstock – Bazzill
This month’s Our Daily Bread Designs Challenge at Operation Write Home Stars and Stamps was to make your own background to be used on a card. I’ve been really into the backgrounds thing lately with my mixed media explorations. I thought I’d do something a little more mainstream for an OWH card, so I used Distress Inks through a stencil. This is a favorite technique of mine. I just take several colors of Distress Ink and apply it with a sponge applicator through a stencil, blending the colors. Then I stamped on top and die cut it and it looks like a piece of patterned paper. Thanks for visiting today.
1 Comment | tags: cardmaking, crafter's workshop, distress techniques, my favorite things, Ranger, stamping, stencils | posted in Backgrounds, Challenges, Distress Techniques, General Cards, OWH
More Than Just a Background Series:
Water Stamping

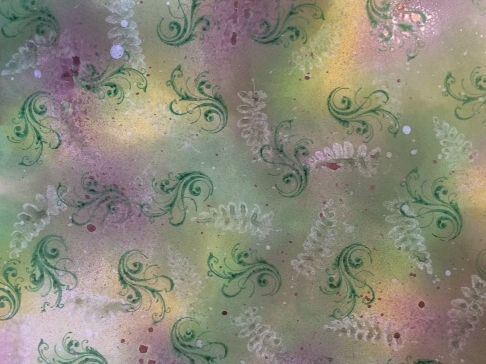
- Stamps – Hampton Art Vingologie Butterflies Clear Stamp & Stencil Set; Kodomo, Inc. “Leaf01”; JudiKins “Calligraphic Flourish”
- Inks – Ranger Distress Inks – Mowed Lawn, Peeled Paint, Crushed Olive, Shabby Shutters; ClearSnap Chalk Ink – Creamy Brown, Rouge, Ice Jade, and Azurite
- Ink spray – Tattered Angels Glimmer Mist – Suede
- Ranger Specialty Stamping Paper
This is the first in a series I’m planning. I make Artist Trading Cards (ATCs) generally once a month to trade with my “Book Club” friends. One of the processes I like to follow is creating a background on a full 8-1/2″ X 11″ sheet of cardstock and then cutting it into 10 standard sized cards. Mirkwood Designs has a great template for getting 10 out of one piece of paper with little waste. But there are so many wonderful techniques you can do to create lovely backgrounds for card bases and ATCs, that I thought I’d show a little more about my backgrounds here and explain some of the steps and variations I try.
For this set of cards, I was inspired by the September issue of Craft Stamper magazine, page 38. I created the background by starting with a sheet of Ranger Specialty Stamping Paper. This paper has a very non-porous surface and is very smooth. I applied Ranger Distress inks with a sponge applicator in several of the greens. I then took the fern stamp and misted it with water. I placed it on the inked surface, which creates a ghost image. I repeated that across the page, changing the orientation of the stamp. I then stamped the flourish in Mowed Lawn randomly on the page. I then spritzed some water, some larger drops and some smaller. Finally, I missed areas with Glimmer Mist to add some additional texture. Below is what the background looked like.
Once it all dried, I cut the paper into 2-1/2″ X 3-1/2″ inch cards for my ATCs. I must confess–sometimes it is pretty hard to cut up my background pieces! I stamped the butterfly and the word “lovely” on a separate piece of cardstock. I cut each out and distressed the stamped pieces and the outside of the cards with chalk inks. I then attached the pieces to the cards with dimensional adhesive, letting interesting places in the background peek through.
Thanks for visiting today. Please let me know if you try this technique.
1 Comment | tags: distress techniques, hampton art, JudiKiins, Kodomo, stamping | posted in Artist's Trading Cards, Backgrounds

- Tag – Ranger #5 Manila
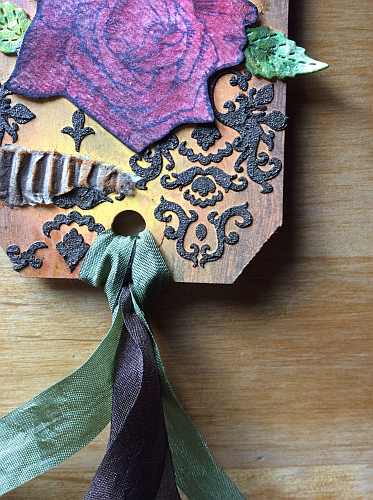
- Stamp – Visible Images “Roses”
- Stencil – The Crafter’s Workshop “Mini Damask”
- Die – Lawn Fawn “Stitched Leaves” set
- Ferro – Viva Decor “Gold iron” (modeling paste)
- Tim Holtz Distress Paints – Spiced Marmalade, Mustard Seed and Tarnished Brass
- Faber Castell Gelatos – Red Cherry, Raspberry and Watermelon
- Tim Holtz Distress Ink – Walnut Stain and Spiced Marmalade
- Ribbon – May Arts “Solid Wrinkled” in Olive and Brown
- Corrugated cardboard
I sure used a lot of supplies for such a small tag! I really enjoy it when I can use a lot of different stuff from a lot of different companies to complete my final project. Makes me feel like I’ve made good use of my stash!
I started out with a plain, manila tag and brushed it with Distress Paints. I then applied Ferro through the stencil for the damask layer. Ferro is thick and has some metallic properties. Its consistency really stands up to a detailed stencil, which you might not expect. I then tore strips from the corrugated cardboard, which had come from the sleeve on my coffee cup! I distressed it with ink before adhering with gel medium. I then added the rose that I had colored on watercolor paper and smoothed out with a baby wipe. I cut the leaves from a scrap from a Gelli Plate print. I distressed the remainder of the elements with walnut stain ink and tied up the tag with the ribbon. I created this for the August Tag Challenge at Mixed Media Mojo.
For a closer look, here’s a detail shot:

Thanks for stopping by.
1 Comment | tags: crafter's workshop, die cuts, distress techniques, flora, Gelatos, lawn fawn, mixed media, Ranger, stencils, viva decor | posted in Challenges, Tags, Mixed Media Mojo

- Stamps –
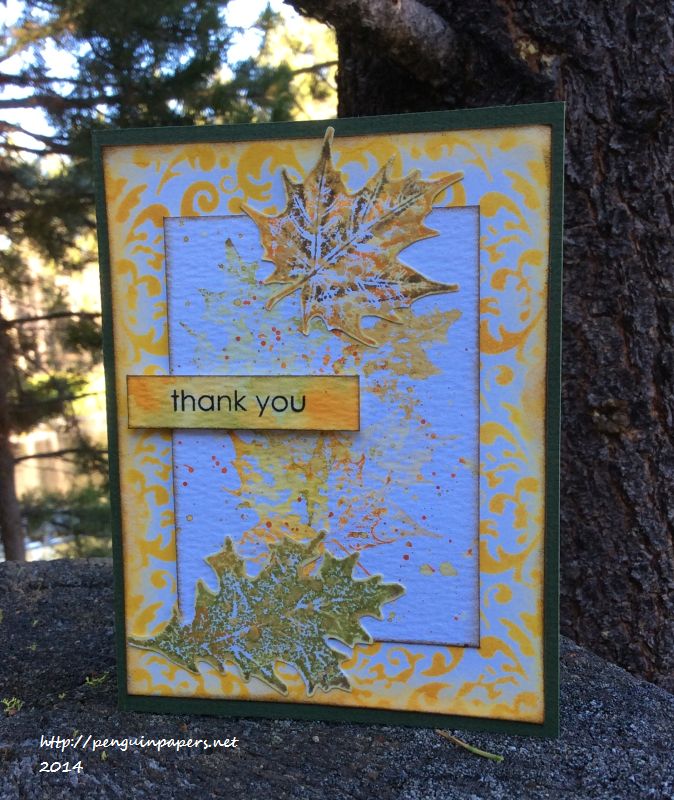
- PrintWorks “Fall Leaf”
- Fred B. Mullett “Maple 2”
- Hero Arts “Everyday Sayings”
- Stencil – Memory Box “Flourish”
- Ranger Distress Inks – Spiced Marmalade, Peeled Paint, Walnut Stain, Mustard Seed, Antique Linen
- Cardstock – Bazzill
This was a fun card to make. I was sitting along Fall River in Central Oregon on a very warm day last weekend and created this card. Distress techniques lend themselves well to dusty, outdoor locations! I created the base background with a Memory Box stencil and Distress Ink and then stamped and cut out the leaves, splattering them with water and Distress Ink. I used the same stamps on watercolor pap er with less ink and more water to give indications of leaves and more splatters. I attached the leaf cut-outs on top of all of the layers and then stamped the sentiment on a small scrap colored with the same ink colors. All elements are edged with ink to finish them. I’m trying to make some Autumn cards for Operation Write Home before the deadline. Thanks for visiting.
6 Comments | tags: cardmaking, distress techniques, fred b. mullett, Hero Arts, leaves, memory box, printworks, stamping, stencils, watercolor | posted in Autumn, Distress Techniques, OWH, Thank You

- Stamps – Lawn Fawn “Critters in the ‘Burbs” set
- Die cut – Spellbinders Nestabilities “Fleur de Lis Rectangles”
- Stencil – Tim Holtz Collection from Stampers Anonymous “Stripes”
- Cardstock – Bazzill
- Ranger Distress Inks: Antique Linen and Faded Jeans
- Watercolor pencils
I’ve been creating some Operation Write Home cards lately. This one could be cheery for a child or an adult. I created the pattern on the card base by pouncing Distress Inks through a stencil and blending. I colored the images with watercolor pencils and filled in areas with a water brush. Thanks for visiting today.
Leave a comment | tags: cardmaking, die cuts, distress techniques, fauna, lawn fawn, Ranger, stamping, stencils, tim holtz, watercolor | posted in Distress Techniques, Love, OWH

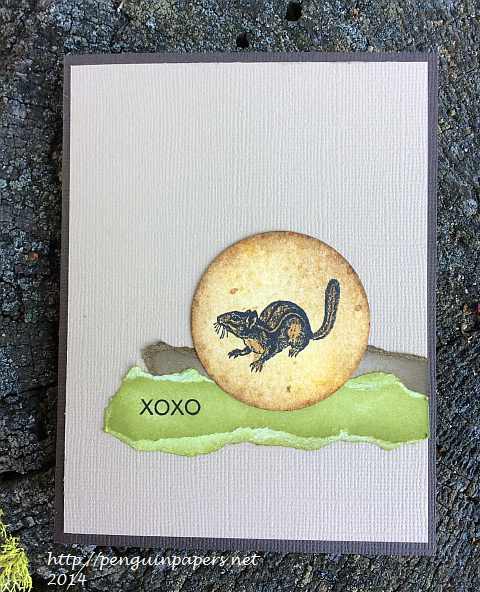
- Stamps – 100 Proof Press “Chipmunk”, Hero Arts “Everyday Sayings”
- Ranger Distress Inks – Antique Linen, Walnut Stain, Peeled Paint, Vintage Photo, Spiced Marmalade
- Cardstock – Bazzill
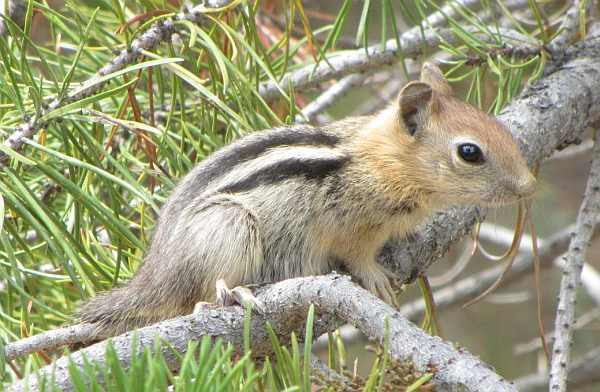
I created this simple card while out among squirrels of this kind. We went camping in Central Oregon and fed our squirrel and chipmunk friends throughout the weekend. I colored the torn cardstock with Distress Inks to match the colors around me and those I used in the chipmunk image. I used the latest sketch at Freshly Made Sketches (#146) when I put this card together. I have been taken with torn paper edges lately–it seemed appropriate to tear and color the accents for a natural feel for this card. Have a great day and thanks for stopping by.

This is a baby Golden Mantled Ground Squirrel. I discovered him hanging out with his sibling and Mom (?) right by our campsite. Mom was begging for nut handouts and sitting on our laps while munching peanuts. The baby was not nearly as brazen! Is it cute or what??
3 Comments | tags: cardmaking, clean and simple stamping, distress techniques, fauna, stamping | posted in Challenges, Clean & Simple, Distress Techniques, Freshly Made, Love

- Stamps – Simon Says Stamp “Sending Happy Thoughts” set
- Stencil – Stampers Anonymout / Tim Holtz “Hearts”
- Washi tape – Kelly Purkey
- Bling – Memory Box (red) and Mark Richards (silver)
- Cardstock – Neenah Classic Crest – Solar White
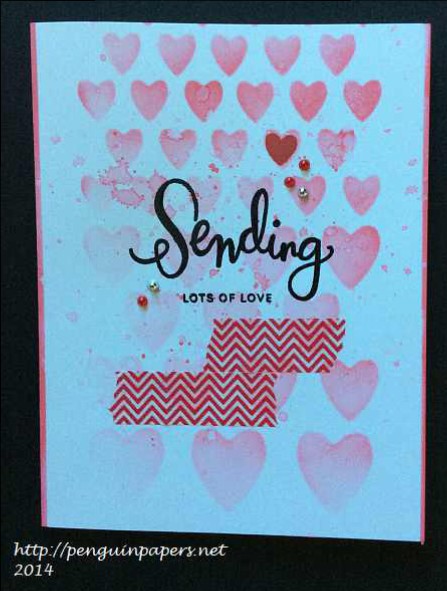
I made this card for Becca’s Teen Time challenge at the OWH Virtual Cardmaking Party this weekend. Her challenge was to create a card that would appeal to a teen. One of the things she suggested was a “messy” card, so I ran with that! First I applied Distress Ink with a sponge applicator through a stencil. Then I splattered some of the ink with a water brush and stamped the sentiment with VersaMark and black embossing powder. I stamped a heart from the stamp set over one of the stenciled hearts. Finally, I embellished the card with washi tape and gems. Thanks for stopping by.
1 Comment | tags: cardmaking, distress techniques, Simon Says Stamp, Stamper's Anonymous, stencils, tim holtz | posted in Challenges, Love, OWH

- Stamps – Penny Black “Poppy Poem” and Stampin’ Up “Sincere Salutations: Thanks so much”
- Stencil – Memory Box “Diamond”
- Cardstock – Bazzill
- Distress Inks – Picked Raspberry, Dried Marigold, Shabby Shutters, Tea Dye
- Dylusions Ink Spray – White Linen
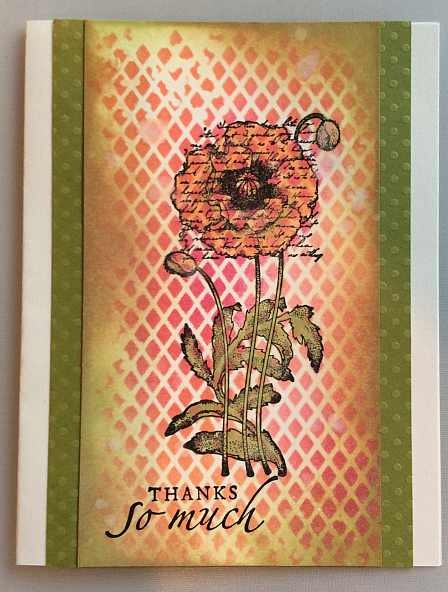
I created the background for this card first, pouncing Distress Inks through the stencil and blending the colors. Once the background was dry, I stamped the poppy image onto it. I added more Distress Ink with a water brush to fill in the poppy, leaves and stems with color. I sprayed the white ink spray lightly to the image and blended Distress Inks along the edges of the imge. Finally, I stamped the sentiment and adhered the image to the green cardstock, then adhered those pieces to a white card base. Thanks for visiting.
1 Comment | tags: cardmaking, clean and simple stamping, distress techniques, flora, penny black, stamping | posted in Distress Techniques, Thank You