Tag Archives: stamping

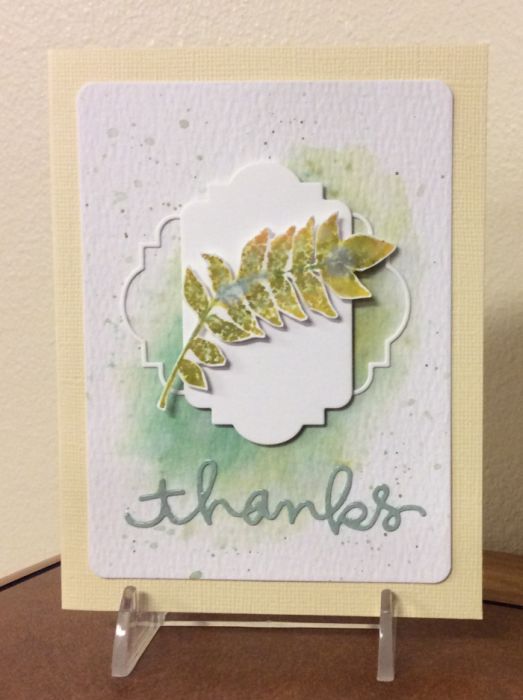
- Stamp – from Simon Says Stamp “Leaves and Scribbles” set
- Dies – Simon Says Stamp “Frames” and “Thanks”
- Ranger Distress Inks: Forest Moss, Mustard Seed, Crushed Olive, Dried Marigold, and Evergreen Bough
- Cardstock – Neenah and Paper Accents
- Ranger Distress watercolor cardstock
- Ranger Glossy Accents
For today’s card, I created a watercolor background and image with Ranger Distress Inks. I did a wash with ink and lots of water for the background and then added some spatters of color. Next, I cut the decorative frame from 110 lb. Neenah white cardstock, which is very hefty. I adhered the thin outer frame horizontally and then added the center vertically in the middle with dimensional adhesive. I applied Distress inks directly to the stamp and then spritzed it with water. Once it was dry, I cut out the leaves and mounted it on top of the frames with a bit more dimensional adhesive. The word “thanks” is a die-cut that I cut out of some cardstock that I found in my stash that matched some of my ink, and then added Glossy Accents on top for some shine to set the sentiment off a little bit.
I’m submitting this card in two challenges: this week’s Simon Says Stamp Flickr Challenge #4 is watercoloring and the Craft Stamper October Take It Make It Challenge which is multi-colored stamping.
5 Comments | tags: craft stamper magazine, die cuts, distress techniques, Ranger, Simon Says Stamp, stamping, watercolor | posted in Craft Stamper, Distress Techniques, Simon Says Stamp, Thank You

- Stamp – from The Cat’s Pajamas “Hello Pumpkin” set
- Die cut from Spellbinders Nestabilities “Curved Rectangles” die
- Cardstock – BoBunny and Bazzill
- Paper Distresser tool – Tim Holtz / Tonic Studios
- Enamel dots – Teresa Collins Signature Essentials – purple
- Ric-Rac, button and fiber from stash
- Copic markers
This main image a favorite from The Cat’s Pajamas since it features penguins and Halloween in the same stamp! Perfect for the TCP Tuesday Inspiration Challenge #277 with all of the Halloween-y colors. I colored the stamped image with Copic markers, cut it out and popped it up with dimensional adhesive. I added some spooky fiber to the button that I’ve had for years. Actually, I’ve had everything I used for this card for years! I guess that’s why it is so appropriate that Shopping Our Stash Challenge # 174 is Halloween. I used the sketch at The Paper Players for inspiration, Paper Players Challenge #219. I don’t think I’ve ever made one card that fit three challenges before! Finally, I distressed the edges of the cardstock. Thanks for visiting today.
5 Comments | tags: cardmaking, Cat's Pajamas, copics, die cuts, distress techniques, fauna, spellbinders, stamping | posted in Autumn, Challenges, Distress Techniques, Halloween, Shopping Our Stash, TCP, The Paper Players

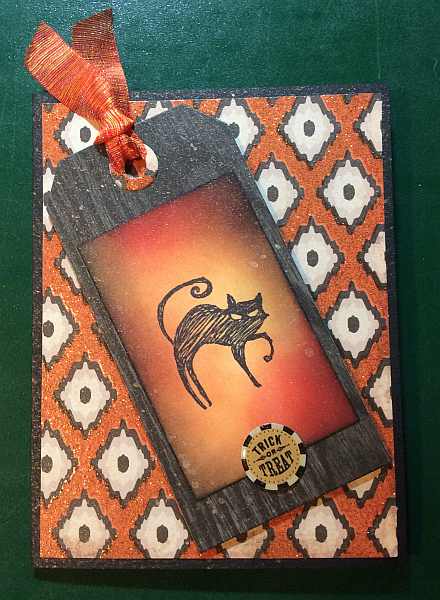
- Stamp – Inkadinkado “Black Cat”
- Dies – Sizzix Tim Holtz Alterations “Tag Collection”
- Patterned papers – My Mind’s Eye “Frightful Collection: Spooky” (both sides)
- Epoxy Sticker – K&Company – Brenda Walton “Haunted Clearlly Yours”
- Ranger Distress Inks: Spiced Marmalade, Fired Brick, Black Soot
- Cardstock – Bazzill
- Ribbon – May Arts
- Perfect Pearls Mist – Biscotti
Today I present you with a spooky Halloween cat with some sparkles for good measure. I created this for the challenge at Friday Mashup (Friday Mashup 181) which was to create a card with a tag, or one with bling, or one that featured both. Well, this fit the requirements for both. The patterned paper had lots of sparkle (not sure how clear that is to see in the photo) and I created a cat tag, distressing the background with Ranger Distress Inks. I also spritzed the whole card with Perfect Pearls Mist for some additional bling. The whole card is quite spooky in my opinion!
Here’s a closer look:
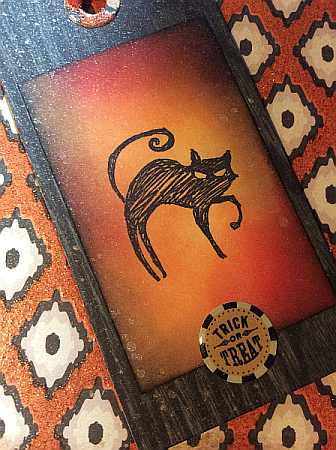
Thanks for stopping by today.
3 Comments | tags: cardmaking, die cuts, distress techniques, inkadinkado, my mind's eye, stamping | posted in Friday Mashup, Halloween, Tags

- Patterned papers –
- Graphic 45 “An Eerie Tale” 8 X 8″ pad
- My Mind’s Eye “Collectable: Beautiful”
- Stamp – from Hero Arts “Messages with Flourish” set
- Die – Spellbinders Nestabilities “Labels Twenty”
- Stickers – Hot Off The Press Dazzles “Autum Splendor”
- Pearls and Gems – Hero Arts “Earth Mixed Accents”
- Cardstock – Bazzill and Paper Accents
I’ve got Jack and the Beanstalk featured for this card. This Graphic 45 paper collection is so pretty and it includes a number of Eerie Tales with sort of a Halloween theme. The copper colored stickers work nicely with the oranges in the papers. I’ve had those stickers in my stash for quite some time as well as the little blingy bits! I think this fits the “It’s the Most Colorful Time of the Year” challenge at Shopping Our Stash, since I used a number of Fall colors, plus green. Thanks for visiting today.
1 Comment | tags: cardmaking, die cuts, Graphic45, Hero Arts, my mind's eye, spellbinders, stamping | posted in Autumn, Birthday, Shopping Our Stash
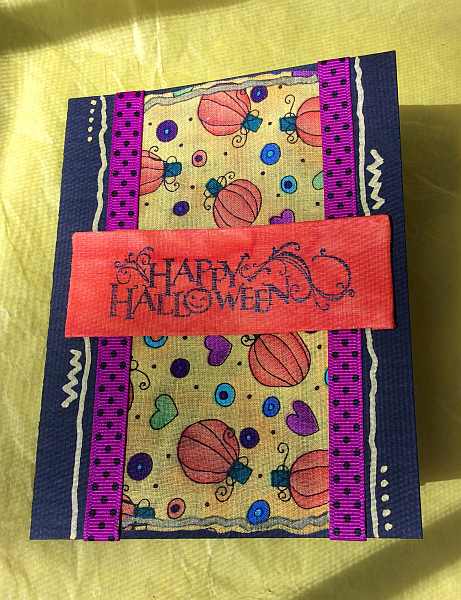
- Stamp – Inkadinkado
- Fabric scraps from my stash of fat quarters
- Claudine Hellmuth (Ranger) Studio Matte Multi-Medium
- Ribbon – Michael’s
- Molotow One4All Acrylic premium paint pen – Metallic Gold
- Cardstock – Bazzill
In honor of World Card Making Day, Mixed Media Mojo has a card making challenge to make a card with a Fall/Halloween theme using some fabric. I made a pretty funky card, but it was fun to do and stretched me to use some fabric. I covered some cardstock with orange batik fabric and then covered it with gel medium–that way when I stamped the Halloween sentiment on it, the ink wouldn’t bleed into the fabric. I also like the texture it gave the fabric. I then attached the pumpkin fabric to heavy black cardstock and covered the outside edges with some ribbon. Before I attached the sentiment panel, I drew some lines and dots with my trusty Molotow metallic gold acrylic paint pen. I drew along the top and bottom of the pumpkin fabric as well and then outlined it with a Micron pen. These Molotow pens really apply the paint in a steady stream–I love the white one as well. I popped up the sentiment panel with dimensional adhesive to finish the card. Thanks for visiting.
4 Comments | tags: cardmaking, inkadinkado, mixed media, stamping | posted in Halloween, Mixed Media Mojo


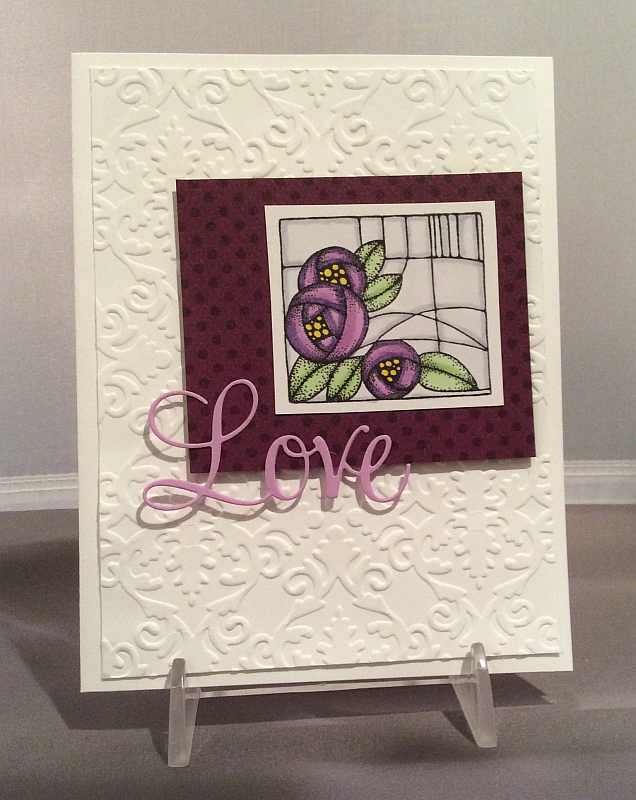
- Stamp – Chocolate Baroque “Rose Square”
- Die – Penny Black “Love and Joy”
- Embossing folder – Elizabeth Craft “Damask”
- Patterned cardstock – BoBunny “Boysenberry Dot”
- Cardstock – WorldWin – Light Groovy Grape
- Copic markers – V12, V15, V17, Y15, G40, G43, C0 and C3
Happy World Cardmaking Day! We are having an Operation Write Home Stars and Stamps Blog Hop in honor of this day. Lots of cardmakers are participating, so make sure you check out all of the talent. If you’d like to know more about the current needs of OWH, check out Operation Tape Gun.
Welcome to my stop. My card is very simple and features a little bit of dimension and some texture. The stamp came as a bonus on the cover of Craft Stamper magazine! Each issue comes with an acrylic stamp. I colored the “Rose Square” stamped image with Copic markers. The small purple piece is popped up with dimensional adhesive and the sentiment die cut floats above the background. I am helping others make this same card at Runaway Art and Craft Studio this weekend during a Make & Take on Saturday.
To return to the Hop, go to the top of Operation Write Home Stars and Stamps home page and you’ll find it at the top of the page through this weekend.
Thanks for visiting!
10 Comments | tags: bloghop, cardmaking, die cuts, embossing, flora, penny black, stamping | posted in Love, OWH

- Stencils – Stampers Anonymous Tim Holtz – Dot Fade and Stencil Girl – Leaf Poetry Stencil
- Stamp – Hero Arts “Newspaper Background”
- Modeling Paste – Viva Modellier Creme – Mother of Pearl and Viva Ferro – Gold iron
- Adirondak Dimension Pearls – Terra Cotta
- Tim Holtz Tissue Wrap – Melange
- Canvas
- Decorative Polyester Leaves
- Claudine Helluth Studio matte (gel) multi-medium
I created this 8 X 8″ canvas with a base of gesso and then added Ranger Distress Inks to give the background a little color. I then stamped the background with a newspaper stamp and applied some tissue wrap with matte gel medium. I added some dimension with modeling paste through stencils and painting a little paste directly onto the canvas. Finally, I attached the polyester leaves that I had in my stash with more gel medium. I drew some lines to accentuate the outline of the leaves with a fine line marker. This canvas has a lot of texture and Autumn color. I created it for the Mixed Media Mojo September Challenge, which is to create a mixed media project with a Fall theme and modeling or embossing paste. Thanks for visiting.
3 Comments | tags: Hero Arts, mixed media, stamping, stencils, tim holtz | posted in Autumn, Canvas, Challenges, Mixed Media Mojo
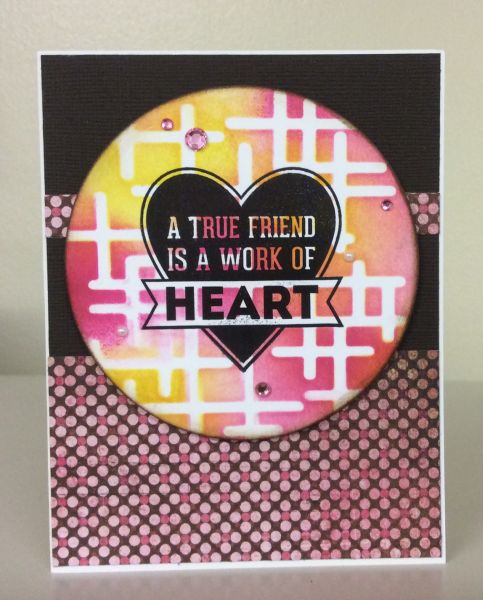
- Stamp – My Favorite Things – “My Favorite Sentiments” set
- Stencil – The Crafter’s Workshop “Crosshatched Frags”
- Patterned paper – Basic Grey “Kissing Booth: Cupid”
- Die – Spellbinder’s Nestabilities “Standard Circles Large”
- Ranger Distress Inks – Mustard Seed, Picked Raspberry and Spiced Marmalade
- Bling – Rhinestones – Queen & Co. and Mark Richards; Pearls – Memory Box
- Cardstock – Bazzill
This month’s Our Daily Bread Designs Challenge at Operation Write Home Stars and Stamps was to make your own background to be used on a card. I’ve been really into the backgrounds thing lately with my mixed media explorations. I thought I’d do something a little more mainstream for an OWH card, so I used Distress Inks through a stencil. This is a favorite technique of mine. I just take several colors of Distress Ink and apply it with a sponge applicator through a stencil, blending the colors. Then I stamped on top and die cut it and it looks like a piece of patterned paper. Thanks for visiting today.
1 Comment | tags: cardmaking, crafter's workshop, distress techniques, my favorite things, Ranger, stamping, stencils | posted in Backgrounds, Challenges, Distress Techniques, General Cards, OWH

- Stamps – from The Cat’s Pajamas “Wish” set (includes bunny, sentiment and stars)
- Dies – Spellbinders Nestabilities “Labels Twenty-Two”
- Patterned paper – Reminisce “Out of this world” and BoBunny “Buttercup Dot”
- Cardstock – Bazzill
- Sakura Gelly Roll pen – Stardust
Happy Birthday, Trenton! This is Trenton’s card for today, celebrating his 16 years of age. It features a great set from The Cat’s Pajamas. The bunny is colored with Copic markers, cut out and popped up with some dimensional adhesive. I carried the star theme through by finding some star patterned paper in my stash for a backdrop and then stamped the little twin stars in the “Wish” set and created a border at the bottom. I trimmed along the star border on the front of the card and colored in the stars with the Stardust Gelly Roll pen so they’d twinkle. I added a strip of red cardstock on the inside of the card to bring out the star border.
This is my candidate for The Cat’s Pajamas Tuesday Challenge #275: Anything Goes. Thanks for stopping by.
1 Comment | tags: cardmaking, Cat's Pajamas, copics, die cuts, spellbinders, stamping | posted in Birthday, Challenges, TCP
More Than Just a Background Series:
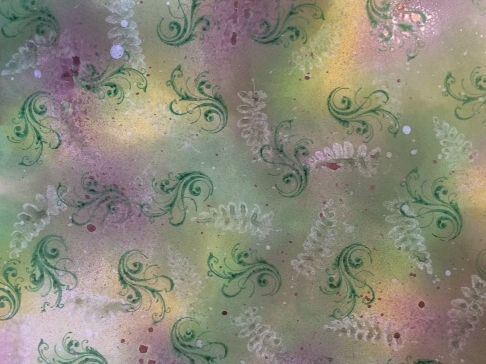
Water Stamping

- Stamps – Hampton Art Vingologie Butterflies Clear Stamp & Stencil Set; Kodomo, Inc. “Leaf01”; JudiKins “Calligraphic Flourish”
- Inks – Ranger Distress Inks – Mowed Lawn, Peeled Paint, Crushed Olive, Shabby Shutters; ClearSnap Chalk Ink – Creamy Brown, Rouge, Ice Jade, and Azurite
- Ink spray – Tattered Angels Glimmer Mist – Suede
- Ranger Specialty Stamping Paper
This is the first in a series I’m planning. I make Artist Trading Cards (ATCs) generally once a month to trade with my “Book Club” friends. One of the processes I like to follow is creating a background on a full 8-1/2″ X 11″ sheet of cardstock and then cutting it into 10 standard sized cards. Mirkwood Designs has a great template for getting 10 out of one piece of paper with little waste. But there are so many wonderful techniques you can do to create lovely backgrounds for card bases and ATCs, that I thought I’d show a little more about my backgrounds here and explain some of the steps and variations I try.
For this set of cards, I was inspired by the September issue of Craft Stamper magazine, page 38. I created the background by starting with a sheet of Ranger Specialty Stamping Paper. This paper has a very non-porous surface and is very smooth. I applied Ranger Distress inks with a sponge applicator in several of the greens. I then took the fern stamp and misted it with water. I placed it on the inked surface, which creates a ghost image. I repeated that across the page, changing the orientation of the stamp. I then stamped the flourish in Mowed Lawn randomly on the page. I then spritzed some water, some larger drops and some smaller. Finally, I missed areas with Glimmer Mist to add some additional texture. Below is what the background looked like.
Once it all dried, I cut the paper into 2-1/2″ X 3-1/2″ inch cards for my ATCs. I must confess–sometimes it is pretty hard to cut up my background pieces! I stamped the butterfly and the word “lovely” on a separate piece of cardstock. I cut each out and distressed the stamped pieces and the outside of the cards with chalk inks. I then attached the pieces to the cards with dimensional adhesive, letting interesting places in the background peek through.
Thanks for visiting today. Please let me know if you try this technique.
1 Comment | tags: distress techniques, hampton art, JudiKiins, Kodomo, stamping | posted in Artist's Trading Cards, Backgrounds