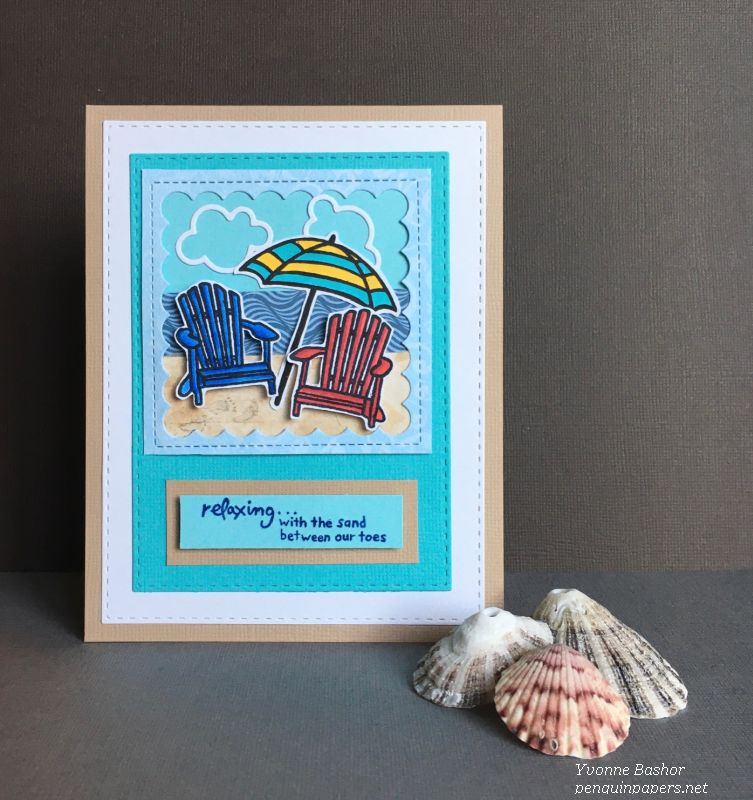
This is my third card using the Cape Cod stamp set created by Jenn Shurkus. For more information on this versatile stamp set, see the photo and explanation below.
For this card, I created a little scene on the beach. The chairs, umbrella, footprints and sentiment are all from the Cape Code stamp set. I made the sand by adhering a tea bag to white card stock with gel medium to create a little texture and a pretty accurate sand color. I stamped the footprints ever so lightly on the sand since they should only indicate an impression. But they’re so light they are hard to detect in the photo! I had a scrap of the wave patterned paper left from a previous card that I though made a good ocean backdrop.
Supplies
Stamps – Cape Cod clear stamp set – Jenn Shurkus, Lawn Fawn – Wild for You (sentiment)
Dies – Lawn Fawn – Simple Puffy Cloud Frames and Outside In Stitched Scalloped Square Stackables; Simon Says Stamp – Stitched Rectangles
Tea bag
Dina Wakley Gel Medium
Copic markers
Patterned paper – Photoplay – Beach Huts
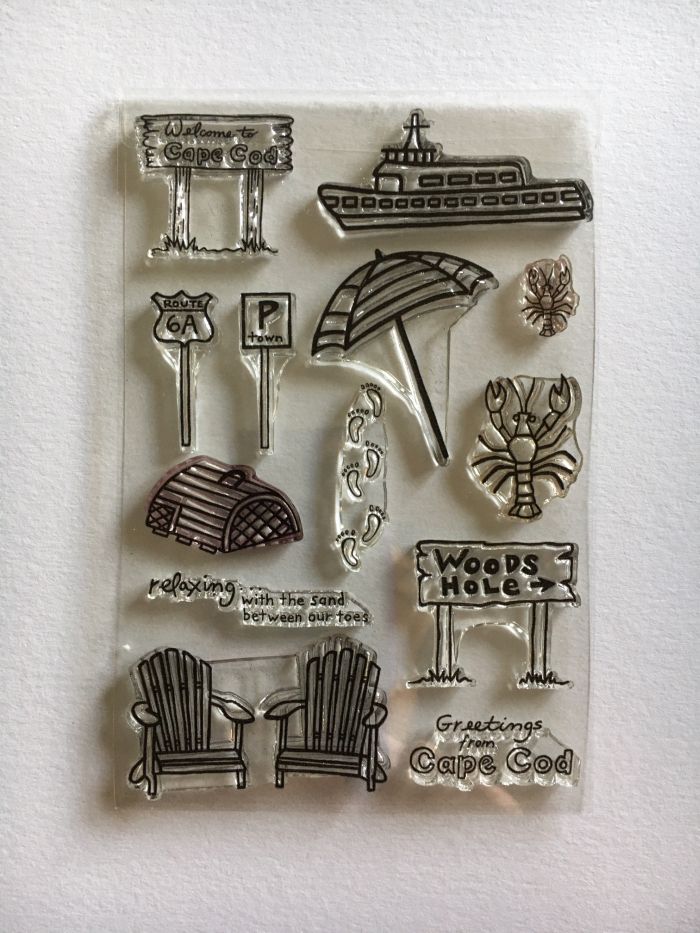
About the Cape Cod stamp set
Jenn Shurkus, who is a creative card maker and instructor, lives on Cape Cod and is raising money for the Cape Cod Resilience Fund. This fund will help small businesses on Cape Cod who are experiencing financial difficulties due to Covid-19. This fund will be around for the long run, and continue to help small businesses out in the future. YOU can help by purchasing one of Jenn’s exclusive Cape Cod stamp sets. For each set sold between June 15th- July 1st, $10 will be donated to the CCRF. Another way you can help? Share this with your creative friends and help spread the word! More details can be found on Jenn’s website. She also has more samples of lovely cards she has made using this stamp set.
Love Live Local is an organization that has supported small businesses and artists on Cape Cod for a number of years now. They are the ones organizing the Cape Cod Resilience Fund. The Cape Cod Resilience Fund will provide direct grants to small business owners on Cape Cod to offer some relief from the economic damage caused by the Covid-19 pandemic. You can read more about them and the fund here: https://lovelivelocal.com/resilience/.
This is my second card using the Cape Cod stamp set created by Jenn Shurkus. For more information on these wonderful stamps, see the photo and explanation below.
I couldn’t resist the lobsters in this set and had fun making a little pattern with them (sort of like synchronized swimming lobsters!). Now, here in Oregon, we don’t have lobsters. We have the tastiest crabs of all: Dungeness. But someday I will go to Cape Cod so I can have a lobster roll! I designed the card front and then wanted to find a sentiment to match the card (sort of backwards, huh?). I did think the one I picked was pretty perfect even though the sentiment went with an entirely different stamp set.
Supplies
Stamps – Cape Cod clear stamp set – Jenn Shurkus, Lawn Fawn – Wild for You (sentiment)
Die – Lawn Fawn – Simple Wavy Banners
Hero Arts Enamel Dots – Aqua
Patterned paper – Photoplay – Beach Huts
About the Cape Cod stamp set
Jenn Shurkus, who is a creative card maker and instructor, lives on Cape Cod and is raising money for the Cape Cod Resilience Fund. This fund will help small businesses on Cape Cod who are experiencing financial difficulties due to Covid-19. This fund will be around for the long run, and continue to help small businesses out in the future. YOU can help by purchasing one of Jenn’s exclusive Cape Cod stamp sets. For each set sold between June 15th- July 1st, $10 will be donated to the CCRF. Another way you can help? Share this with your creative friends and help spread the word! More details can be found on Jenn’s website. She also has more samples of lovely cards she has made using this stamp set.
Love Live Local is an organization that has supported small businesses and artists on Cape Cod for a number of years now. They are the ones organizing the Cape Cod Resilience Fund. The Cape Cod Resilience Fund will provide direct grants to small business owners on Cape Cod to offer some relief from the economic damage caused by the Covid-19 pandemic. You can read more about them and the fund here: https://lovelivelocal.com/resilience/.
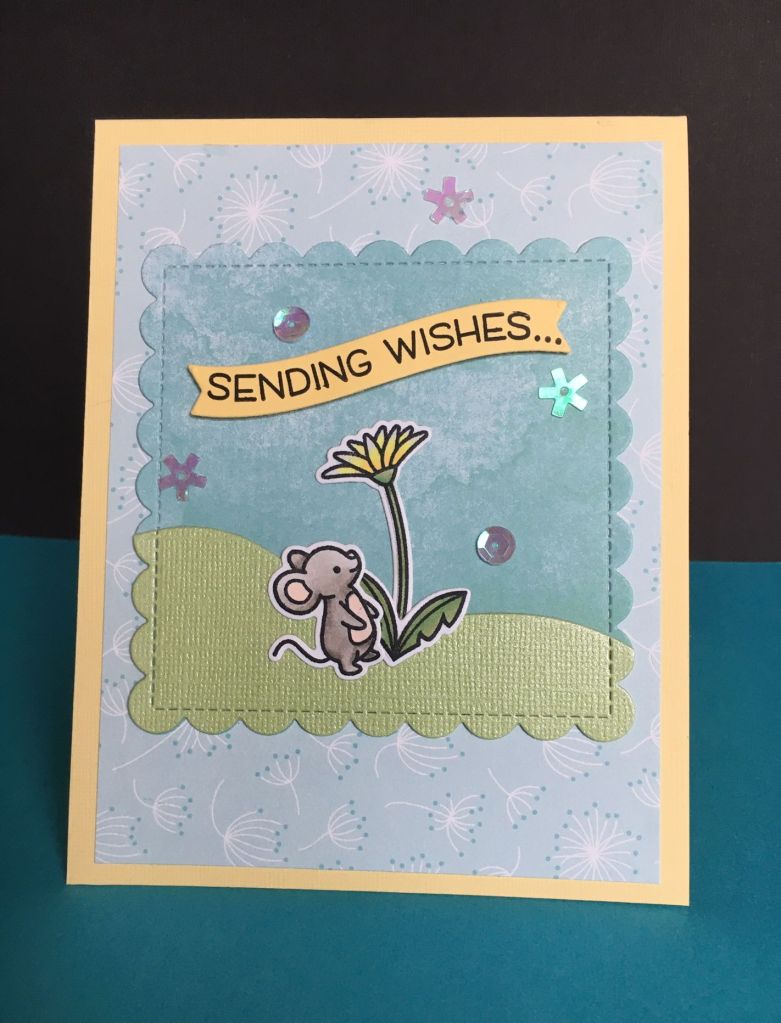
Lawn Fawn: Dandy Lion, Wavy Sayings, Simple Wavy Banners, Super Star, Outside In Stitched Scalloped Square Stackables, and Pivot Pop-Up
Patterned papers: Lawn Fawn
Sequins
Cardstock
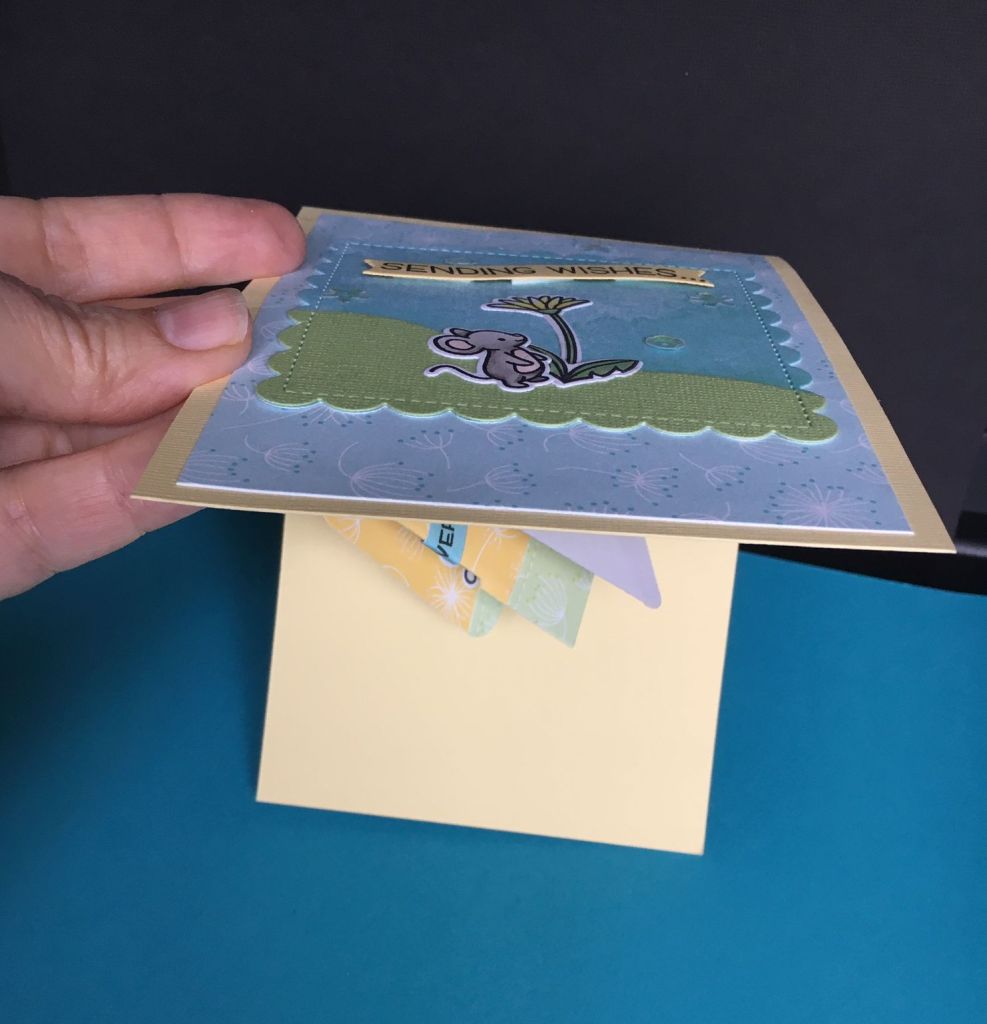
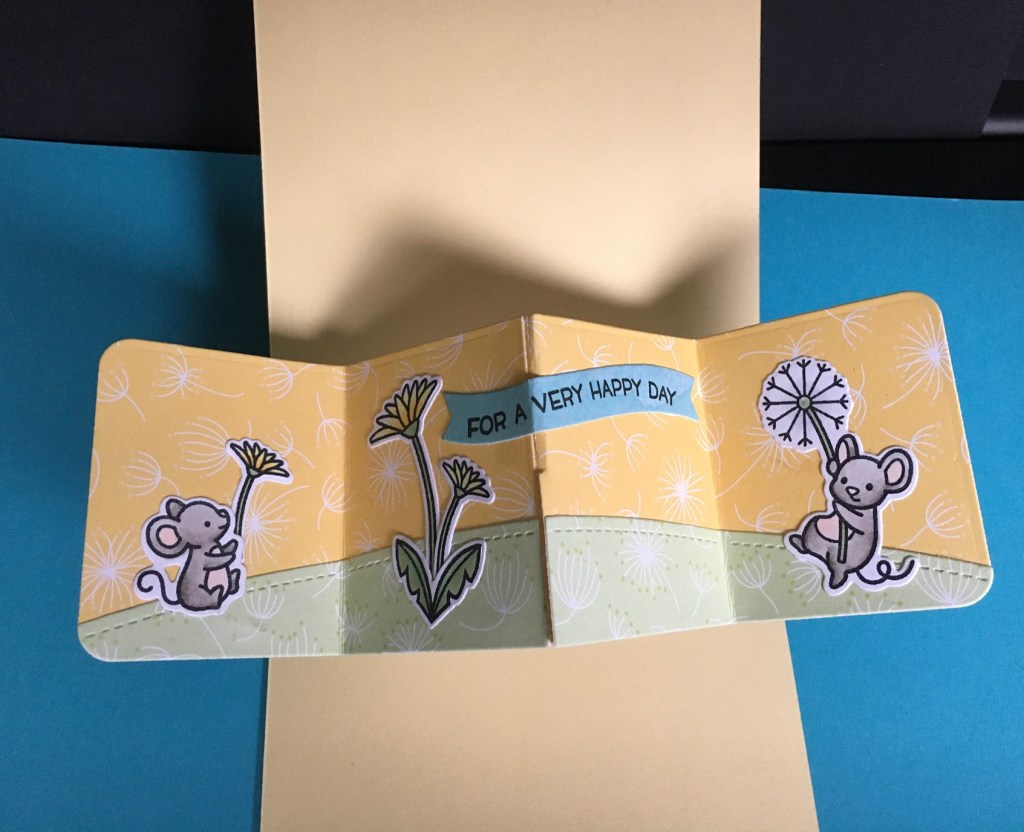
Looks like a surprise inside!
I had never made a card with this clever pivot pop-up mechanism that I cut out with the Lawn Fawn die so-named. Not only do the mice provide a major cuteness factor, the way the inside of the card pops-out is a really fun surprise! I colored all of the critters and dandelions with Copic markers.
The inside of this card, fully deployed!
It pops out with such dimension, but it folds very flat so it is easy to pop in an envelope and mail! And so I did. I made this for a card exchange and sent it off to an online friend in Ontario, Canada.
Wishing you a happy day, full of smiles and surprises! Thanks for visiting.
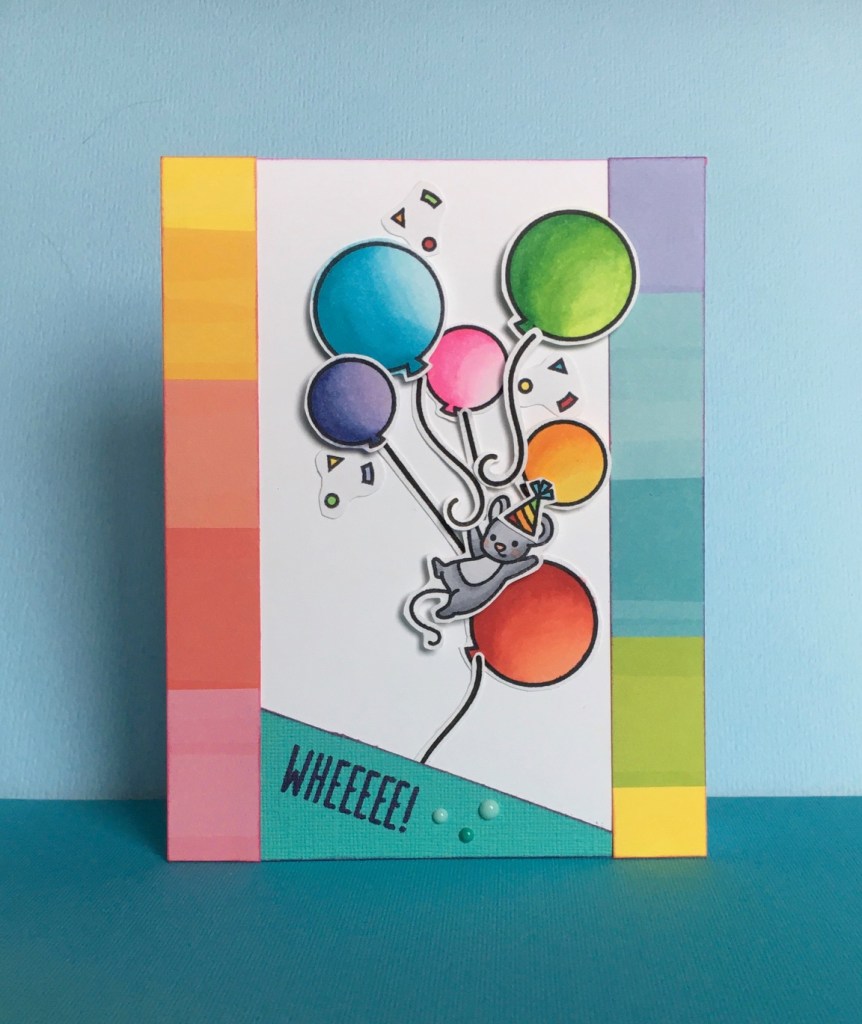
These little mouse is so cute, trying to stay aloft among the balloons!
Stamps and Dies – Lawn Fawn – Really High Five
Patterned paper – Lawn Fawn – Yellow Brick Road
Enamel Dots – Hero Arts – Hero Hues Aquas
Copic markers
I created this card for a class I’m teaching at Runaway Art and Craft Studio in Salem, Oregon. This mouse is so cute and I loved making it the star of this card! It was fun to color the balloons to match the colors on the rainbow stripes of the paper. All of the balloons and the mouse are colored with Copic markers. I cut the rainbow paper in a narrow strip, halved it and adhered it to both sides of the card base. It gave it a really different look. I added the enamel dots by the sentiment, stamped at a jaunty angle, to finish off the card. Thanks for stopping by!
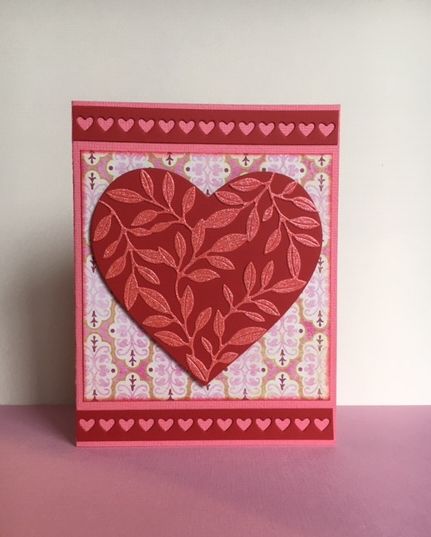
Memory Box – Scallop Pinpoint Loving Heart Cut Out and Leafy Heart
Lawn Fawn – Valentine Borders
Patterned paper – My Mind’s Eye – Collectible
Cardstock – Bazzill and Bazzill Bling
I have really enjoyed making Valentines this year. I sent this one to my mom. I had a good time mixing and matching different products together to make this card. The main attraction is such a pretty leafy heart die from Memory Box! I look forward to making some other non-Valentine cards with it as well.
Dies – Lawn Fawn – Stud Puffin, Simple Wavy Banners, and Outside In Stitched Heart Stackables
Patterned paper – Reminisce – Love Never Fails collection
Copic markers
Card stock – Bazzill
This card was really fun to make. I sent it off with a care package to my son, who is a college student in need of chocolate!
I created the little heart shaker tag first, using the Lawn Fawn die set, and filling it with sequins and beads. I cut out hearts using another Lawn Fawn die set, one to layer the tag onto and the other for the light blue heart-shaped window. I then stamped the puffin, fish and hearts, then die cut it, then colored them with Copic markers. I adhered the stamped images on top of the shaker window, then attached the tag to the deep pink heart with a brad that I’ve had in my stash for over a decade! The tag allows the tag to swing a little bit so the beads and sequins shift around when shaken.
I added the patterned paper inside the window and layered the rest on top, finishing it with the sentiment. Here’s a closer look at the details:
Thanks for visiting and have a Happy Valentine’s Day!
I had a lot of fun coloring this adorable Penny Black image, watercoloring it with Zig Clean Color markers and a water brush. I highlighted the stars with a gold metallic Sparkle Pop pen. Once dry, I framed the image with the frame that fits it perfectly. I added the stamped and heat-embossed sentiment at the bottom of the card. Thanks for stopping by.
Dies – Lawn Fawn Snow Globe Gift Tag and Mini Snowflakes
Patterned papers – Lawn Fawn
Peace Joy Love collection: Rudolph
Snow Day collection: Chunky Scarf
Glitter paper – Lawn Fawn Pixie Dust and Gold Rush
Red cardstock – Bazzill
Ribbon
White embossing powder
I really like this snow globe die set from Lawn Fawn! You can make adorable gift tags with it, but I had fun using the globe as a focal point on this simple card front. For the layout of this card, I used a sketch featured in CAS(E) this Sketch #350 challenge. I combined two small prints on the patterned papers for a little spice and tied a ribbon through the tag to keep it authentic. Thanks for stopping by.
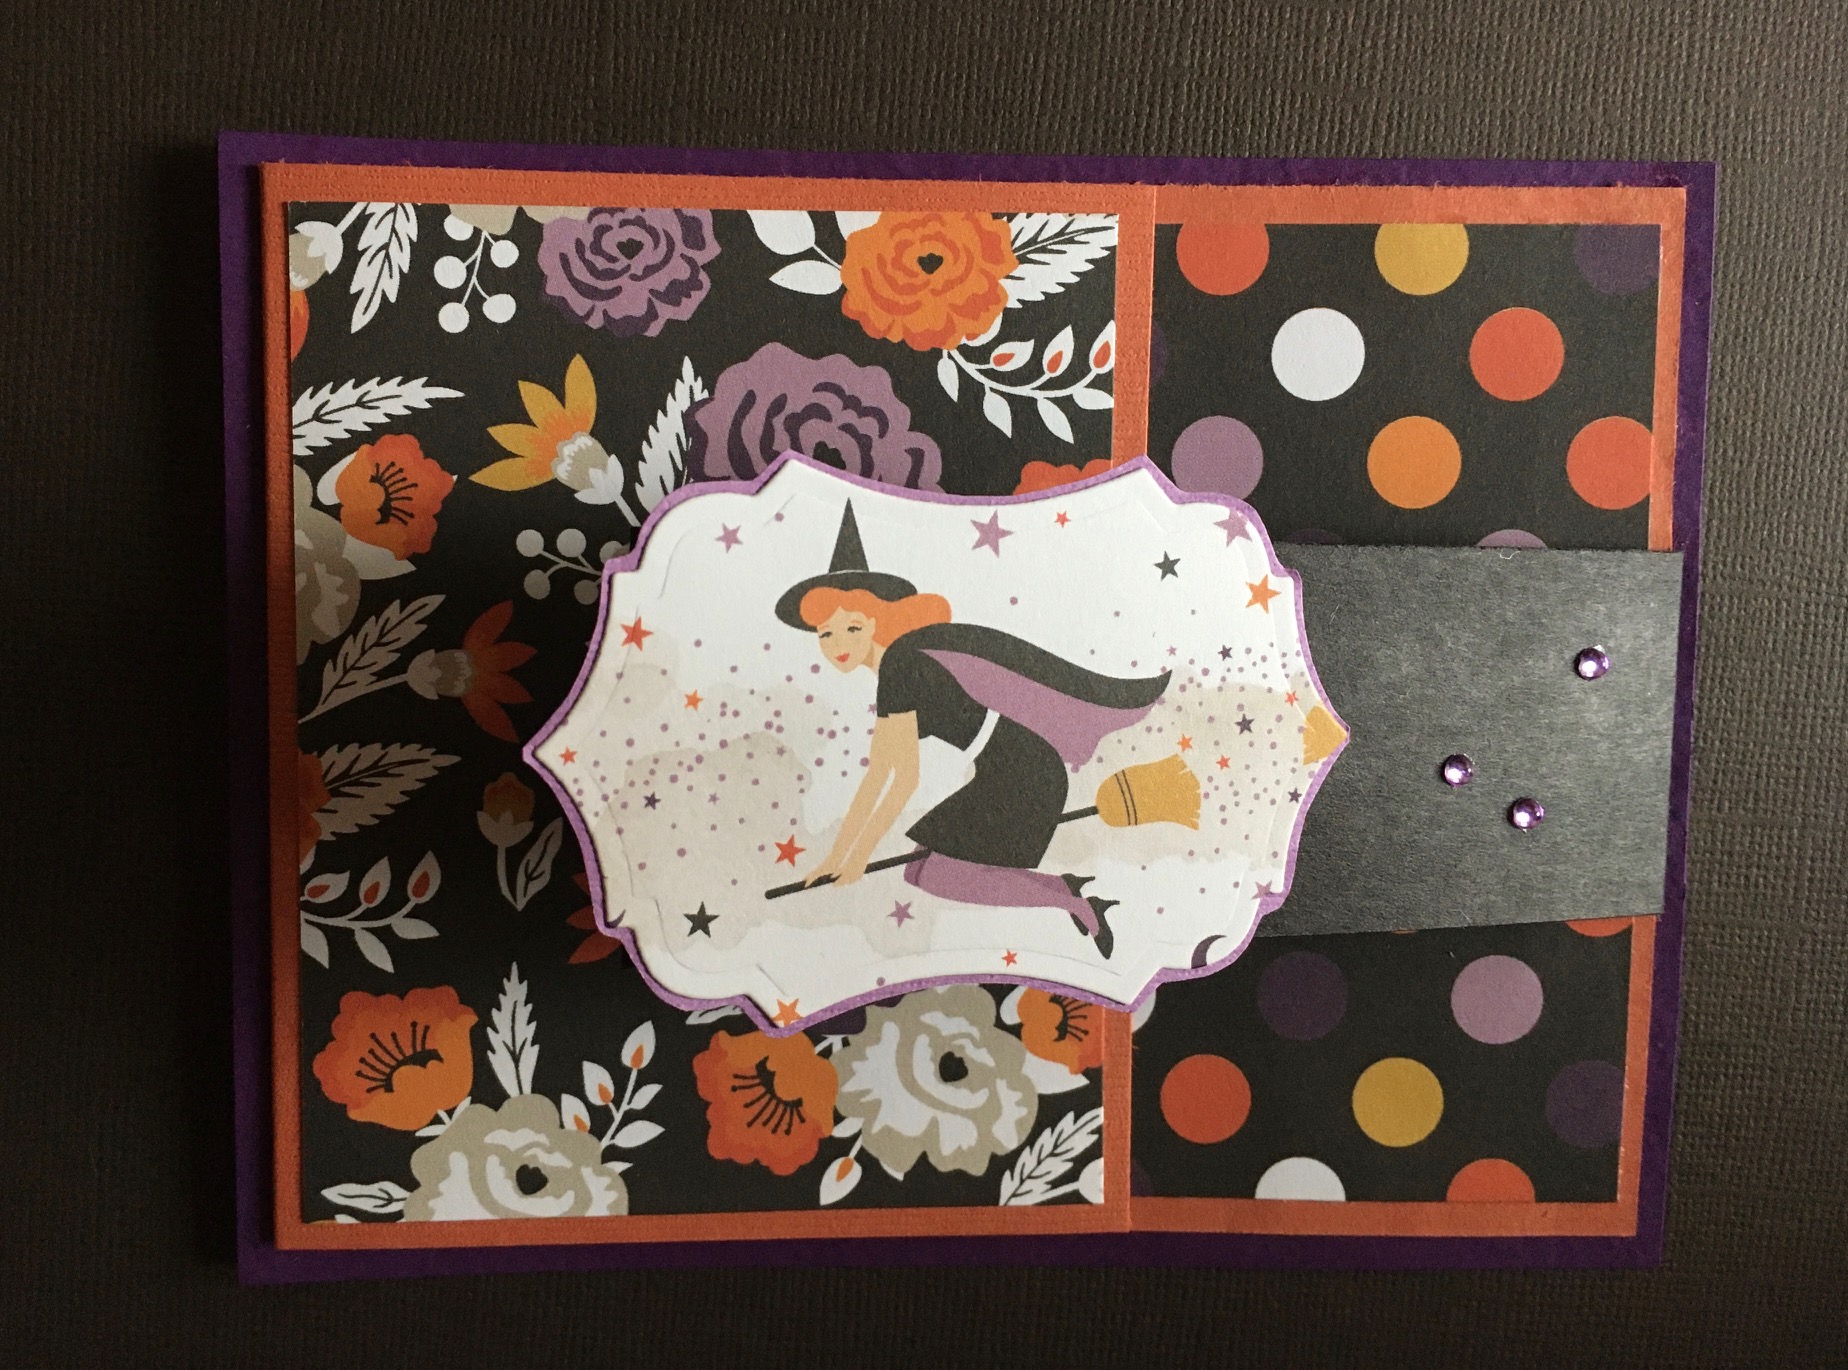
I created this Halloween card for an exchange. It is made predominately with Echo Park papers and it is a fun fold, so I am including several photos so that you might be able to see how it works.
Lawn Fawn – Snow Cool, Say What? Christmas Critters and Winter Fox
Stampers Anonymous/Tim Holtz – Reflections
Embossing folders – Sizzix Snowfall and Swirls
Ranger Stickles – Diamond
Vellum
White embossing powder – Stampendous
Watercolor paper
Cardstock
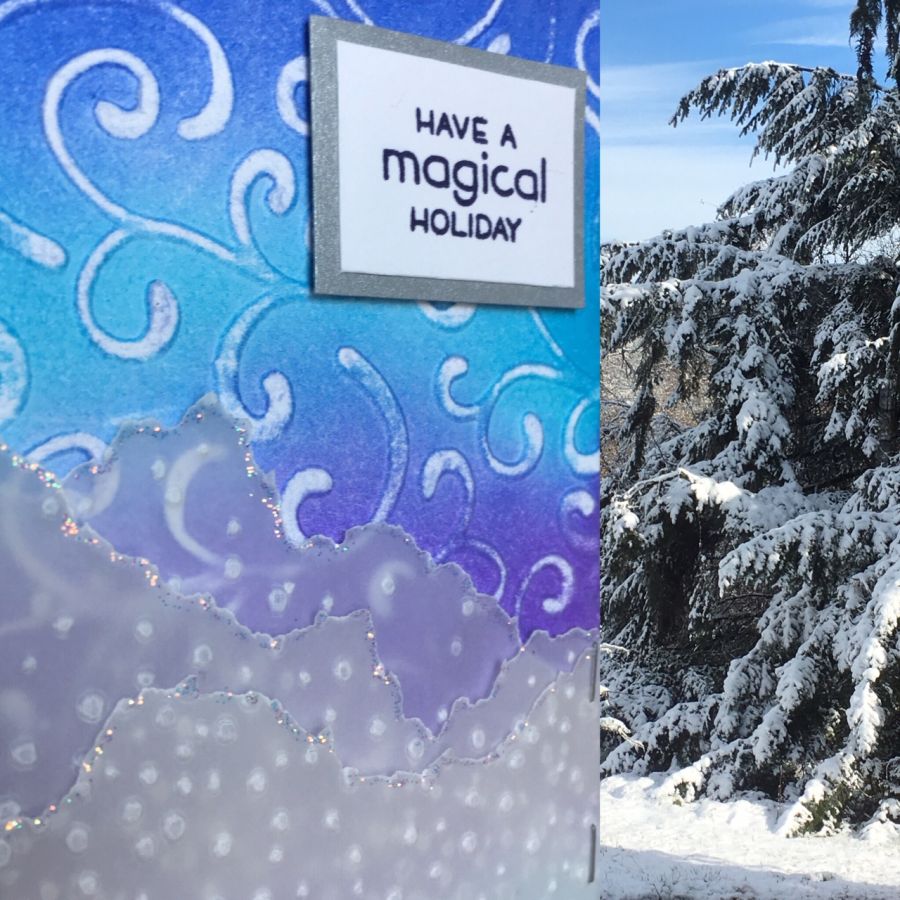
I was on deck to present the demonstration at our Craft Stamper group last week. We select something from an issue of Craft Stamper magazine and present it to the group and then we all make the project. It just so happened that I selected the masterclass that featured snowy hills from the January 2019 issue. While I was working on my sample cards, it snowed here, in March. This isn’t the first time we’ve had snow in March in Oregon’s Willamette Valley, but we’ve had at least four doses in the past two weeks. That is a little unusual. We are in the midst of one more snow shower today and that may be the end of it for this winter. Crazy!
For the first card I used two different embossing folders. I first applied Distress Inks, blending four colors. I then dry-embossed it with the Swirls embossing folder and then sanded it to expose the swirls. For the snow drifts, I embossed the snow onto vellum with the Snowfall embossing folder. I then tore the vellum into pieces to resemble snowy drifts and layered them together. When I liked the composition, I stapled the vellum onto the background with the Tim Holtz Tiny Attacher and applied Stickles glitter glue to the edges of the vellum. I added a layered sentiment and a layer of silver cardstock and adhered it to a white card base. You can see the sparkle in the photo below.
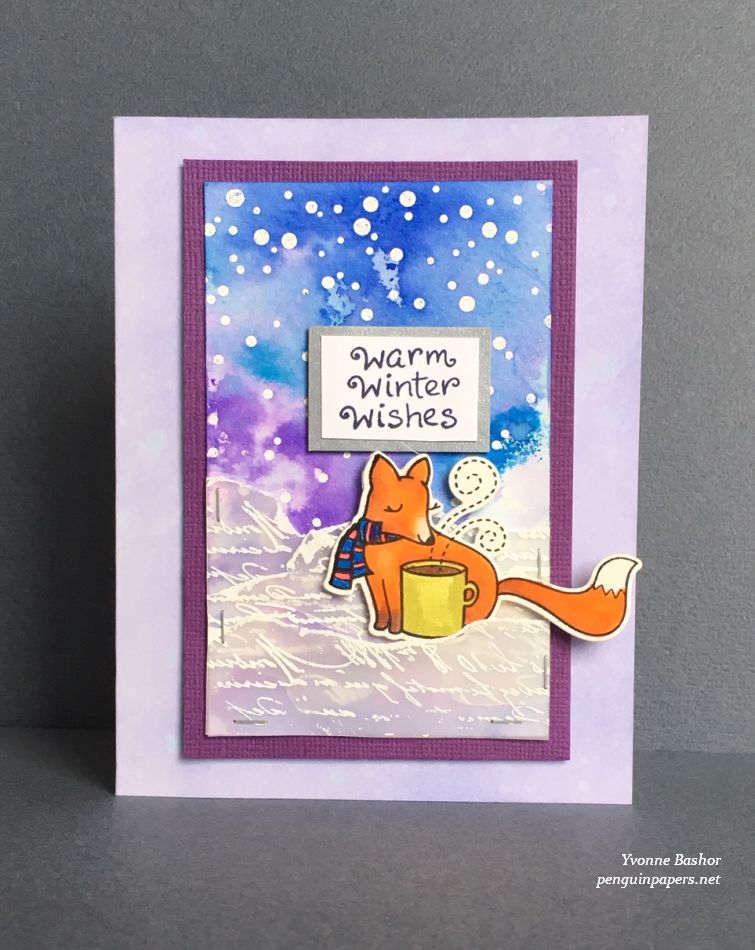
For the second card (below), I used the Distress Inks like watercolor. I heat-embossed the snow on watercolor paper using the Lawn Fawn Snow Cool stamp set and white embossing powder. Then I applied the Distress Inks to my craft sheet and spritzed the ink with water. By dragging the watercolor paper through the wet ink, drying, and reapplying, I created the colorful and snowy background. The embossing powder resists the “snow” that is heat embossed. I heat embossed the Tim Holtz script stamp on the vellum for this card and tore it to make the drifts again this time. I also applied embossing powder to the torn edges to give the appearance of snow. Again, I attached the vellum to the background with the Tim Holtz Tiny Attacher. To finish off this card, I stamped and colored the Lawn Fawn fox and popped it up onto the scene. I liked having his tail go off the background. I colored the card base by applying Milled Lavender and Shaded Lilac Distress Oxide inks to white cardstock. Finally I layered all of the pieces together and added the sentiment.
Thanks for visiting. I still have some catching up to do with posting here!