Tag Archives: crafter’s workshop

- Stencil – The Crafter’s Workshop “Mini Ferns”
- Stamp – Simon Says Stamp “Square Sayings”
- Patterned paper – Echo Park “For the Record 2”
- Ranger Dylusions Ink Sprays – Fresh Lime, Vibrant Turquoise and London Blue
- Golden Molding Paste
- Cardstock – Bazzill
I made this card based on a lesson from the Online Card Classes Stenciled class. I tried my hand at using molding paste with a stencil. My variation was to mist the cardstock with ink sprays prior to adding the molding paste and it actually incorporated some of the color into the stenciled image. Kind of a happy accident! I’ve included a close-up here to try to show it in a little more detail.
 My color scheme reflects the colors of the Seattle Seahawks, who will soon be playing in the Super Bowl. The Operation Write Home Stars and Stamps CardBowl is this weekend, and one of the challenges is to use something that reflects one of the teams playing in your card design. Living in the northwest, it seemed only appropriate to select the Seattle team, so I picked the team colors! Thanks for stopping by today.
1 Comment | tags: cardmaking, crafter's workshop, echo park, Ranger, Simon Says Stamp, stencils | posted in Challenges, Online Card Classes, OWH
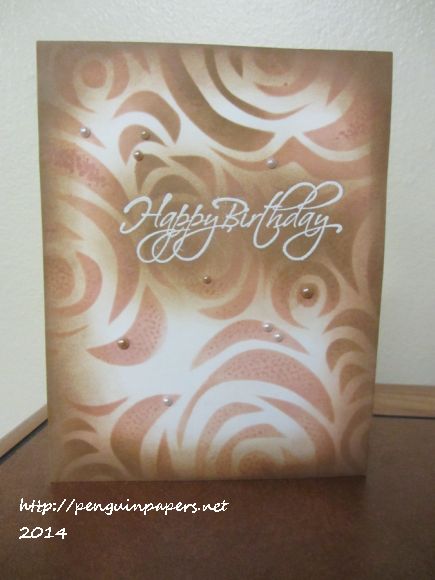
- Stencil – The Crafter’s Workshop “Echoes”
- Stamps – Penny Black “Flourish Birthday” and Impression Obsession “C-A-C Gradation”
- Pearls – KaiserCraft – Chino and White pearls
- Distress Inks – Ranger – Brushed Corduroy and Tattered Rose
- Embossing Powder – Stampendous – Detail White
Another stenciled card, using a white embossed greeting as a sort of resist. I’ve applied Distress Inks with a foam applicator through the stencil and then stamped over it with a subtle background image. This is a very simple, one layer card with a few pearls to dress it up. I was inspired by Day Two of the Stenciled class over at Online Card Classes. I have more stenciling experiments in the works! Thanks for stopping by.
Leave a comment | tags: cardmaking, crafter's workshop, embossing, Impression Obsession, penny black, stamping, stencils | posted in Birthday, Distress Techniques, Online Card Classes

- 5 X 5″ Canvas
- Kitty image – Ten Two Studios (Lisa Vollrath)
- Stencils – The Crafter’s Workshop “Quatrefoil” by Ronda Palazzari and “Halftone Borders”
- Tissue Tape – Tim Holtz Ideology “Symphony”
- Bling button – Melissa Frances Embellishments
- Chipboard shape – Paper Accents “Marquee #2”
- Rubber stamp – JudiKins “Calligraphic Flourish”
- Patterned papers – Creative Imaginations “Beautiful You” (Christine Adolph) 6 X 6″ pad and Momenta “Botanicals” 6 X 6″ pad
- Tissue Wrap “Terminology” Tim Holtz Ideology
- Hearts – Studio Calico Wood Veneer
- Acrylic paint
I created this mixed media canvas on a whim, the first one I’ve attempted. It was fun to start with a canvas and acrylic paint and then to build layers on top using papers, stencils, chipboard, rubber stamps, etc. I made the flower out of tissue tape with a little bling in the center. The image is from a set I purchased from Lisa Vollrath at Ten Two Studios. There’s very little better than dressing up a cat! Have a great day!
2 Comments | tags: crafter's workshop, stamping | posted in Canvas

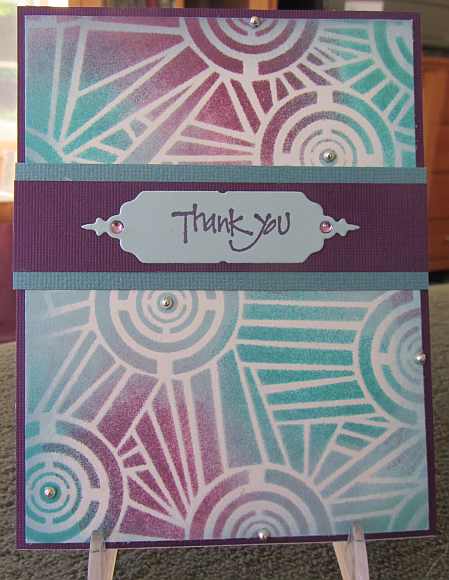
- Stamps – Stamper’s Anonymous Tim Holtz Collection “Reflections” and My Favorite Things “Pretty Poppies” (Thank You)
- Stencil – Crafter’s Workshop mini stencil “Harlequin”
- Dies – Spellbinders “Vintage Labels Three”
- Cardstock – Bazzill
- Baker’s Twine
- Ranger Distress Inks and ColorBox Chalk Inks
I’m taking the Online Card Classes Summer Card Camp 2, which is really packed with great information. I would highly recommend this class and have been pleased with many other classes offered by them. This week we are challenged to work with a specific color palette and three sketches, if we so desire. The color palette includes light and dark brown, light and dark magenta/purple and a light blue. I was inspired by a lesson Kristina Werner gave us and created the focal image on this card by creating a panel with Distress Inks on watercolor paper. I added some home-made spritzes of Distress ink with Perfect Pearls and layered some stamping and stenciled images. I then die cut this inkiness using a Spellbinders Vintage Label die and layered it atop a cardstock die cut a hair bigger that I offset. I created the sentiment and inked up all of the elements with chalk ink to tie together the color scheme with the lighter purple. Before I built the card, I tied baker’s twine onto the base and then applied the other elements on it using dimensional adhesive. Thanks for visiting!
Leave a comment | tags: cardmaking, crafter's workshop, die cuts, distress techniques, spellbinders, Stamper's Anonymous, stamping | posted in Distress Techniques, Online Card Classes, Thank You

- Stamps – My Favorite Things “Flopsy Goes Camping”
- Stencil – The Crafter’s Workshop “Quatrefoil” by Ronda Palazzari
- Patterned paper – Basic Grey “Out of Print”
- Copic Markers and Ranger Distress Ink
- Cardstock – Bazzill
It is my habit to take a little bit of stamping and cardmaking stuff with me when I go camping. I set-up on a picnic table or a stump (really!) and ink away. I seem to be particularly drawn to distress techniques, since they are already kind of messy and a little dirt won’t hurt! I managed to make five cards and a couple of tags on our trip this past weekend. So in the spirit of camping, I thought I’d use this marshmallow-toasting bunny stamp I received during the OWH fundraiser. I also followed the color theory recommendations in the most recent OWH Design Bootcamp to use a major, minor and accent color for a nicely balanced palette. I created the background using Chipped Sapphire Distress ink and pounced it through the stencil. It really looks like patterned paper when it’s done. I tried to vary the application of ink so it is lighter and darker across the background, and if you use your imagination, could emulate the night sky. The little campfire is colored with Copics. The bunny is pure white and popped up for a little dimension. Thanks for visiting.
1 Comment | tags: basic grey, cardmaking, copics, crafter's workshop, distress techniques, fauna, my favorite things, stamping | posted in Challenges, Distress Techniques, General Cards, OWH, Uncategorized

- Stamp – Magenta “Sleeping Cat”
- Background – made with Gelli Plate – Gelli Arts – layers of acrylic paint with impressions from: Stencil Girl “Damask Waves 6” and Crafter’s Workshop “Basketweave” template
- Cardstock – Bazzill
- Embossing folder – Cuttlebug “Swiss Dots”
- Ribbon – May Arts
- Ink – Ranger Distress Ink: Seedless Preserves
- Acrylic Paints and Ranger Distress Paint (Brushed Pewter)
I made this card using a background/monoprint I created with my Gelli Plate. This particular background consists of three separate runs to get the layers of color I wanted. Each print run used a different color(s) of paint and different imagery. I used Freshly Made Sketches Sketch #93 as inspiration for the layout of this card. Because I’ve been demonstrating mono-printing with the Gelli Plate at a local art and craft studio, I have lots of backgrounds to work with! You may see more soon. I blended some Distress Ink onto the cat image to avoid the stark white paper I had stamped it on. It worked better visually with the background that way. Thanks for visiting.
2 Comments | tags: cardmaking, crafter's workshop, distress techniques, fauna, Gelli Plate, Magenta stamps, stamping, Stencil Girl | posted in Design Team, Distress Techniques, Freshly Made, General Cards, Monoprints, Uncategorized
- Stencil – Crafter’s Workshop “Aboriginal TCW323”
- Die cut made with Memory Box “Bistro Label”
- Stamp – Printworks “Thank You”
- Bling – Mark Richards “Lavendar Dots” and “Silver Metal”
- Cardstock – Bazzill
- Distress inks – Ranger – Tumbled Glass, Peacock Feathers, Seedless Preserves
I followed the OWH Tuesday Tutorial Distressed Butterflies link for inspiration to make the background for the is card. The effect is almost airbrushed-looking, which I always like. Once I get started making backgrounds, I want to make more, so I’ll have to pull out some more stencils and different colors of Distress Inks and continue on! Have a great day!
2 Comments | tags: cardmaking, crafter's workshop, die cuts, distress techniques, memory box, stamping | posted in Distress Techniques, OWH, Thank You


 My color scheme reflects the colors of the Seattle Seahawks, who will soon be playing in the Super Bowl. The Operation Write Home Stars and Stamps CardBowl is this weekend, and one of the challenges is to use something that reflects one of the teams playing in your card design. Living in the northwest, it seemed only appropriate to select the Seattle team, so I picked the team colors! Thanks for stopping by today.


